Removing the prop for test glides is a good idea because glides will be more consistent and repeatable.
I don't think it's necessary to add weight at the CG to simulate the weight of the rubber. Temporary noseweight is needed for purposes of setting elevator trim and dialing in the optimum CG location. After decalage and static margin have been fine tuned, you can then mark CG location on the fuselage, re-install the prop and rubber, and return CG location to your mark. You are then ready to adjust thrust angles.
I've noticed a lot of flyers change the CG location in order to correct diving or stalling. That only works if the decalage (elevator trim) is first adjusted correctly. This can be done either by warping the stab, re-gluing at a different angle of incidence, or using a trim tab.
Glide Test Step 1. Trim in as much up elevator as possible without stalling. The more altitude you have at the launch, the more time the model will have to settle to terminal velocity. The steady state glide is what you're looking for in this step.
Glide Test Step 2. Launch the model into a slight dive. If it pulls out quickly, the CG is probably too far forward. Remove noseweight and trim in some down elevator (see Step 1). If the model does NOT pull out, or tucks under, the airplane is tail heavy. Add noseweight and trim in some up elevator (see Step 1).
2015 Challenge, FW-190 "Red 13"
70 posts
• Page 5 of 5 • 1, 2, 3, 4, 5
Re: 2015 Challenge, FW-190 "Red 13"
![]() by David Lewis » Tue May 05, 2015 9:53 pm
by David Lewis » Tue May 05, 2015 9:53 pm
Last edited by David Lewis on Sun Nov 08, 2015 1:31 pm, edited 5 times in total.
- David Lewis
- Posts: 289
- Joined: Thu Jun 13, 2013 11:47 am
- Location: Orlando FL
Re: 2015 Challenge, FW-190 "Red 13"
![]() by Mitch » Wed May 06, 2015 7:25 am
by Mitch » Wed May 06, 2015 7:25 am
Thanks David,
I do not think it was a bad idea to lighten the front end as I did now, because I had no ballast in my FW at this time. Now I can add the weight back if I need to my filling 1 hole at a time with clay.
It will be easy for me to replace temporary weight (of the prop) with a flat washer of the same weight behind the cooling fan. I will do some test glides again at my schoolyard before Sunday's flights, without the prop, but with the weight of the prop. Moreover without the weight of the rubber motor.
I plan to have a new rubber motor of vastly larger size and power for my FW. I will also have 8 inch and 9 inch props ready. Last Sunday was a last minute event for me... I got an email the night before and only then thought of going to the field. It was my first day at our Flying Field. I had a great time, but 2 others lost there planes. One we can see in a tree just downwind from the field, the other flew up high at 10:30 when it was getting windy and ended up about 1 mile downwind from our field. My flights were modest, but I gain experience from every flight. I am sure my FW will do better with a stronger motor and larger prop!
Mitch, Always Learning, Always Trying, Always Having Fun!
- Mitch
- Posts: 1347
- Joined: Mon Aug 22, 2011 9:16 pm
- Location: Kent, WA
Re: 2015 Challenge, FW-190 "Red 13"
![]() by pedwards2932 » Wed May 06, 2015 9:52 am
by pedwards2932 » Wed May 06, 2015 9:52 am
Where do you put the balancing weight if the plastic cowling is glued on? Do you put it in the prop spinner?
- pedwards2932
- Posts: 45
- Joined: Sat Apr 11, 2015 6:19 pm
Re: 2015 Challenge, FW-190 "Red 13"
![]() by Mitch » Wed May 06, 2015 11:39 am
by Mitch » Wed May 06, 2015 11:39 am
I do not fly with the spinner. FAC rules, the prop and assembly are not judged for scale appearance. So I plan to make a 3 blade prop with spinner for photo shoots and display only.
This is my third generation of this model. I do not glue the cowling on. I see no reason, The side bumps are glued very well to the cowling with Testor's liquid plastic cement, and the cowling is a snug fit over the front of the plane. That snug fit and the side bumps hold the cowling on. So I will still have access to add or remove weight. I expect the model will now be in balance, or I may need to add weight up front. If I need to add weight I can fill a hole with clay and a BB if I need to... But I can still add a washer or two behind the cooling fan before I do that.
For test glides I will place a flat washer behind the cooling fan. The prop assembly weighs 4 grams. I have different washers and will add 4 grams.
Here is a picture from before I drilled the holes:
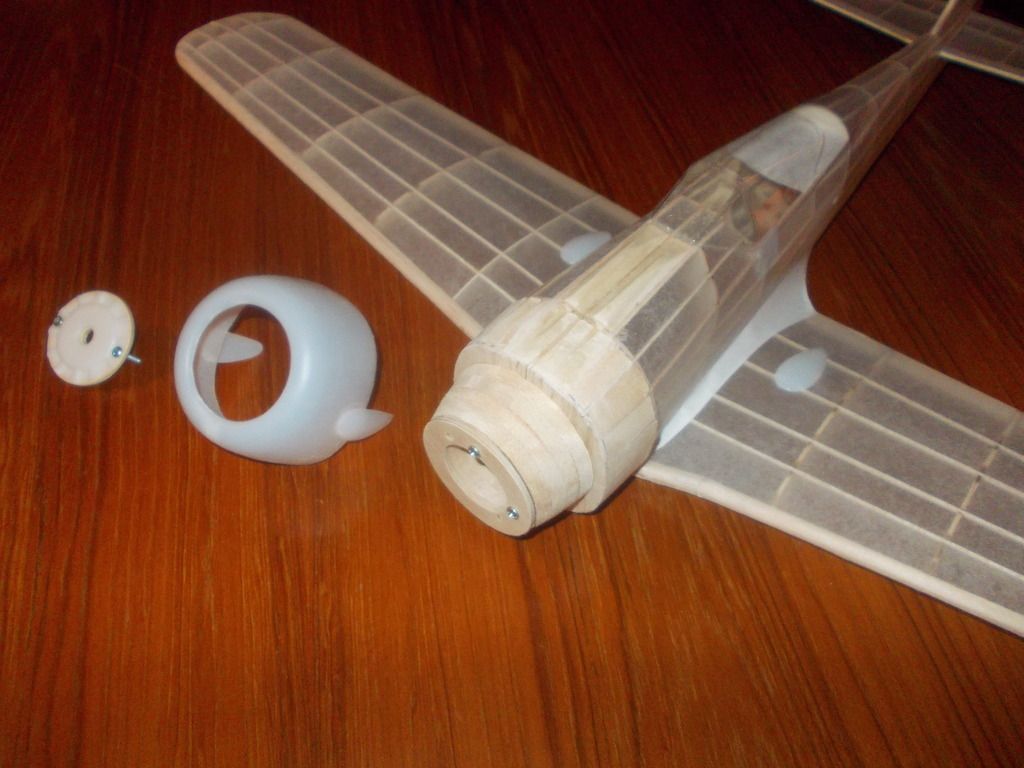
The front cover was a cooling fan for the Focke-Wulf. I can back out one screw and slip in a flat washer. On my model that front cooling fan is the plastic piece and is backed up with plywood. That is where I had my ballast before but I ended up removing that when I added all the 'in-fill' from B1 to B2 to add strength to my plane in the event of hard landings. I also think having the cowling just a snug fit will give it some flex and movement in case of a hard landing also.
I plan to do some test glides after school is out today. I should not be on the school grounds during school hours.
I also plan on all future glide tests and flights to have the canopy on. My rubber motor was picking up dirt and grass last Sunday and that can not be good. I will attach the canopy with Scotch tape. I will have a complete field box with me this time. I did not have adequate supplies last Sunday.
Also, my horizontal tail is only glued in with 1 drop of glue at the front... I may be able to add a shim if I need to adjust the angle of the stabilizer.
So I plan to re-do my glide tests. When the plane is satisfactory to me I will leave all flying surfaces set. Then for powered flights I will only adjust the thrust angle. With more power and a larger prop I know the plane will get more of a prop torque effect and this is when my 2 adjustment screws will be what I need! I plan to have 2 motors. 10 grams and 20 grams. I plan to use the 10 gram motor for initial test flights and wind to the torque I want. That way I should see the plane react to the initial burst of power without have to fully wind a full competition motor!
... of course that's IF I can get that much motor into the plane. I am not sure how big a bowl of spaghetti 20 grams of rubber is going to be?
Mitch
- Mitch
- Posts: 1347
- Joined: Mon Aug 22, 2011 9:16 pm
- Location: Kent, WA
Re: 2015 Challenge, FW-190 "Red 13"
![]() by Mitch » Wed May 06, 2015 6:02 pm
by Mitch » Wed May 06, 2015 6:02 pm
Update for glides test of FW-190 and Me-109
Well I added 4 grams to simulate the props and glide tested 2 planes after school today.
The Me-109 is fantastic and ready to go... She glided about 50 feet was down to a few feet off the deck and flew for another 20 feet!
The FW-190 is okay but I ended up removing the ballast to simulate the prop weight, so I will try to remove more weight from the front end.
Here they are:
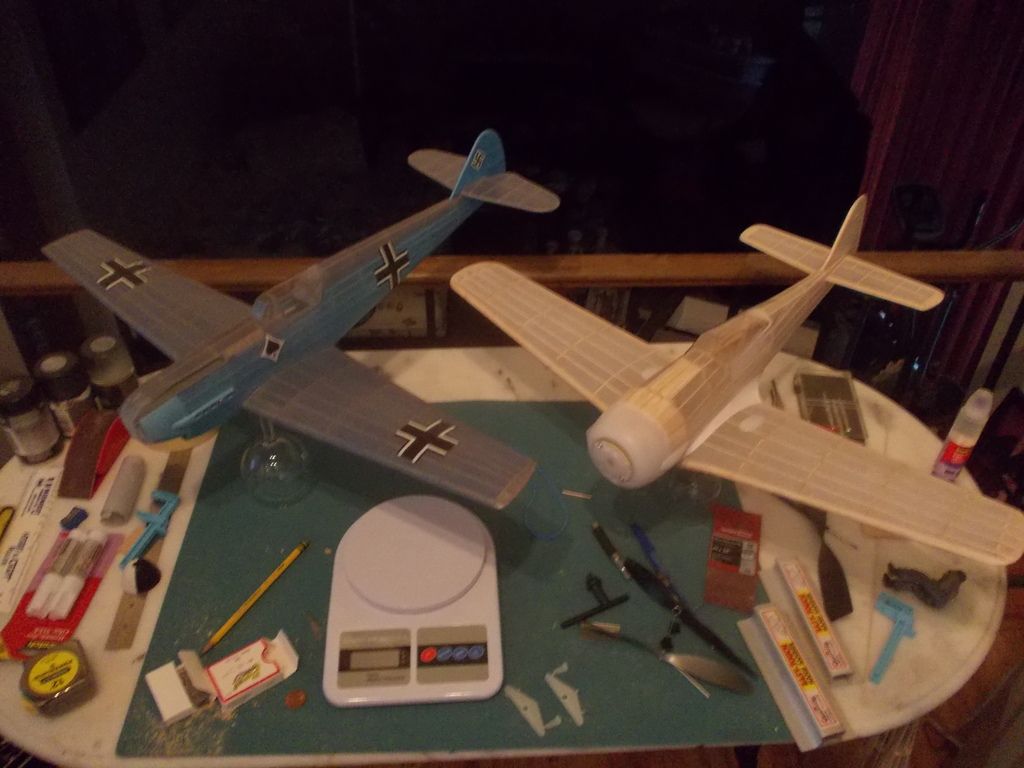
The Me-109 is ready for FAC combat and weighs in at 64 grams!
The FW-190 needs a little more work and paint and is my Guillow Challenge entry and weighs in now at 74 grams!
I was looking at props and I am amazed these planes fly at all with a 7 inch prop. I plan to fly them both next Sunday with 9 inch Props!
Mitch
 UPDATE: After enlarging the holes in the front end of the FW, I was able to remove 1 more gram... That will have to be it...so she weighs 73 + 4 for the prop is 77 and about 20 grams of rubber she should weigh in at 97 grams. If I can squeeze 30 grams of rubber in the Me-109 she will be 94 grams and 30% of her weight will be the ENGINE! Her hook to peg length is longer but her fuselage narrow and motor chamber is tighter!
Well I added 4 grams to simulate the props and glide tested 2 planes after school today.
The Me-109 is fantastic and ready to go... She glided about 50 feet was down to a few feet off the deck and flew for another 20 feet!
The FW-190 is okay but I ended up removing the ballast to simulate the prop weight, so I will try to remove more weight from the front end.
Here they are:

The Me-109 is ready for FAC combat and weighs in at 64 grams!
The FW-190 needs a little more work and paint and is my Guillow Challenge entry and weighs in now at 74 grams!
I was looking at props and I am amazed these planes fly at all with a 7 inch prop. I plan to fly them both next Sunday with 9 inch Props!
Mitch
- Mitch
- Posts: 1347
- Joined: Mon Aug 22, 2011 9:16 pm
- Location: Kent, WA
Re: 2015 Challenge, FW-190 "Red 13"
![]() by Mitch » Fri May 08, 2015 9:03 am
by Mitch » Fri May 08, 2015 9:03 am
Getting ready for Sunday Flights:
I plan to make a few motors with the rubber I have on hand (more on order) I plan to start with 2 motors of 12 grams. about 50% more than the Guillow grey. I plan to fly my FW190 and Me109 on the same weight motors with 9 inch props. I also plan to make a tail wheel for the FW from plywood and spare parts from the Guillow box. I was going to make this from paper, but since I need to add weight to the tail I will make a hard tail wheel. This will also serve the pupose of protecting the rudder, since it is hitting the ground on all the landings.
I will be using 3/16 rubber. That is the same as the Guillow grey. I also have some 1/8 and plan that for my smaller models, I might try to fly my 100 series SE5. I can also bring my 1000 Hellcat and that will start with 25 grams of 3/16 rubber and a 12 inch prop! I have not used my torque meter yet and am not sure how it attaches to my GismoGeezer winder... so I will be going on counts again rather than torque.
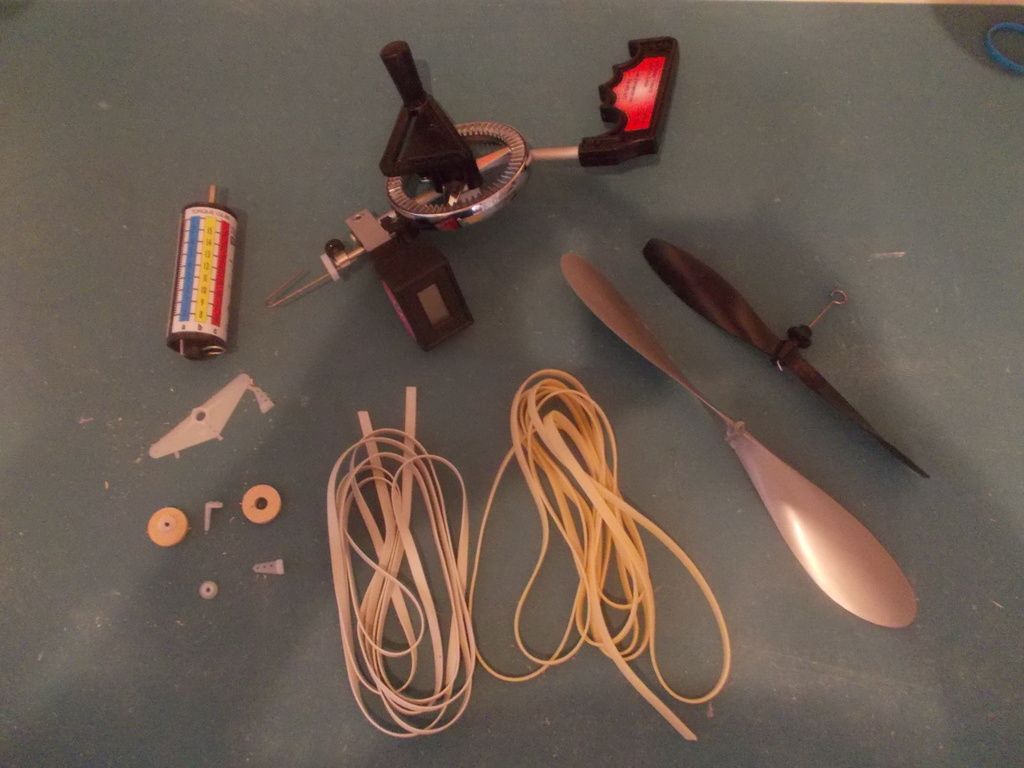
Here you can see my tail wheel and the 7 inch prop to the 9 inch prop. Also the amount of rubber I plan to use for my next flight tests!
SUNDAY WX forecast: Overcast with 0% chance of rain.
 Question for Flyers: I am planning on still using 4 stands in my 400 series craft and plan to use 6 strands for the 1000 series... Do you think that is a good starting point? Also 4 stands of 1/8 with a 7 in Peck prop for my 100 series SE5 (18 inch ws). Thanks...
I also have some stretchy line on order for rigging the SE5 I will post updates on how that works out!
Mitch
I plan to make a few motors with the rubber I have on hand (more on order) I plan to start with 2 motors of 12 grams. about 50% more than the Guillow grey. I plan to fly my FW190 and Me109 on the same weight motors with 9 inch props. I also plan to make a tail wheel for the FW from plywood and spare parts from the Guillow box. I was going to make this from paper, but since I need to add weight to the tail I will make a hard tail wheel. This will also serve the pupose of protecting the rudder, since it is hitting the ground on all the landings.
I will be using 3/16 rubber. That is the same as the Guillow grey. I also have some 1/8 and plan that for my smaller models, I might try to fly my 100 series SE5. I can also bring my 1000 Hellcat and that will start with 25 grams of 3/16 rubber and a 12 inch prop! I have not used my torque meter yet and am not sure how it attaches to my GismoGeezer winder... so I will be going on counts again rather than torque.

Here you can see my tail wheel and the 7 inch prop to the 9 inch prop. Also the amount of rubber I plan to use for my next flight tests!
SUNDAY WX forecast: Overcast with 0% chance of rain.
Mitch
- Mitch
- Posts: 1347
- Joined: Mon Aug 22, 2011 9:16 pm
- Location: Kent, WA
Re: 2015 Challenge, FW-190 "Red 13"
![]() by NavyAD1 » Sat May 23, 2015 5:26 am
by NavyAD1 » Sat May 23, 2015 5:26 am
Your FW-190 is absolutely top notch. I can almost hear that radial firing up.
- NavyAD1
- Posts: 13
- Joined: Sat Apr 25, 2015 11:26 am
Re: 2015 Challenge, FW-190 "Red 13"
![]() by Mitch » Sat Nov 07, 2015 9:27 pm
by Mitch » Sat Nov 07, 2015 9:27 pm
Thank You...and she flew well at WEST FAC 5... No awards, but I was pleased with her flying...until I blew a motor...that was disturbing... then the prop was wound so tight the thust wire slipped over the prop and cut 3 gashes in 3 fingers as I was trying to hook on the prop and did not know what was happening...Blood Sweat and Tears... her she is after Combat flying, 2 blown motors and a worn out prop...
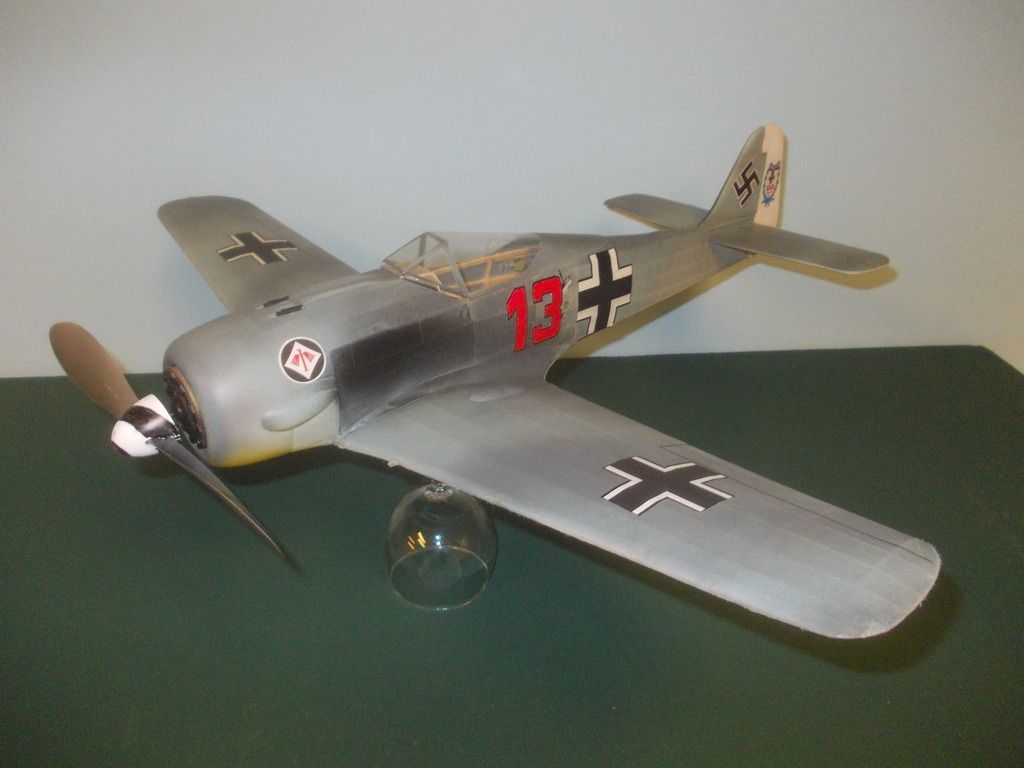
Her best time was 29 seconds...although no trophies she is in the record books of FAC scale competition!
Mitch
PS Her cannons and wing mg's were lost in landings...those can be replaced easily. The canopy is shattered with the force of the first blown engine. I will keep that canopy... looks like Heinz took a .50 cal shell though his cockpit... but he will fly again. Next time Heinz will be in the cockpit.
- Mitch
- Posts: 1347
- Joined: Mon Aug 22, 2011 9:16 pm
- Location: Kent, WA
Re: 2015 Challenge, FW-190 "Red 13"
![]() by Mitch » Sat Feb 27, 2021 4:32 pm
by Mitch » Sat Feb 27, 2021 4:32 pm
Hi Guys,
I just started up with Facebook and showed a picture of this model. I told guys over there the build thread is here, so with this post it will come back to the top. I hope a few more guys will join in this forum. I just got off my ship, I am dusting off the models, I plan to travel to AZ and plan to bring a few planes with me to get them in the air again. I can't believe this model is over 5 years old now.
Mitch
- Mitch
- Posts: 1347
- Joined: Mon Aug 22, 2011 9:16 pm
- Location: Kent, WA
Re: 2015 Challenge, FW-190 "Red 13"
![]() by MKelly » Tue Mar 02, 2021 5:35 pm
by MKelly » Tue Mar 02, 2021 5:35 pm
Nice build! Bring yours to WestFAC this fall and I'll bring mine - we can have a Guillow's FW-190 impromptu mass launch.
Mike
Mike
- MKelly
- Posts: 12
- Joined: Tue Jun 20, 2017 1:46 pm
70 posts
• Page 5 of 5 • 1, 2, 3, 4, 5
Return to General Building Questions
Who is online
Users browsing this forum: No registered users and 16 guests