2015 Challenge, FW-190 "Red 13"
70 posts
• Page 2 of 5 • 1, 2, 3, 4, 5
Re: 2015 Challenge, FW-190 "Red 13"
![]() by davidchoate » Tue Jan 06, 2015 4:57 pm
by davidchoate » Tue Jan 06, 2015 4:57 pm
If I do My FW- 190; I'm considering the Dora model with the inline engine. I am confident I can make the modifications. I have a $00 Spitfire too I may do, but I'm on a Biplane kick lately, and have an older non laser Thomas Morse Scout, and a 16.5" WS Dumas Curtis Howk. I want to do that rubber powered of course.
- davidchoate
- Posts: 1263
- Joined: Wed Aug 14, 2013 6:41 am
- Location: PHiladelphia PA
Re: 2015 Challenge, FW-190 "Red 13"
![]() by Mitch » Tue Jan 06, 2015 5:03 pm
by Mitch » Tue Jan 06, 2015 5:03 pm
Hey Guys...
That's GREAT! If I am going to build a 1000 series for this competition my first choice would be the Thunderbolt! I would try to lighten it up... Look at my build of the 1000 series Hellcat. I have not flown that yet as I live in Seattle and we are in the middle of the 11-1/2 month rainy season. I do not know if my Hellcat qualifies because it is already built. Let me think... I believe I used all kit wood. I will ask Howard.
I need to ask if we are allowed to make changes for different versions of the airplanes. I was making a few changes but following the outlines on the plans. I need to ask if that is allowed as long as we use kit wood. I am confident I will build at least a few models for this years competition, as the 1/16 scale is my favorite!
Mitch
- Mitch
- Posts: 1347
- Joined: Mon Aug 22, 2011 9:16 pm
- Location: Kent, WA
Re: 2015 Challenge, FW-190 "Red 13"
![]() by Chris A. » Tue Jan 06, 2015 6:45 pm
by Chris A. » Tue Jan 06, 2015 6:45 pm
Hi Mitch, I too like the FW 190 and have built the Guillows kit. However any weight in the tail really adds up when you have to balance to the CG. You may want to take a look at how Earl Stahl made thick but light tail components. In addition to a scale like airfoil shape by adding strips on top of the 1/16th ribs he also had less warping after covering. I think you can make the 1/16th internal ribs removable after you shape the outside ribs to the airfoil and fuselage fairing shape. You may want to try pre coloring your tissue before putting it on the model. Any weight that you can take out of the tail section really pays off in flight time. Are you going to make it gear up or down? If up, a lot of weight can be saved in the rear as the FW's tail wheel need only be part of a wheel as it is a partial retract. Always the trade off between scale appearance and flight times.
- Chris A.
- Posts: 92
- Joined: Tue Apr 01, 2014 10:50 am
Re: 2015 Challenge, FW-190 "Red 13"
![]() by Mitch » Tue Jan 06, 2015 8:32 pm
by Mitch » Tue Jan 06, 2015 8:32 pm
Thanks Chris, I always build with gear up. In the recent past I only use colored tissue and no paint. I plan to have the tail wheel represented. My goal is to build the model staying within the guidelines of the challenge. I have built ALL the 400 series in the past few years, some more than once.
Here is a picture of my FW-190, I built about 3 years ago:
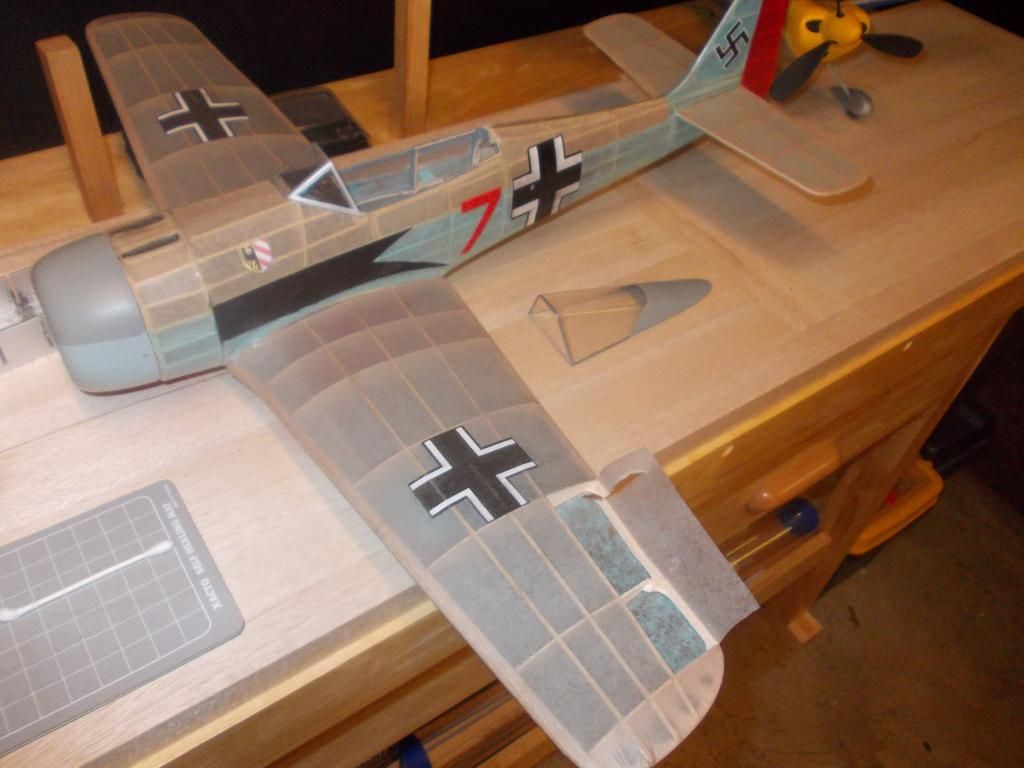
Originally this model was built exactly as per plans and as per Guillow instructions. It has gone though many repairs, including a new wing, new tail. New color scheme. Changed location of rear peg. Installation of adjustable thrust. I plan to use light grey paper overall for my new build for the challenge. I plan to Airbrush a light coat of medium grey to the top as per the reference picture.
I do not plan to fly this model with FAC but want to show what can be done with what is in the kit.
Mitch
- Mitch
- Posts: 1347
- Joined: Mon Aug 22, 2011 9:16 pm
- Location: Kent, WA
Re: 2015 Challenge, FW-190 "Red 13"
![]() by Mitch » Wed Jan 07, 2015 8:47 am
by Mitch » Wed Jan 07, 2015 8:47 am
Well the tail is almost done:
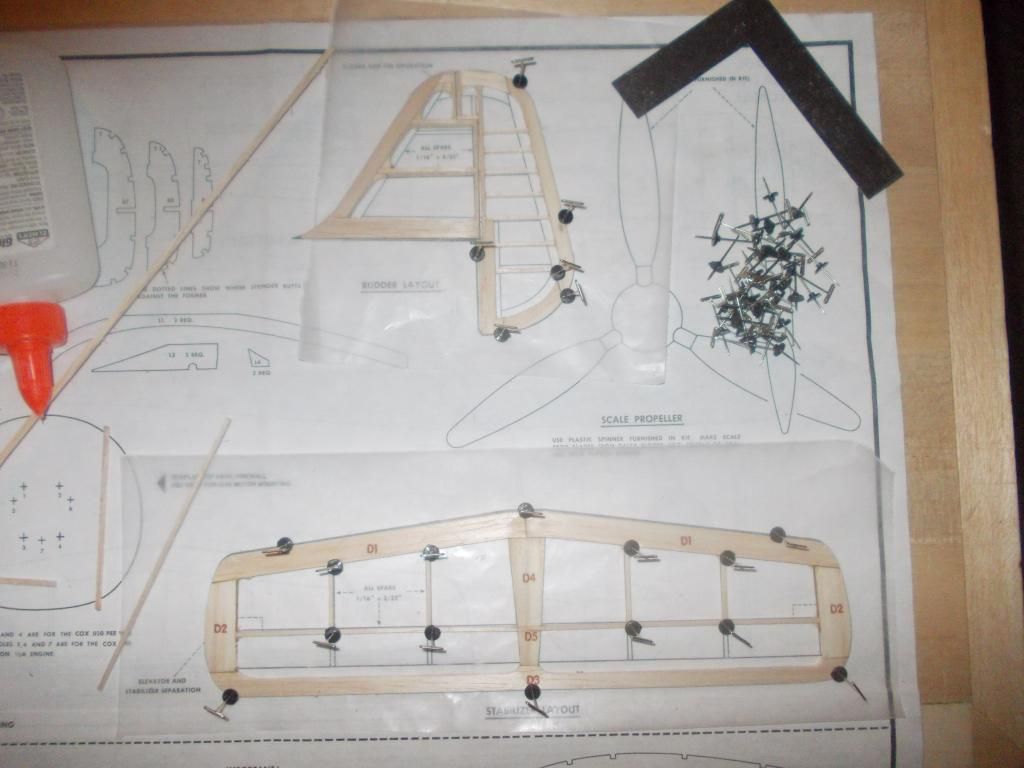
When finished I expect I added at least 1 gram, so that will be about 4 grams of ballast. I will try to remove some excess wood from the rear half of the fuselage to partly make up for that. I trimmed down D3 and plan to add twice the number of little stringers like I did with the rudder. This is just for scale looks. Not really necessary, and totally against what I have always done in the past. Oh well, I like the way it looks.
Mitch
- Mitch
- Posts: 1347
- Joined: Mon Aug 22, 2011 9:16 pm
- Location: Kent, WA
Re: 2015 Challenge, FW-190 "Red 13"
![]() by Chris A. » Wed Jan 07, 2015 9:03 pm
by Chris A. » Wed Jan 07, 2015 9:03 pm
I started making duplicate size FW 190 horizontal stabilizers by substituting laminated 1/16th strips (2) for parts D1 and D3. The main problem I was having after covering was with slight warps. Never able to solve the warp problem, even after misting and flattening under a brick. The slight warp just kept coming back. Suggestion on warp prevention anyone?
- Chris A.
- Posts: 92
- Joined: Tue Apr 01, 2014 10:50 am
Re: 2015 Challenge, FW-190 "Red 13"
![]() by Mitch » Thu Jan 08, 2015 3:15 am
by Mitch » Thu Jan 08, 2015 3:15 am
Yes. I have the same problem as I tend to sand down my tails to much to reduce weight.
Try the steam method, use as teapot or just a small pot of boiling water. Pass the part over the steam for a while and you will be able to bend it back to shape. Over bend it just a bit, so when it relaxes it will be straight.
On the field for small adjustments you can use your breath. Breath warm air over the part and bend the tail just a little bit.
Hope this helps.
Still some sanding to do, but here is my tail for my FW-190:

Mitch
UPDATE: I am going back to work tomorrow and will be aboard my ship for 33 days. I am leaving my model home this time, so it will be on hold...
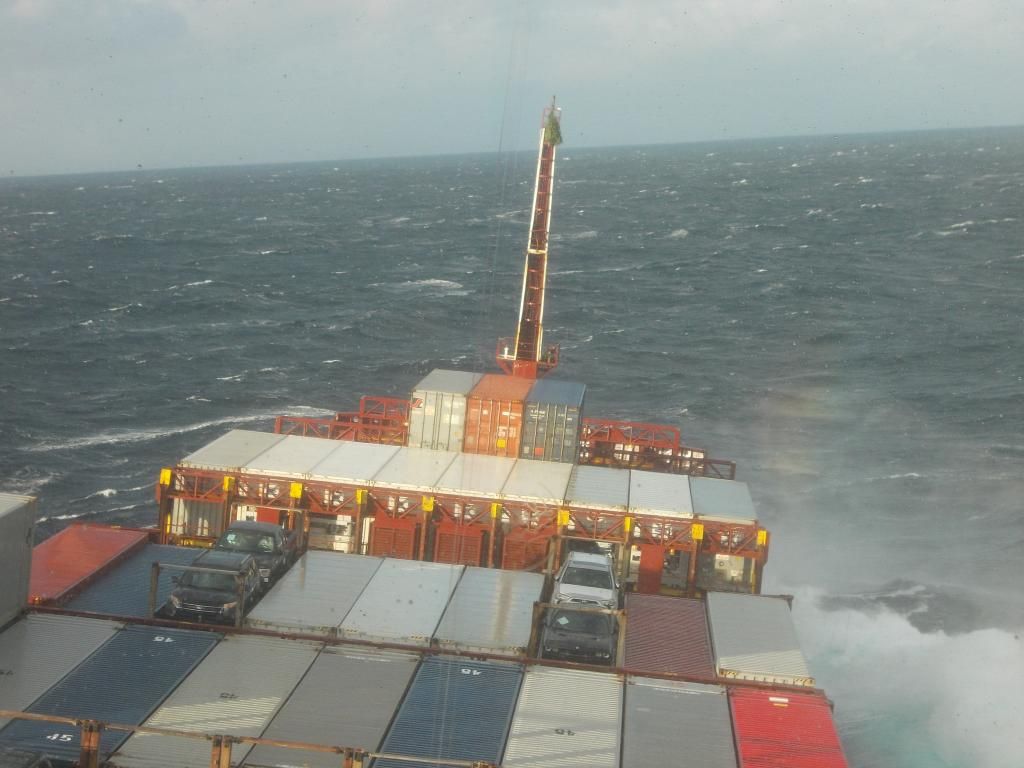
This is a picture from last year, but the view will be about the same...I just noticed...and Yes that is a Christmas tree on our mast, so this was the Christmas trip of 2013.
Mitch
- Mitch
- Posts: 1347
- Joined: Mon Aug 22, 2011 9:16 pm
- Location: Kent, WA
Re: 2015 Challenge, FW-190 "Red 13"
![]() by Mitch » Thu Feb 12, 2015 2:34 pm
by Mitch » Thu Feb 12, 2015 2:34 pm
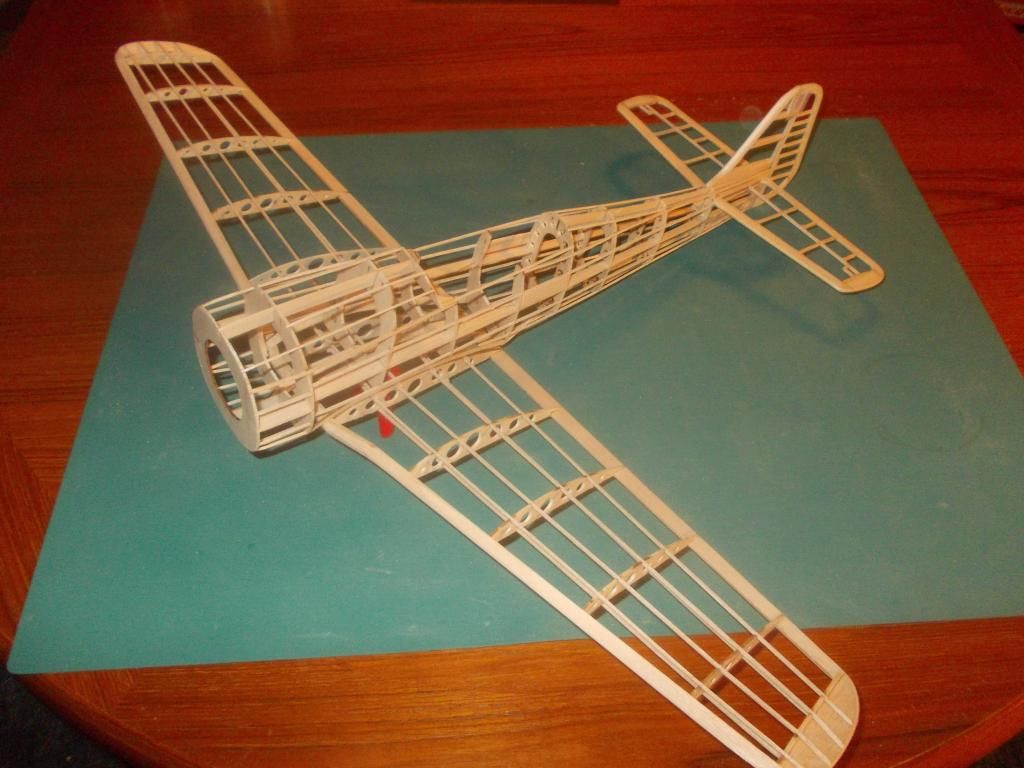
Okay... Now that I am back home, I want to finish up the FW and make room on the building table for my P-38.
Laid in all the longrons last night. Needs a few "L" parts. The fuselage weighed 15 grams. I sanded the frame until all the burn marks were removed and needed to sand the front end for the cowling to fit. The fuselage weighs now 14 grams. I will now 'open up' the inside of the frames for the massive motor that this model will hold.
Here she is now:
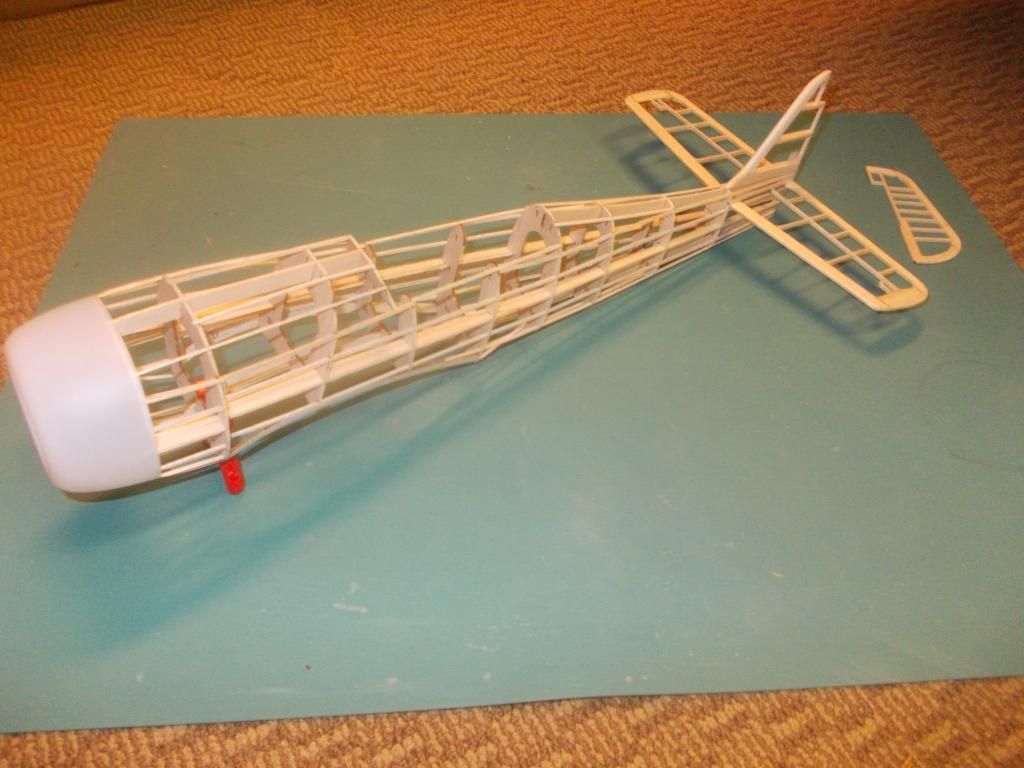
I have a new FW kit and can now make the wing. Before I use all those parts I will make copies for the next FW. The Guillow parts will go into this model as this model is for the "G" challenge.
Mitch
- Mitch
- Posts: 1347
- Joined: Mon Aug 22, 2011 9:16 pm
- Location: Kent, WA
Re: 2015 Challenge, FW-190 "Red 13"
![]() by Mitch » Thu Feb 12, 2015 5:03 pm
by Mitch » Thu Feb 12, 2015 5:03 pm
Wing modification:
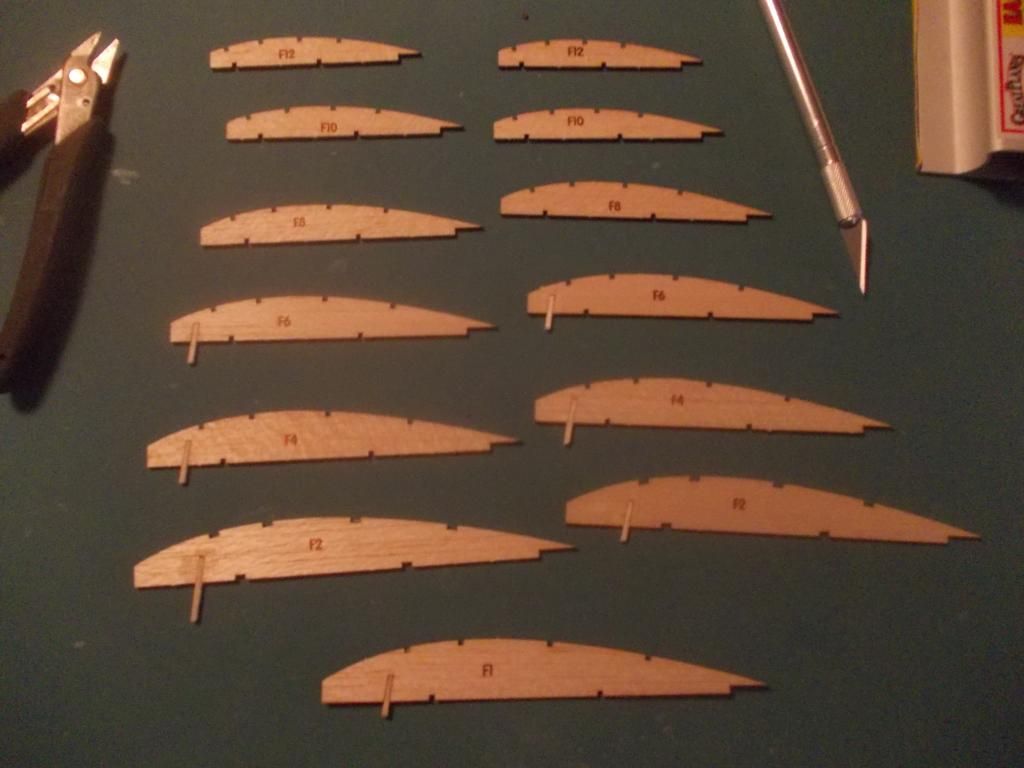
1. First off I plan to use only half the ribs. For this model I will use the even numbers.
2. Secondly I will not use the wing/landing gear brace. So I filled in that space with 1/16 square stock.
3. When I set in the dihedral I will go to the maximum standard for FAC rules. That is: to the bottom of the canopy.
4. When these parts are dry I will cut out lightening holes in the ribs and construct the wing.
5. Finally, when the wing is complete I will scallop the TE of the wing.
I will build up this wing tonight.
I am also planning on using kit paper for this model and then airbrush the colors I want after the paper is sealed with dope.
Mitch
UPDATE: After glue dried I cut out lightening holes:
...and before I did that I cut out new F1, F2's and E parts. As I am still short one wing. So the next FW I build. I will use the odd ribs! For this build I will use all the original Guillow parts. But not ALL the parts. But all the parts will be from the Guillow kit!
Mitch

1. First off I plan to use only half the ribs. For this model I will use the even numbers.
2. Secondly I will not use the wing/landing gear brace. So I filled in that space with 1/16 square stock.
3. When I set in the dihedral I will go to the maximum standard for FAC rules. That is: to the bottom of the canopy.
4. When these parts are dry I will cut out lightening holes in the ribs and construct the wing.
5. Finally, when the wing is complete I will scallop the TE of the wing.
I will build up this wing tonight.
I am also planning on using kit paper for this model and then airbrush the colors I want after the paper is sealed with dope.
Mitch
UPDATE: After glue dried I cut out lightening holes:

...and before I did that I cut out new F1, F2's and E parts. As I am still short one wing. So the next FW I build. I will use the odd ribs! For this build I will use all the original Guillow parts. But not ALL the parts. But all the parts will be from the Guillow kit!
Mitch
- Mitch
- Posts: 1347
- Joined: Mon Aug 22, 2011 9:16 pm
- Location: Kent, WA
Re: 2015 Challenge, FW-190 "Red 13"
![]() by Mitch » Fri Feb 13, 2015 1:08 am
by Mitch » Fri Feb 13, 2015 1:08 am
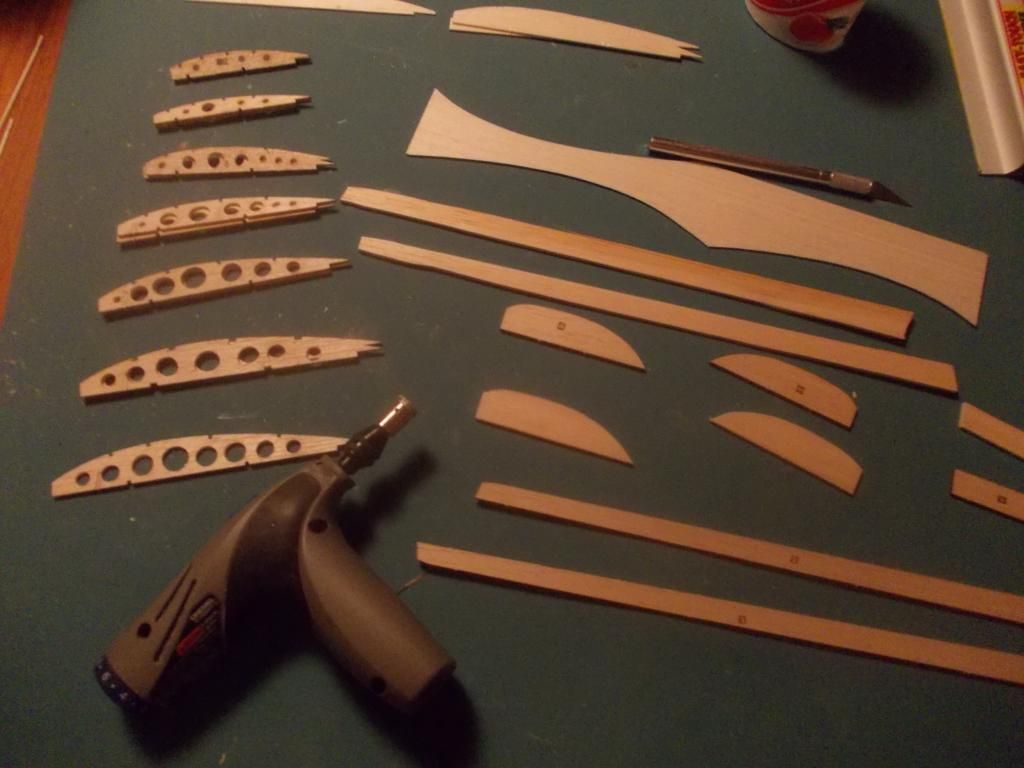
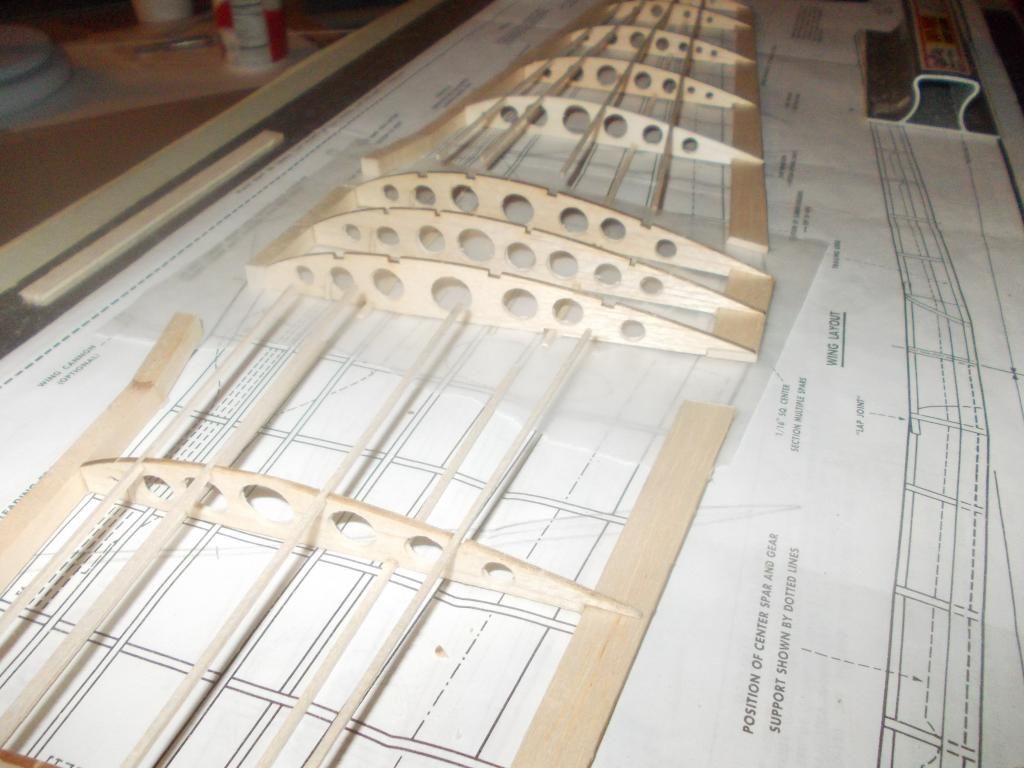
UPDATE on wing construction.
Wing build was going okay:

I was laying in the ribs for outside in towards the center. Then I realized F2 needs to be cracked and 'bent'... see plans:

The problem I created is, I drilled a lightening hole where the rib needs to be 'cracked'. I decided to proceed with what I have. If I realized this before I would not have drilled a large lightening hole there. I think the 6 spars will hold the wing together, and the loss in strength will not be a fatal flaw.
In the future I should review the plans and decide where to drill out the lightening holes with better information.
Oh well! We will see! I do not believe my rubber powered models go though too many G forces, and I believe the wing will hold up in my flight tests.
Mitch
Update, End of the Day report:
Both Port and Starboard wings are glued up. I will leave them on the board tonight. Move them off when dry and build the center section.
- Mitch
- Posts: 1347
- Joined: Mon Aug 22, 2011 9:16 pm
- Location: Kent, WA
Re: 2015 Challenge, FW-190 "Red 13"
![]() by jpuke » Fri Feb 13, 2015 6:18 am
by jpuke » Fri Feb 13, 2015 6:18 am
Nice work Mitch.
What are you using to put the holes in the wing ribs?
I've always tried using drill bits and turning them by hand but I end up splitting ribs and getting ugly holes. I have given up on lightening holes and started cutting new ribs instead from thinner wood but I'd gladly go back to them if I can find a proper tool.
Thanks,
Jeremy
- jpuke
- Posts: 75
- Joined: Wed May 04, 2011 8:03 am
- Location: Lincoln, NE
Re: 2015 Challenge, FW-190 "Red 13"
![]() by Mitch » Fri Feb 13, 2015 12:41 pm
by Mitch » Fri Feb 13, 2015 12:41 pm
You can see the hole saw in the dremel tool. I found these at my LHS recently. They came in a set of 4. They are not specific to wood but work just fine on balsa. I was worried they might clog up but they are working fine.For enlarging the hole more I use 2 sanding drums on my dremel. For smaller holes I use a small drill bit in the dremel. I like the round holes as I am leaving wood in specific places for strength.
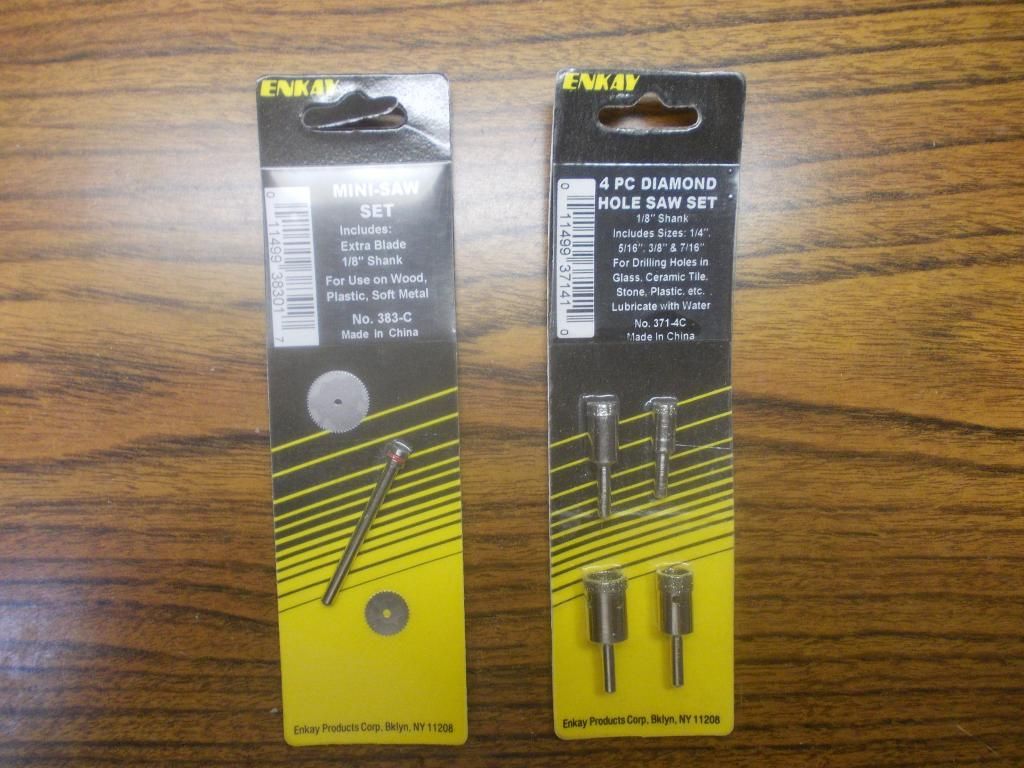
They are made by Enkay. If your LHS does not have them you can ask if he can get them. I have made special orders though LHS and they seem to appriciate that, or look for them on the web.
For my P-38 I enlarged the holes with the sanders that came with my dremel.
I LOVE TOOLS. Makes me look good. Believe me there are mistakes in every build I do. A friend of mine who is a carpenter once told me "It's not necessary how good you are, but how well you can hide your mistakes!"
Mitch... Keep Building, Keep Flying, Stay young Forever!
PS: The wings are moved apart and the center section is now being glued up. When that is dry I will marry everything together. Dihedral on plans 1-1/2 inches. I plan on about 2-1/2 inches.
- Mitch
- Posts: 1347
- Joined: Mon Aug 22, 2011 9:16 pm
- Location: Kent, WA
Re: 2015 Challenge, FW-190 "Red 13"
![]() by Mitch » Fri Feb 13, 2015 4:52 pm
by Mitch » Fri Feb 13, 2015 4:52 pm
Okay Guillow Fans... Here is the wing so far:
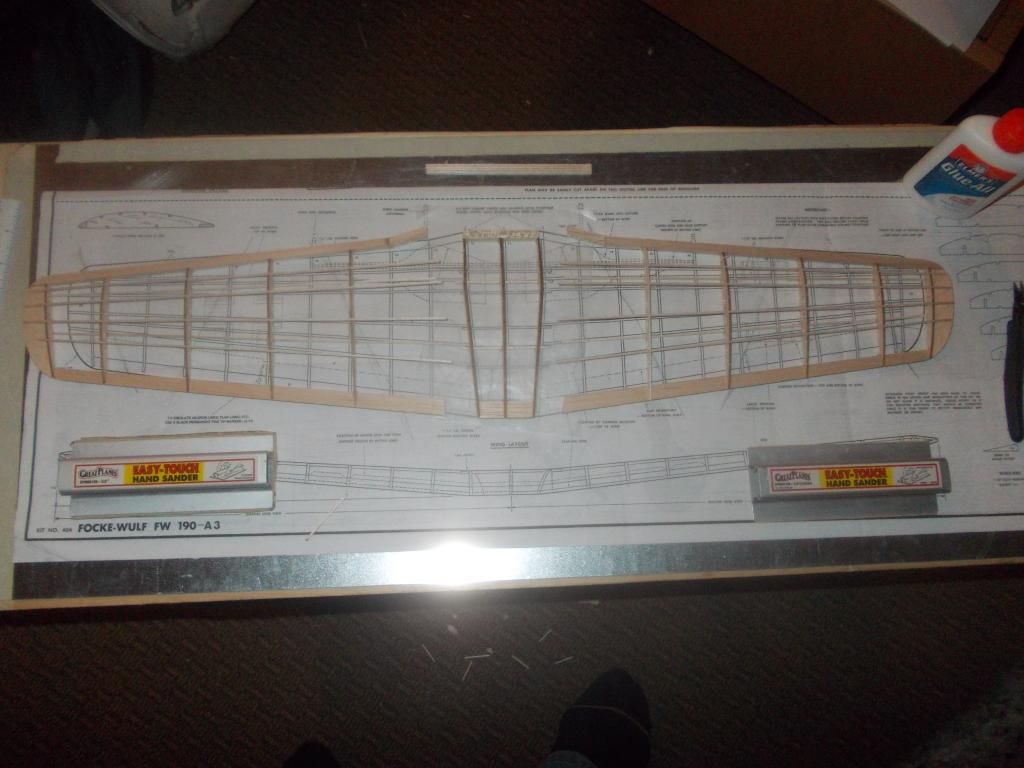
Glued up center section. The LE was a bit over-sized, and when dry I sanded down the LE to have the angle for the wing dihedral.
Checking position of spars line up with notches.
At that point I placed the fuselage over the wing and decided on 2-1/4 inch dihedral. It looks just a bit lower than the bottom of the canopy. And it looks 'right'.
Next I add glue and glue in only the top spars.
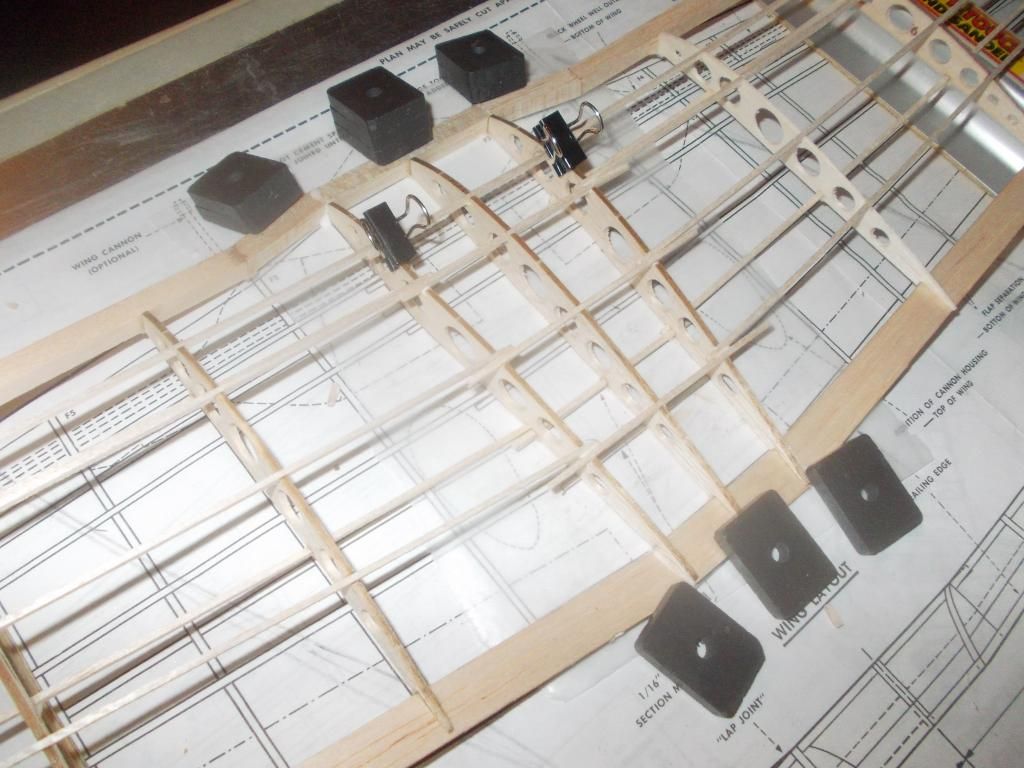
I have found when I try to glue the bottoms also, there is too much going on for me to handle. When the wing is dry I will remove and glue in the bottom spars. I 'opened up' the top notches to make an easy fit for the 2 spars. The forward notch was a bit too loose and I needed to put on paper clip 'clamps' to hold the spars in place. I will also trim down those center spars when everything is dry.
For a Rubber Powered model I see no need for that wing brace, and not using it I can set what ever dihedral I want at this stage. The wing will be strong enough for how I fly. If you are going U control or RC, I would build the wing as per plans. Somewhere on the plans Guillow always says 'for rubber power, built the model as light as possible' or something like that. So I will be also scalloping the TE to remove more 'extra' wood. Of course the LE needs to be cut down and sanded to the edge that I need.
Mitch
UPDATE: The wing came off the board, glued the bottom spars in. Trimmed all spars. The wing weighs 13 grams at this point. Still need to 'LIGHTLY' sand the wing. Trim the LE and TE and add lightening holes in the wing tips. Maybe I can get the weight down near 10 grams?
This is all Guillow stock wood parts!

Glued up center section. The LE was a bit over-sized, and when dry I sanded down the LE to have the angle for the wing dihedral.

Checking position of spars line up with notches.
At that point I placed the fuselage over the wing and decided on 2-1/4 inch dihedral. It looks just a bit lower than the bottom of the canopy. And it looks 'right'.
Next I add glue and glue in only the top spars.

I have found when I try to glue the bottoms also, there is too much going on for me to handle. When the wing is dry I will remove and glue in the bottom spars. I 'opened up' the top notches to make an easy fit for the 2 spars. The forward notch was a bit too loose and I needed to put on paper clip 'clamps' to hold the spars in place. I will also trim down those center spars when everything is dry.
For a Rubber Powered model I see no need for that wing brace, and not using it I can set what ever dihedral I want at this stage. The wing will be strong enough for how I fly. If you are going U control or RC, I would build the wing as per plans. Somewhere on the plans Guillow always says 'for rubber power, built the model as light as possible' or something like that. So I will be also scalloping the TE to remove more 'extra' wood. Of course the LE needs to be cut down and sanded to the edge that I need.
Mitch
UPDATE: The wing came off the board, glued the bottom spars in. Trimmed all spars. The wing weighs 13 grams at this point. Still need to 'LIGHTLY' sand the wing. Trim the LE and TE and add lightening holes in the wing tips. Maybe I can get the weight down near 10 grams?
This is all Guillow stock wood parts!
- Mitch
- Posts: 1347
- Joined: Mon Aug 22, 2011 9:16 pm
- Location: Kent, WA
Re: 2015 Challenge, FW-190 "Red 13"
![]() by Wildpig » Sat Feb 14, 2015 9:47 am
by Wildpig » Sat Feb 14, 2015 9:47 am
Mitch wrote:....
..I LOVE TOOLS. Makes me look good. Believe me there are mistakes in every build I do. A friend of mine who is a carpenter once told me "It's not necessary how good you are, but how well you can hide your mistakes!"
Mitch! You hid all your mistakes in a masterpiece.
P.S. That big ship is heeled over to far for my tastes.
- Wildpig
- Posts: 529
- Joined: Thu Jan 26, 2012 9:41 am
Re: 2015 Challenge, FW-190 "Red 13"
![]() by Mitch » Sat Feb 14, 2015 4:08 pm
by Mitch » Sat Feb 14, 2015 4:08 pm
Thanks Wpig,
As per the picture of the ship...I dont think any model work was being done that day... we dont talk about those days...
Here she is weighing in at 30 grams:
I decided NOT to scallop the TE as the wood is light and if I break the wing at this point I think I would have to build a new one. I will drill lightening holes on the wingtips as those E4 parts are very large.
Another feature of the FW is the rear half of the fuselage is very narrow. As you see with my gauge (black tube) My rear peg will be much further forward than plans.
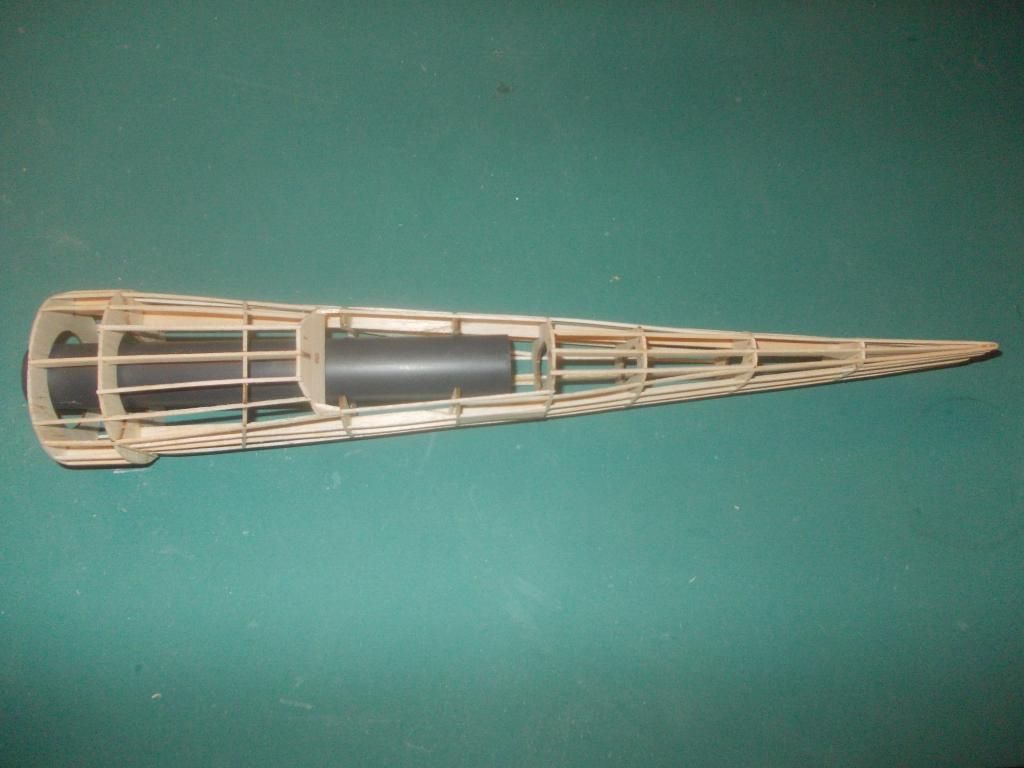
This will keep the center of mass of the rubber over the cg, and also alow me to use a blast tube when winding. I plan on using the amount of rubber to equal 30 % of the AUW.
I am hoping for a finished model of about 60 grams, then pack in about 30 grams of rubber. If... I say "IF" I can do that, then I believe this model would be an FAC contender. If this model ends up too heavy, I am ready to build another before WESTFAC V. Again this model is being built for the G Challenge and there is more I could have done to lighten the rear end.. ie. contest balsa, and bent balsa tail etc. This model is ALL Guillows!
Mitch
 Happy Valentines Day, I will go to dance class and then spend the remainder of the day with my daughter and her new puppy!
As per the picture of the ship...I dont think any model work was being done that day... we dont talk about those days...
Here she is weighing in at 30 grams:

I decided NOT to scallop the TE as the wood is light and if I break the wing at this point I think I would have to build a new one. I will drill lightening holes on the wingtips as those E4 parts are very large.
Another feature of the FW is the rear half of the fuselage is very narrow. As you see with my gauge (black tube) My rear peg will be much further forward than plans.

This will keep the center of mass of the rubber over the cg, and also alow me to use a blast tube when winding. I plan on using the amount of rubber to equal 30 % of the AUW.
I am hoping for a finished model of about 60 grams, then pack in about 30 grams of rubber. If... I say "IF" I can do that, then I believe this model would be an FAC contender. If this model ends up too heavy, I am ready to build another before WESTFAC V. Again this model is being built for the G Challenge and there is more I could have done to lighten the rear end.. ie. contest balsa, and bent balsa tail etc. This model is ALL Guillows!
Mitch
- Mitch
- Posts: 1347
- Joined: Mon Aug 22, 2011 9:16 pm
- Location: Kent, WA
70 posts
• Page 2 of 5 • 1, 2, 3, 4, 5
Return to General Building Questions
Who is online
Users browsing this forum: No registered users and 3 guests