2015 Challenge, FW-190 "Red 13"
70 posts
• Page 3 of 5 • 1, 2, 3, 4, 5
Re: 2015 Challenge, FW-190 "Red 13"
![]() by davidchoate » Sun Feb 15, 2015 11:56 am
by davidchoate » Sun Feb 15, 2015 11:56 am
I like how You did the rudder and elevator. Its uncommon to see You put in that much detail as you usually go for lightness. I know they dont Fly as long. But sometimes its cool to go for the scale looks. And to make one that looks good on display.
- davidchoate
- Posts: 1263
- Joined: Wed Aug 14, 2013 6:41 am
- Location: PHiladelphia PA
Re: 2015 Challenge, FW-190 "Red 13"
![]() by Mitch » Mon Feb 16, 2015 2:01 am
by Mitch » Mon Feb 16, 2015 2:01 am
Thanks, I like it also and I always talk about 'compound interest' that is: removing weight from aft, and you get triple the benefit with less ballast. I also think there is something called 'diminished returns'. I think that applies to me trying to lighten the wing. One gets to a point and no more weight is coming off and then you start weakening the structure. This is just my thought. The wood is what you have. And the wood is pretty good on this build I think, and that is why I decided NOT to scallop the TE of the wing. I do not want to weaken the structure at this point. I drilled out some lightening holes in the wingtips, but all my sanding did no more to remove weight. The wing is at 13 grams. The build at this point is 30 grams.

I am not trying to build better than anyone, I am trying to show that ANYONE can do what I do. I plan to cover this model with Guillow paper, and fly with the Guillow prop and rubber. So the only mods I did to improve performance are, rear peg forward and adjustable front end (not done yet). With a Guillow prop I do not believe you need much adjustment as the prop is only 7 inches. The tail mods will add weight but as you say will enhance to look of the finished model. (I hope)
IF the model shows potential, I will put in tan rubber (a lot) and a 9 inch prop. With that I believe the adjustable front end will be very helpful. If this model does not fly well, I am ready to build another (not for G challenge) with more modifications, and plan to bring one of them to WESTFAC V.
Mitch
- Mitch
- Posts: 1347
- Joined: Mon Aug 22, 2011 9:16 pm
- Location: Kent, WA
Re: 2015 Challenge, FW-190 "Red 13"
![]() by Mitch » Fri Feb 20, 2015 9:25 pm
by Mitch » Fri Feb 20, 2015 9:25 pm
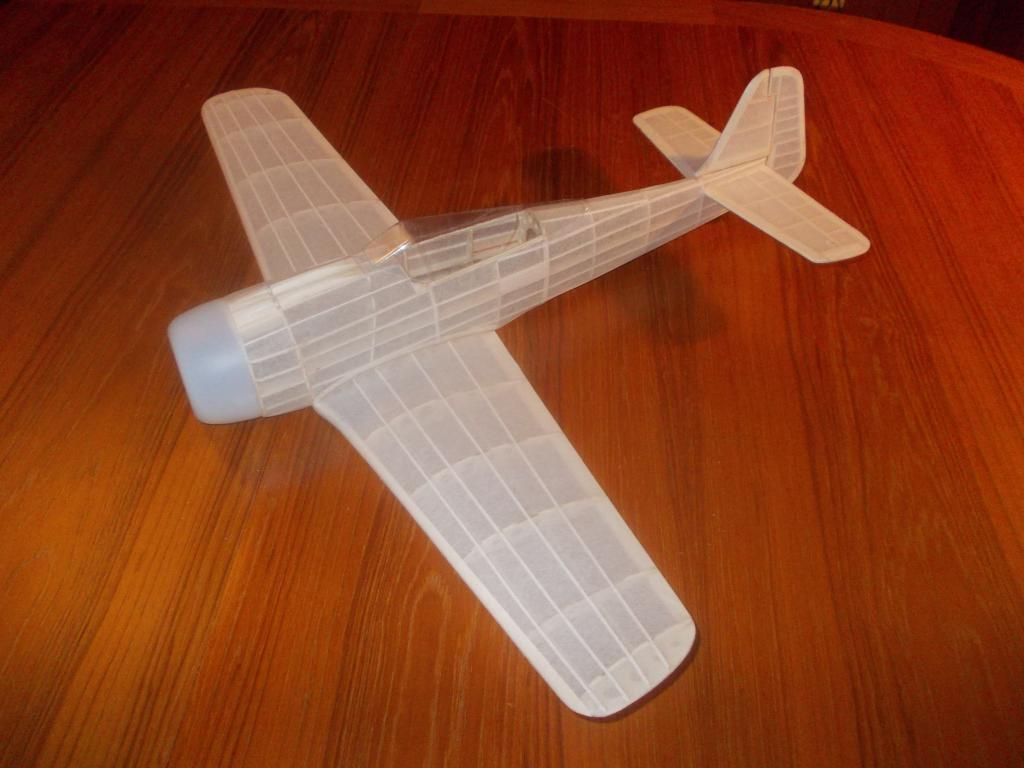
Okay, I think all the skeleton is done, weighing in at 30 grams.
Now onto covering. I have been using colored Light Domestic Tissue for the past 2 years, but thought since this is the G challenge I will use all kit parts, as much as possible. So I am using supplied paper:
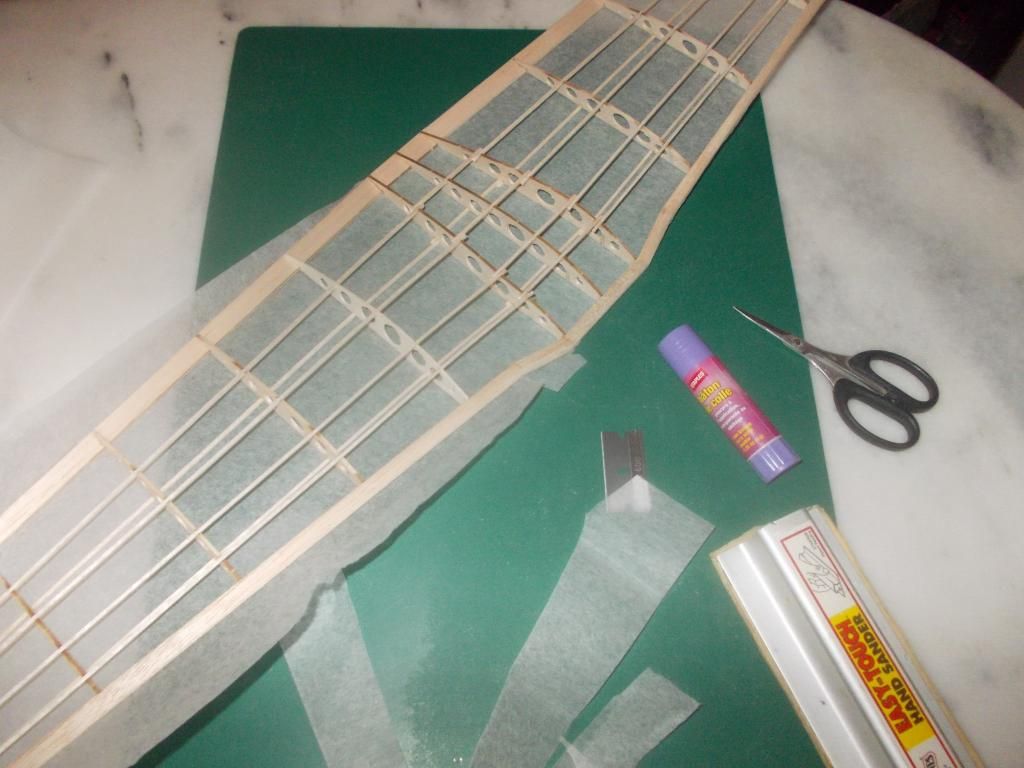
When starting a covering job I like to use a flat razor, start with a new blade. I covered the bottom first with 1 sheet. Cut over size and trim off excess with fine sander. I will cover the top with 2 pieces. I will not cover the center section as I checked and it is totally enclosed in fuselage.
Mitch
PS: Sorry for slow progress, I am home on vacation, but working 2 jobs and now have to go to dance class... I don't want to keep the ladies waiting.
UPDATE: Here is the wing covered. It is now 14 grams. I think the 1 gram increase is the glue. The paper seems very light to me:
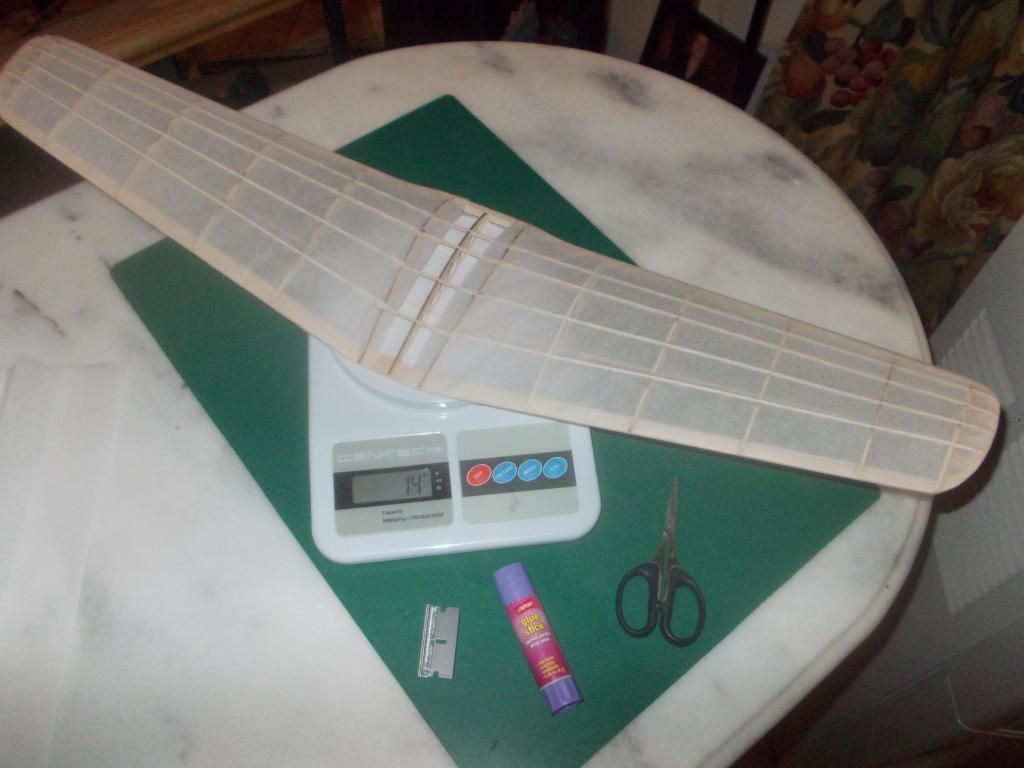
I will let the glue dry for a few hours before I mist and shrink the paper. I normally add washout before this stage, my mistake. I am working on about 4 hours of sleep per night this past week. Well, off to dance class then work all night. I will sleep on Sunday!
Now onto covering. I have been using colored Light Domestic Tissue for the past 2 years, but thought since this is the G challenge I will use all kit parts, as much as possible. So I am using supplied paper:

When starting a covering job I like to use a flat razor, start with a new blade. I covered the bottom first with 1 sheet. Cut over size and trim off excess with fine sander. I will cover the top with 2 pieces. I will not cover the center section as I checked and it is totally enclosed in fuselage.
Mitch
PS: Sorry for slow progress, I am home on vacation, but working 2 jobs and now have to go to dance class... I don't want to keep the ladies waiting.
UPDATE: Here is the wing covered. It is now 14 grams. I think the 1 gram increase is the glue. The paper seems very light to me:

I will let the glue dry for a few hours before I mist and shrink the paper. I normally add washout before this stage, my mistake. I am working on about 4 hours of sleep per night this past week.
- Mitch
- Posts: 1347
- Joined: Mon Aug 22, 2011 9:16 pm
- Location: Kent, WA
Re: 2015 Challenge, FW-190 "Red 13"
![]() by Mitch » Sat Feb 21, 2015 7:47 pm
by Mitch » Sat Feb 21, 2015 7:47 pm
Okay, after sleeping most of the day, I will get back to work on the important stuff.
Forcing the washout is not the way I prefer to set it, but here it goes:
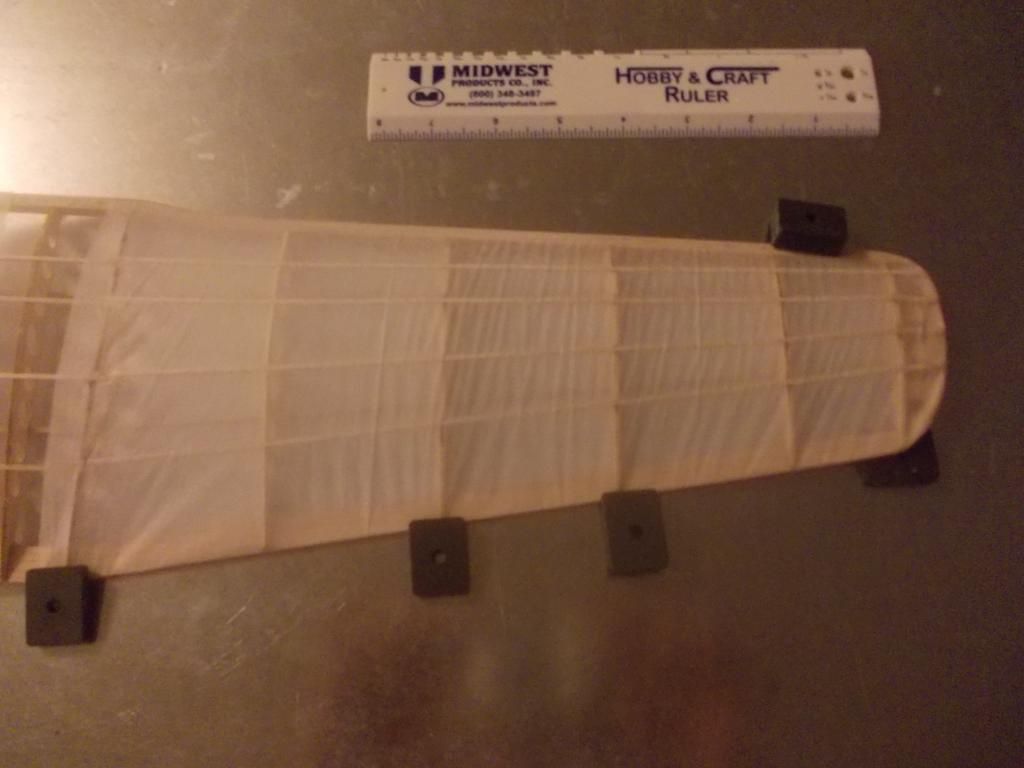
I prefer to get the washout in the wing first then cover. Paper went though first cycle of shrinking. I sprayed the starboard wing a second time and will now try to get in some washout.
This is the first time in a long while I am using Guillow paper. I really like it. This model will be painted. If I can get the paint on without too much weight I will consider painting my P-38, as I do not like working with silver paper.
Mitch
- Mitch
- Posts: 1347
- Joined: Mon Aug 22, 2011 9:16 pm
- Location: Kent, WA
Re: 2015 Challenge, FW-190 "Red 13"
![]() by Mitch » Sun Feb 22, 2015 12:42 pm
by Mitch » Sun Feb 22, 2015 12:42 pm
I am satisfied with the wing and tail. Now getting ready for the fuselage.
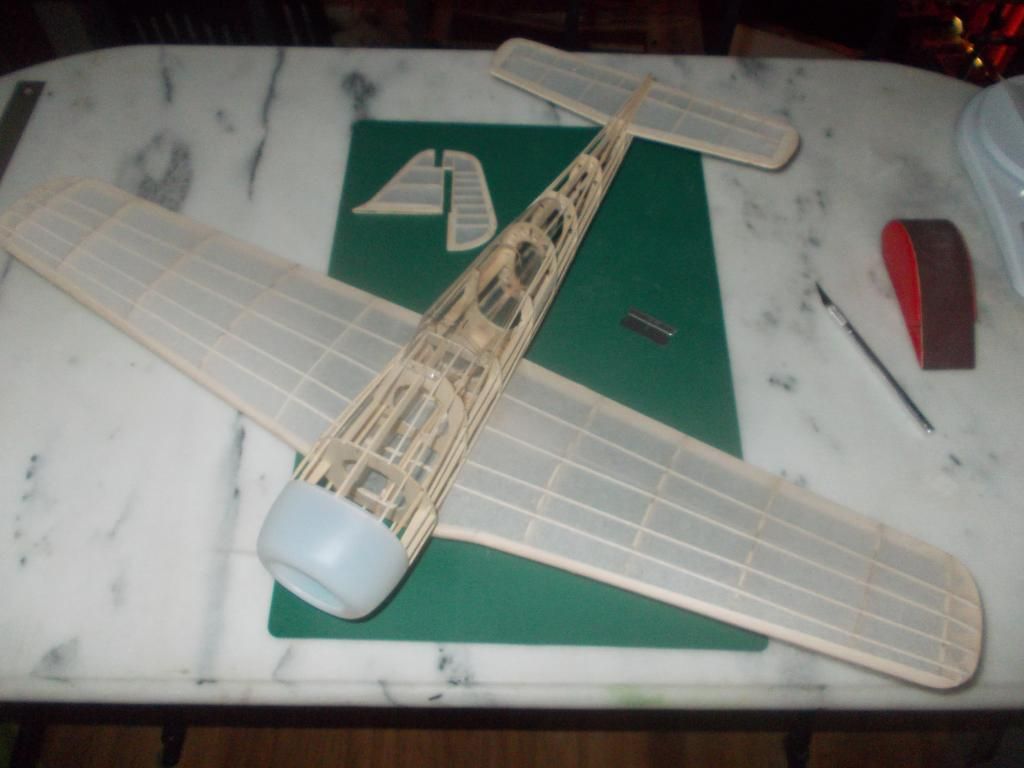
I know Guillows makes a lot of plastic parts for ease of application, but I have not had the best results with the gun troughs for the Focke-Wulf. I plan to fill this area in with balsa, and also make the bumps on the top of the fuselage that are the enclosures for the machine guns. So I will work on that today. Then cover the fuselage.
I do plan to use all the other plastic parts, engine cowl bumps and bumps that cover the cannons. I have left those off in previous builds, but since this model will be painted, the colors will be seamless. Also I am sure one losses points on judging if the model is not depicted accurately.
Mitch
PS: I really like the paper in the 400 and 1000 series kits. If I can paint without much added weight this may be the way of the future for me.
- Mitch
- Posts: 1347
- Joined: Mon Aug 22, 2011 9:16 pm
- Location: Kent, WA
Re: 2015 Challenge, FW-190 "Red 13"
![]() by Mitch » Sun Feb 22, 2015 3:09 pm
by Mitch » Sun Feb 22, 2015 3:09 pm
Fuselage mg's:
Step 1. Using a block of wood from the P-38 kit, is my starting point. Wood is 2.5 x 5 x.5 inches
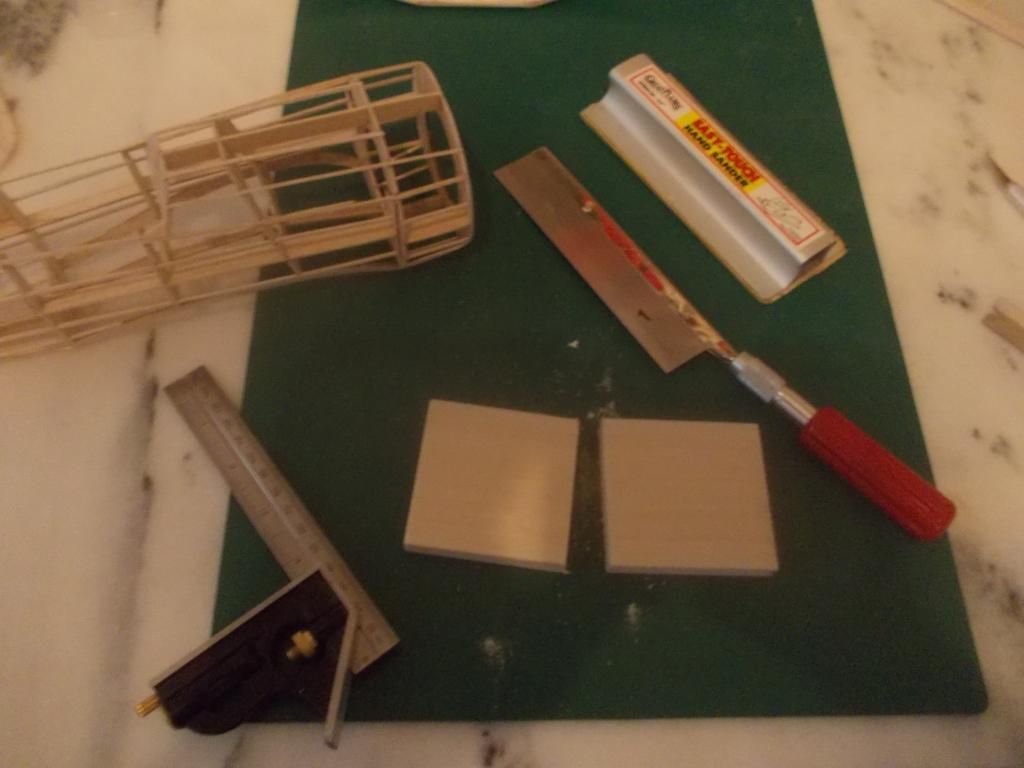
Step 2. Cutting the basic pieces to fill the spots
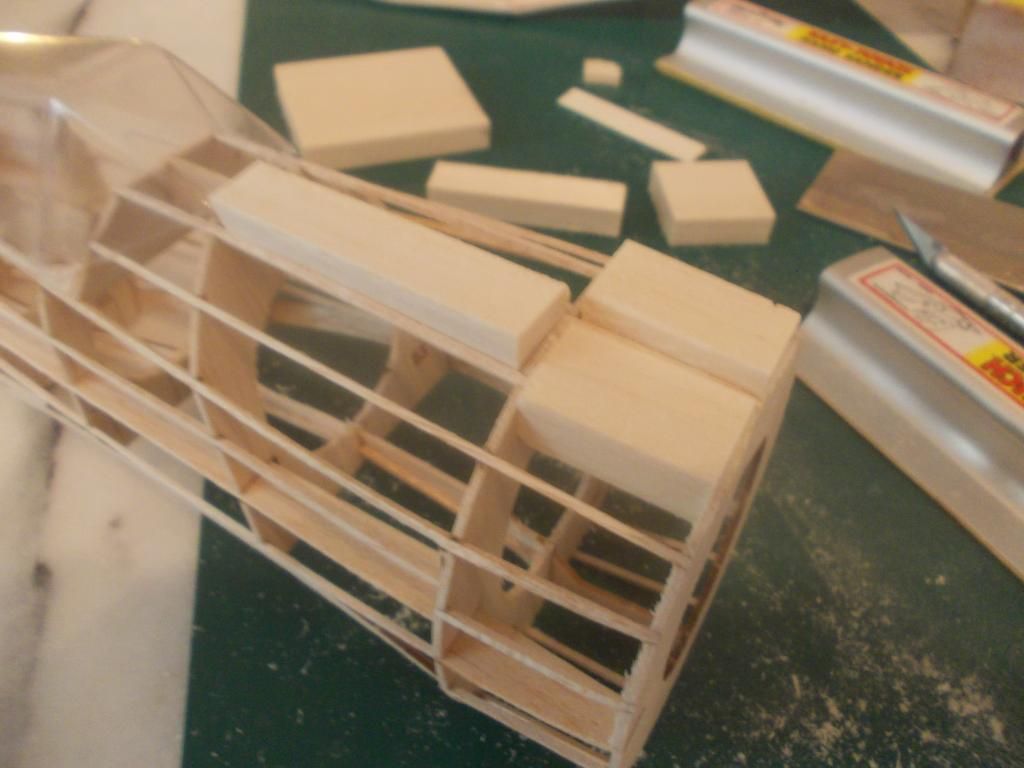
Step 3. Sanding to shape. The trough is very subtle. The hump needs more work. The mg's is one of those straws from Starbucks.

Still needs more work, but I am hoping for a better finished look. Hope to have the fuselage finished tonight.
 NOTE: I filed out a notch in B2 with a small round file, as the starting point for the gun trough.
Mitch
PS: I don't drink Starbucks, I do not pay 7 dollars for a cup of coffee, my daughter works as a Barista at a Tea/Coffee shop.
Step 1. Using a block of wood from the P-38 kit, is my starting point. Wood is 2.5 x 5 x.5 inches

Step 2. Cutting the basic pieces to fill the spots

Step 3. Sanding to shape. The trough is very subtle. The hump needs more work. The mg's is one of those straws from Starbucks.

Still needs more work, but I am hoping for a better finished look. Hope to have the fuselage finished tonight.
Mitch
PS: I don't drink Starbucks, I do not pay 7 dollars for a cup of coffee, my daughter works as a Barista at a Tea/Coffee shop.
- Mitch
- Posts: 1347
- Joined: Mon Aug 22, 2011 9:16 pm
- Location: Kent, WA
Re: 2015 Challenge, FW-190 "Red 13"
![]() by Mitch » Sun Feb 22, 2015 5:41 pm
by Mitch » Sun Feb 22, 2015 5:41 pm
Now with the fuselage near finished I will will be handling it more carefully, I decided to add more lightening holes aft of the rear peg.
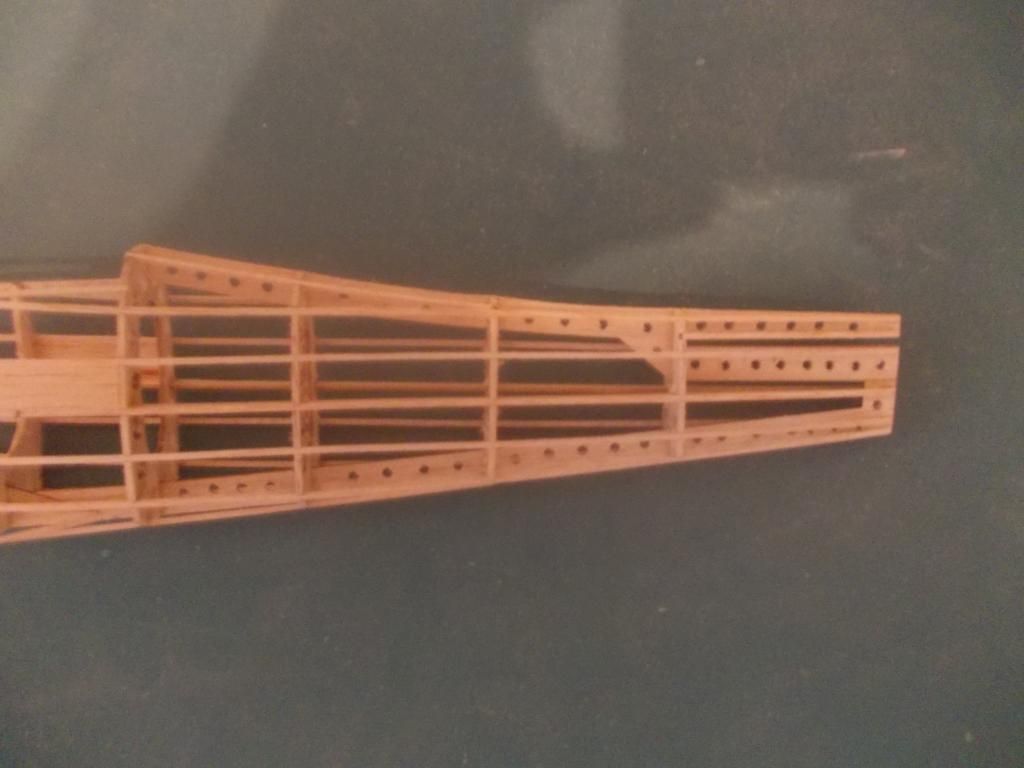
NOTICE where the rear peg is going to be! Just aft of the cockpit!
I believe these keels in the Guillow models are designed for gas powered flights and that is much stronger (and heavier) than I need for rubber powered free flight.
Remember: Guillow says "For a rubber powered model, build MUST be as light as possible" or some such thing.
The fuselage went from 14 grams to 13 grams.
Then I glued in the front details:
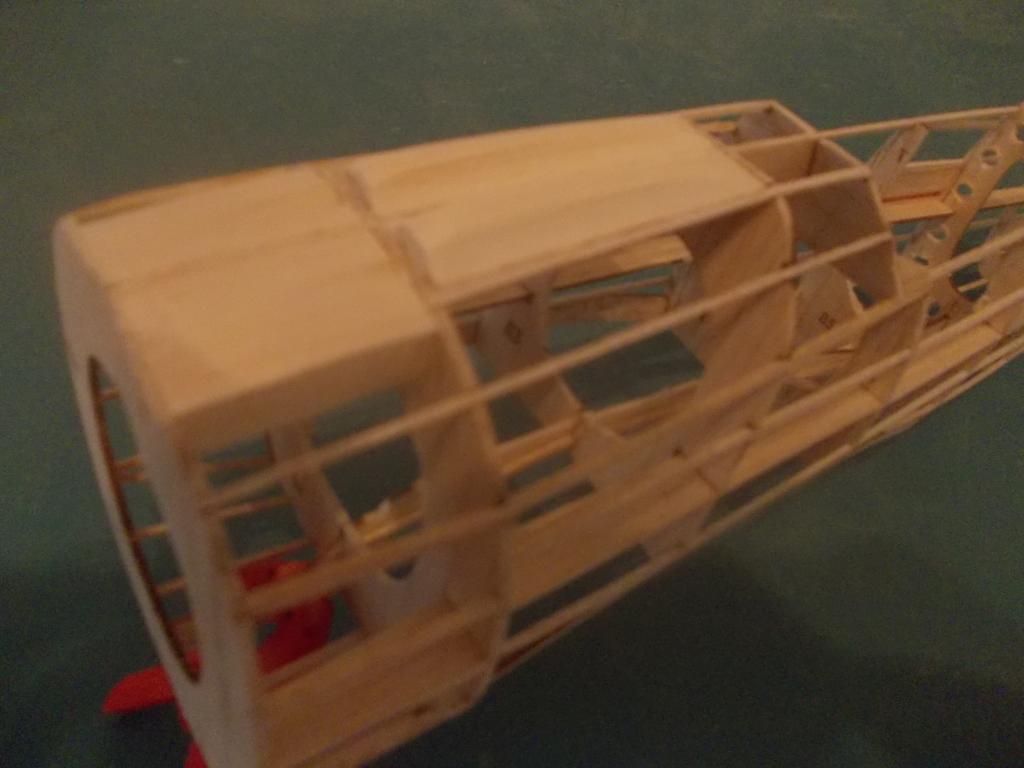
The weight of the fuselage went from 13 grams to 15 grams. BUT the weight distribution has moved FORWARD!
I will build the front nose block as light as possible because I DO NOT want to add ballast to the tail!
Now on to covering the fuselage. This will consume most of the rest of the day. Fuselages always take me a fair amount of time.
Mitch
UPDATE: found this on youtube:
https://www.youtube.com/watch?v=qhAgU-GUc1Q
I plan to add some details like exhaust pipes and louvers as per view at time 0:20
I also need to trim down the mg bumps more.
- Mitch
- Posts: 1347
- Joined: Mon Aug 22, 2011 9:16 pm
- Location: Kent, WA
Re: 2015 Challenge, FW-190 "Red 13"
![]() by kittyfritters » Sun Feb 22, 2015 9:06 pm
by kittyfritters » Sun Feb 22, 2015 9:06 pm
Mitch,
Nice progress! And, there were people telling me that no one would build a model as complex as a 400 series kit for the Challenge. Gotta love it!
Keep 'Em Flying!
Howard
Nice progress! And, there were people telling me that no one would build a model as complex as a 400 series kit for the Challenge. Gotta love it!
Keep 'Em Flying!
Howard
- kittyfritters
- Posts: 697
- Joined: Tue Jan 03, 2006 6:58 pm
- Location: California
Re: 2015 Challenge, FW-190 "Red 13"
![]() by Mitch » Sun Feb 22, 2015 10:58 pm
by Mitch » Sun Feb 22, 2015 10:58 pm
Thanks Howard, and for all of you here she is in her silkspan...
What you see here weighs 45 grams. A few small plastic pieces and the front end. Dope and Paint... I think my 60 grams target is within reach!
I plan to fly for the challenge with kit prop and rubber. So the only changes are:
1. Adjustable front end.
2. Move rear peg forward.
3. Use Aluminum tube (instead of wood dowel) with securing device (slices of fuel line hose), for rear peg.
Mitch
- Mitch
- Posts: 1347
- Joined: Mon Aug 22, 2011 9:16 pm
- Location: Kent, WA
Re: 2015 Challenge, FW-190 "Red 13"
![]() by Mitch » Mon Feb 23, 2015 10:54 pm
by Mitch » Mon Feb 23, 2015 10:54 pm
Here is a comparison check for FW's
Version 1 Mod 1:
(NO PICTURE)
As per Guillow's instructions without lightening, Model weighed about 100 grams.
Version 1 Mod 2:
Originally built as per plans, Replaced wing and tail and changed location of rear peg, removed weight from inside fuselage as much as possible.
Model weighs 85 grams
Front End:

NEW BUILD:
Version 2 Mod 1:

You saw the build, everything here weighs 74 grams.
Front End:
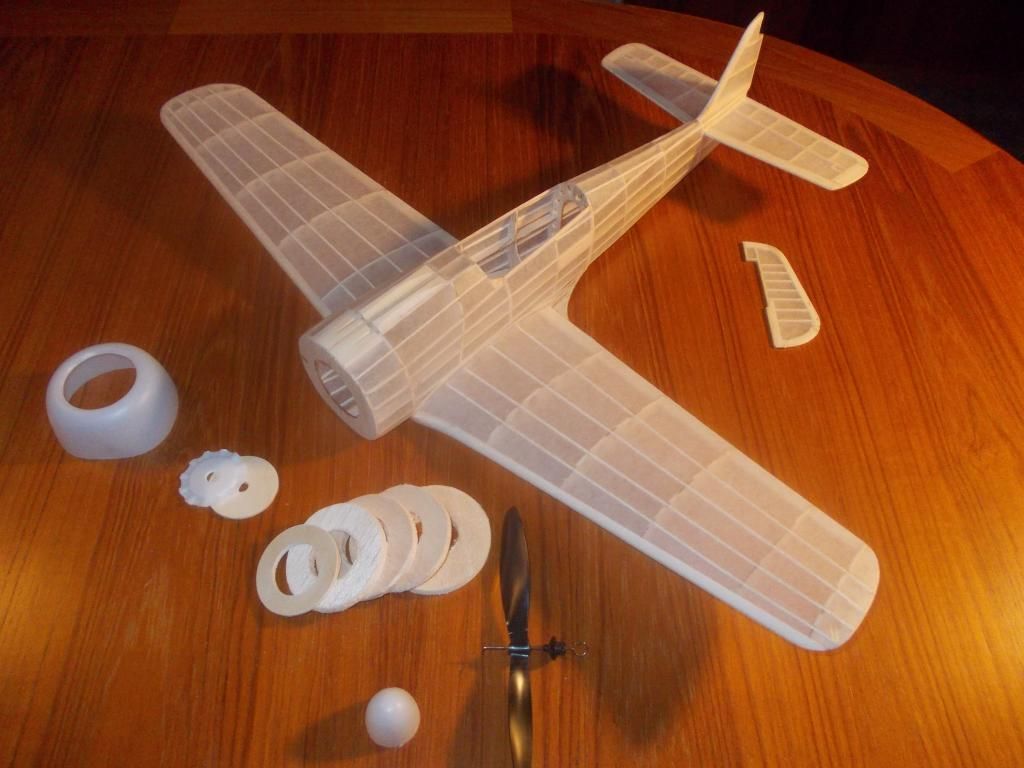
I think I can remove some excess wood from those doughnut rings to make sure the model is not nose heavy.
The model still needs paint, decals, and minor parts.
I plan to finish front end tomorrow. The new FW will receive wing fairings and all other details. Mitch
Version 1 Mod 1:
(NO PICTURE)
As per Guillow's instructions without lightening, Model weighed about 100 grams.
Version 1 Mod 2:
Originally built as per plans, Replaced wing and tail and changed location of rear peg, removed weight from inside fuselage as much as possible.

Model weighs 85 grams
Front End:

NEW BUILD:
Version 2 Mod 1:

You saw the build, everything here weighs 74 grams.
Front End:

I think I can remove some excess wood from those doughnut rings to make sure the model is not nose heavy.
The model still needs paint, decals, and minor parts.
I plan to finish front end tomorrow. The new FW will receive wing fairings and all other details. Mitch
- Mitch
- Posts: 1347
- Joined: Mon Aug 22, 2011 9:16 pm
- Location: Kent, WA
Re: 2015 Challenge, FW-190 "Red 13"
![]() by Mitch » Tue Feb 24, 2015 1:41 am
by Mitch » Tue Feb 24, 2015 1:41 am
End of the day report:
Wing Fairings are on, Cannon Bumps. Front end is stacked up and glued. (Black tube will be removed) After that is dry I will remove about 25% of that wood. The front end pieces weighed almost 20 grams! The whole airplane before that was only 45 grams! The weight is starting to add up fast!
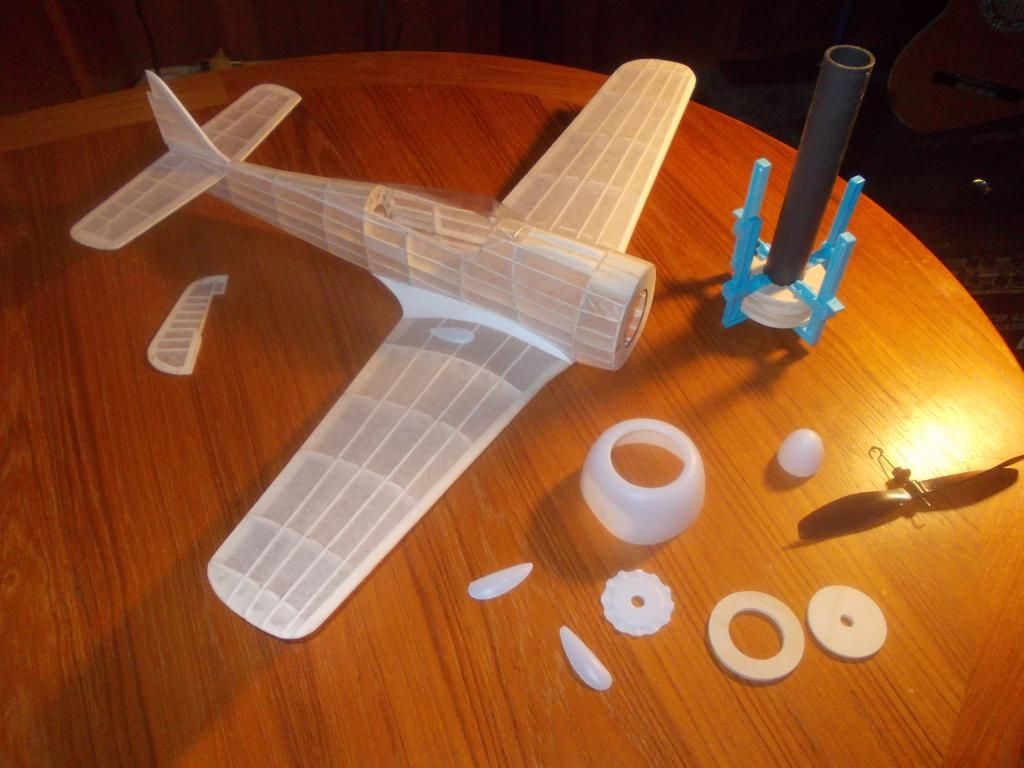
This is only about the third time I added the wing fairings. I like the look, but in the past I omit because I do not normally paint the model.
The only extra items in the model are about 3 dollars of balsa and plywood for the front end. I will use 4 small wood screws for alignment and adjustment. Rear peg will be aluminum tube so I can use stooge to stretch wind the motor. This model will be flown with supplied rubber and prop!
Cockpit detail will be made from paper. And the pilot will be from the Guillow's 1000 series spare parts!
Mitch
PS: Check out this video:
https://www.youtube.com/watch?v=HlCCUVqBagM
I see this is also red 13, at point 1:11 you can see the tail markings! Really I only found this video yesterday, I was planning on making Red 13 before I saw this. But now my next FW needs to have more cockpit detail!
- Mitch
- Posts: 1347
- Joined: Mon Aug 22, 2011 9:16 pm
- Location: Kent, WA
Re: 2015 Challenge, FW-190 "Red 13"
![]() by Mitch » Wed Feb 25, 2015 2:41 pm
by Mitch » Wed Feb 25, 2015 2:41 pm
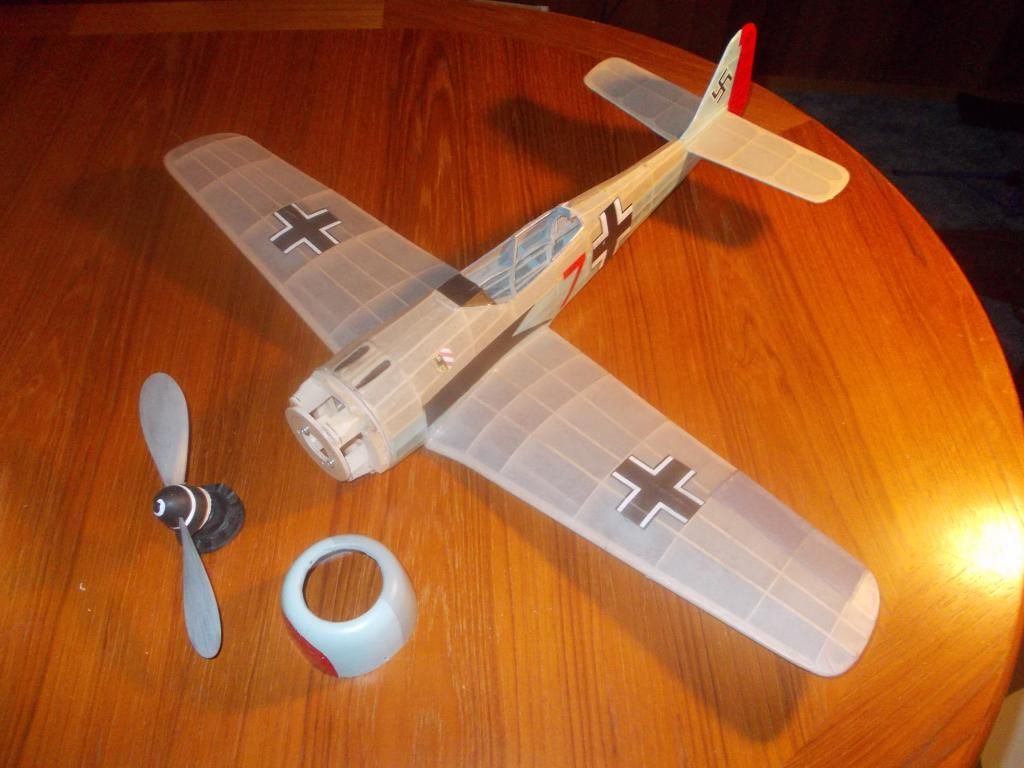
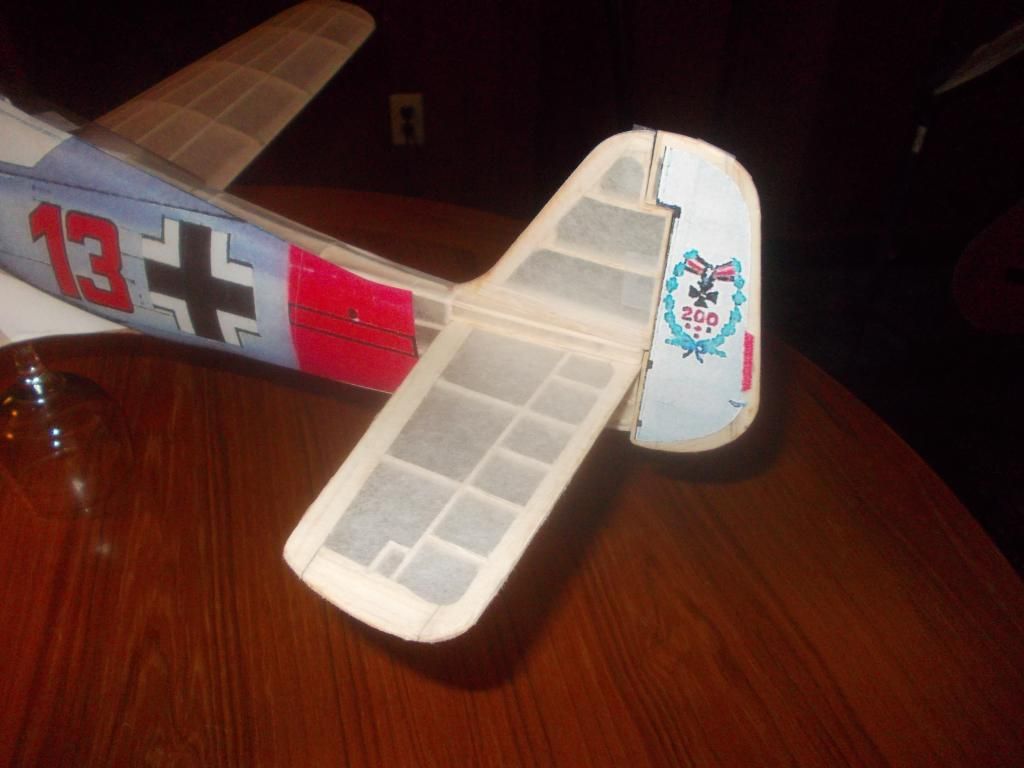
Okay here she is Without Paint.
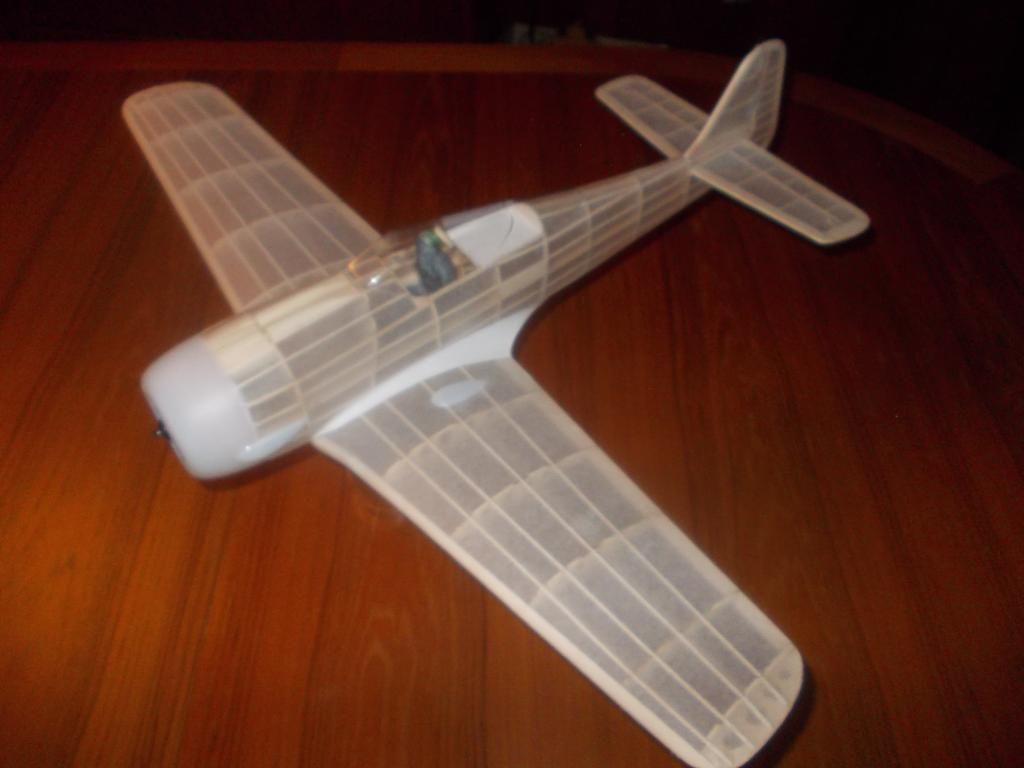
I will add mg's and cannons, exhaust pipes and side louvers after painting.

Close up with pilot in cockpit.
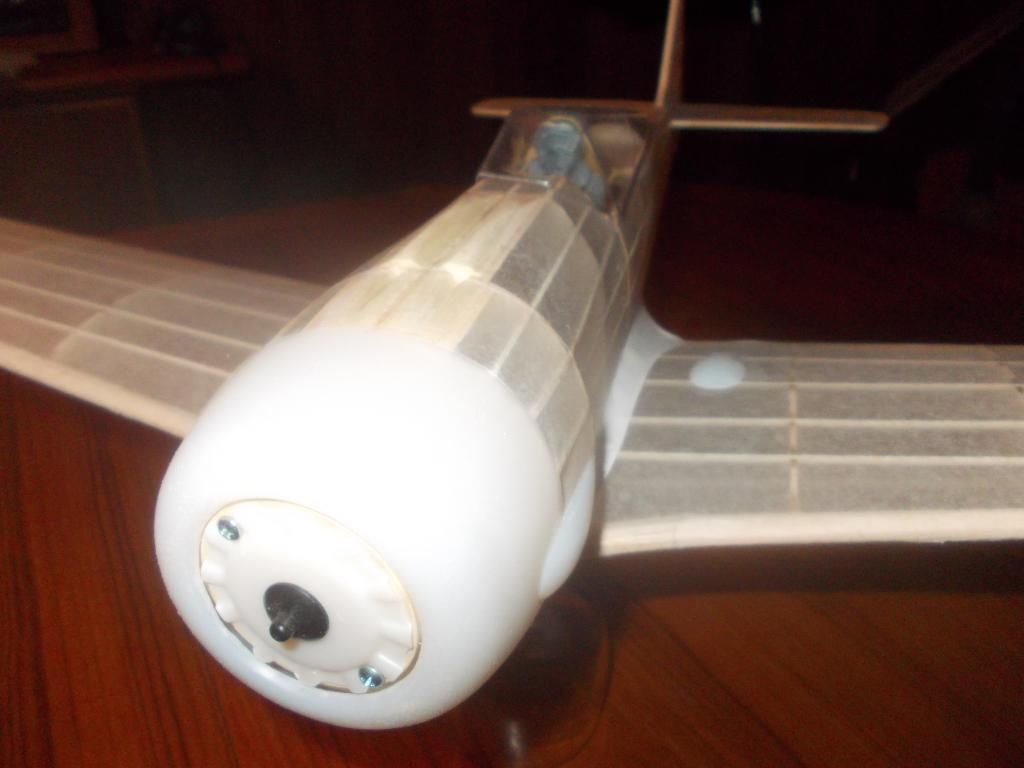
Close up of front end.
The model weighs 72 grams (without Pilot). It feels nearly in balance. At this point I will do some trim tests, and maybe get some flights in before paint, as I am not sure how much extra weight that will add. I was hoping for final numbers in the 60's, I built this model as light as I could, but I am not a miracle worker.
Here is a view with the front plate off, for those of you newbies here. I will explain to you how this works. My front end has evolved and this is the best I have at the moment.
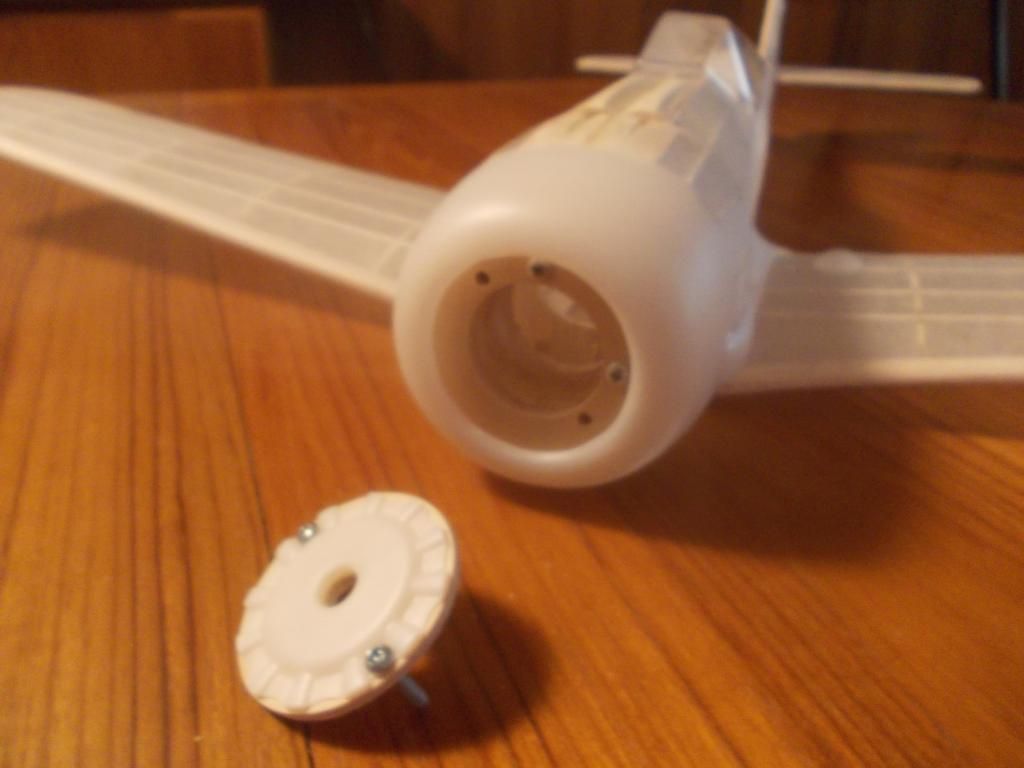
I use #4 sheet metal screws. 2 for alignment are 5/8 inch, and the 2 for adjustment are 3/8 inch. The adjustment screws are at 12 o'clock and 3 o'clock. By backing out the crews I get the down and right thrust I need. The alignment screws are 180 degrees apart and are at 11 o'clock and 5 o'clock. I use screws because they will not bend or get loose like small nails will.. The receiving holes for them are large and the slip right into the plane. The entire area for my rubber motor has been enlarged inside the model and I can stretch wind the motor with a blast tube.
Also if I need more weight I can slip in a flat washer between the cooling fan and the plywood plate, as they are not glued together, only screwed together and can come apart if needed. I have my small Phillips screwdriver and several sizes of flat washers in my field box.
Mitch...Keep Building, Keep Flying, Keep Improving...and share everything I learn. NO SECRETS!
- Mitch
- Posts: 1347
- Joined: Mon Aug 22, 2011 9:16 pm
- Location: Kent, WA
Re: 2015 Challenge, FW-190 "Red 13"
![]() by Mitch » Thu Feb 26, 2015 4:25 pm
by Mitch » Thu Feb 26, 2015 4:25 pm
Okay, After spending a few dollars at Staples to color enlarge some picture from my reference book. Here is a preview of what I hope the model will look like:
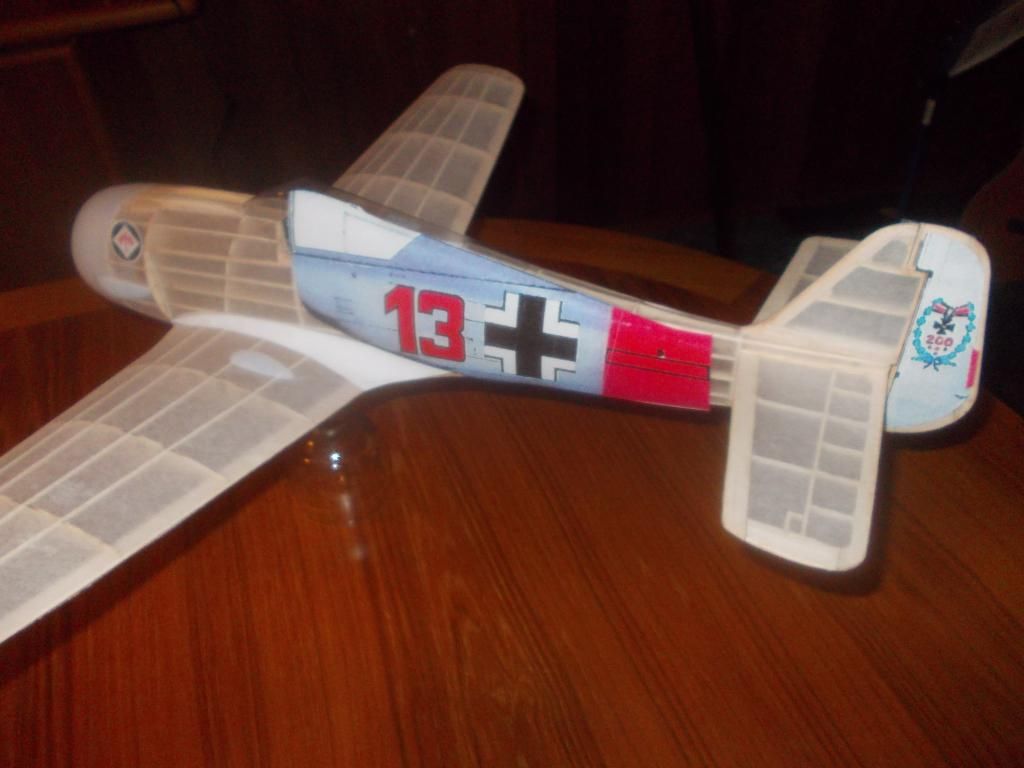
I just hope the paining works out. I could have covered this model in Light grey paper with a touch of other colors... We will see if the extra work is worth the final result. I will not be able to start painting until next week.
I missed the tail in the above picture so here is another photo:
I will cut out the "13" and tail mark. Also using the "Flying 1" Cowl mark of the Squadron. The rest of the markings will be photos of the decal sheet.
Mitch
PS: Interesting note: Seems like the fuselage is the exact size of my photo copy and the Guillow Tail is slightly larger than the photocopy. Makes for a better flying model and the tail does not look overly large.

I just hope the paining works out. I could have covered this model in Light grey paper with a touch of other colors... We will see if the extra work is worth the final result. I will not be able to start painting until next week.
I missed the tail in the above picture so here is another photo:

I will cut out the "13" and tail mark. Also using the "Flying 1" Cowl mark of the Squadron. The rest of the markings will be photos of the decal sheet.
Mitch
PS: Interesting note: Seems like the fuselage is the exact size of my photo copy and the Guillow Tail is slightly larger than the photocopy. Makes for a better flying model and the tail does not look overly large.
- Mitch
- Posts: 1347
- Joined: Mon Aug 22, 2011 9:16 pm
- Location: Kent, WA
Re: 2015 Challenge, FW-190 "Red 13"
![]() by Mitch » Fri Feb 27, 2015 2:44 am
by Mitch » Fri Feb 27, 2015 2:44 am
Just Thought I would update one more time... I want to test fly the plane before painting... so the plane is ready, tonight I worked some more on the pilot.
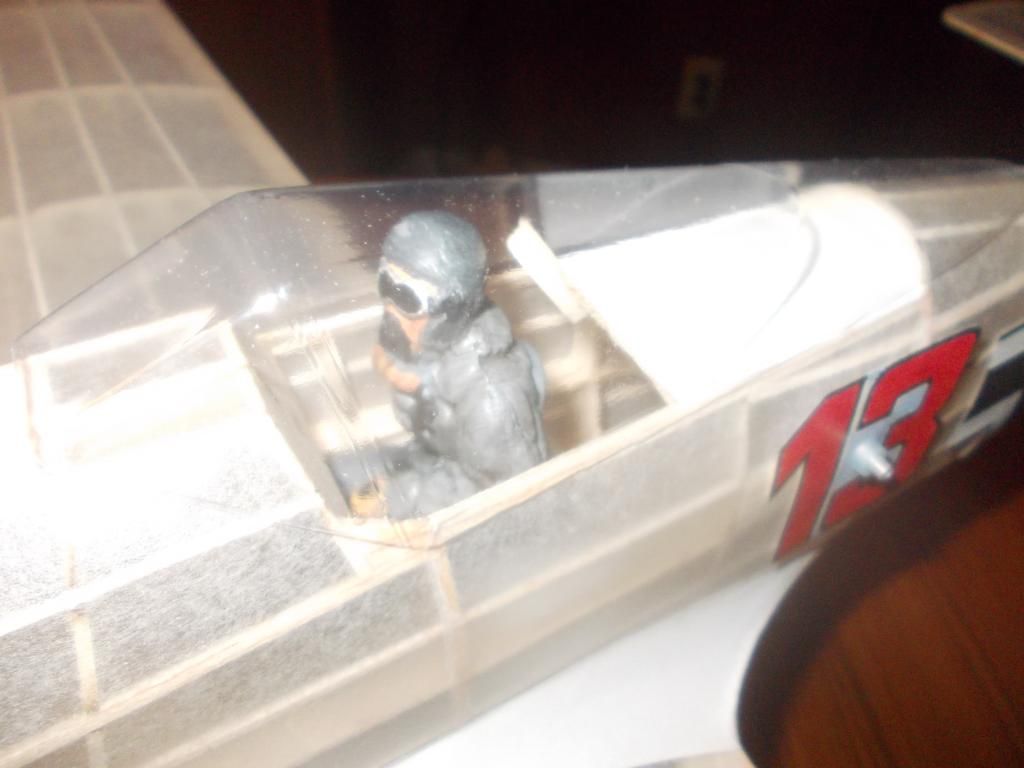
This is the 1000 series pilot. They come in all the 1000 series kits and 2 for the bombers. All the 400 series and 1000 series are exactly 1/16 scale. People have asked before where to get pilots. With a little work, and paint, I think these are excellent pilots for flying models. There are a few 1/16 pilot figures available from other companies, but they are full figure injection plastic models and will cost as much as one of Guillow Plane kits.
Mitch
PS: Now I just need to add some detail to the inside of the cockpit.
- Mitch
- Posts: 1347
- Joined: Mon Aug 22, 2011 9:16 pm
- Location: Kent, WA
Re: 2015 Challenge, FW-190 "Red 13"
![]() by jpuke » Fri Feb 27, 2015 8:59 am
by jpuke » Fri Feb 27, 2015 8:59 am
Interesting work there with the adjustable nose. Since the thrust alignment screws (12 and 3:00) are not flush, do you have the down and right thrust built in from the beginning? I was thinking of doing something similar but I was going to use flat screws and countersink the holes so that the plug sits flush on them until I need to change the thrust alignment.
Again, interesting solution. Have you found that you can get away without having adjustable tail surfaces by just adjusting the thrust line? I like adjustable tails but I hate the weight that they add. (I see that you rudder is moveable)
Thanks,
Jeremy
Again, interesting solution. Have you found that you can get away without having adjustable tail surfaces by just adjusting the thrust line? I like adjustable tails but I hate the weight that they add. (I see that you rudder is moveable)
Thanks,
Jeremy
- jpuke
- Posts: 75
- Joined: Wed May 04, 2011 8:03 am
- Location: Lincoln, NE
70 posts
• Page 3 of 5 • 1, 2, 3, 4, 5
Return to General Building Questions
Who is online
Users browsing this forum: Bing [Bot] and 11 guests