SE5 or SE5a, this one is heading to WESTFAC V!
33 posts
• Page 2 of 3 • 1, 2, 3
Re: SE5 or SE5a, this one is heading to WESTFAC V!
![]() by Bill Gaylord » Wed Nov 19, 2014 10:18 pm
by Bill Gaylord » Wed Nov 19, 2014 10:18 pm
Looks like you'll have a real winner here that shouldn't need much if any ballast, especially with the lightening. Gotta love the long nose WWI subjects.
- Bill Gaylord
- Posts: 904
- Joined: Sun Nov 09, 2008 1:29 pm
- Location: Grove City PA
Re: SE5 or SE5a, this one is heading to WESTFAC V!
![]() by Mitch » Thu Nov 20, 2014 12:55 am
by Mitch » Thu Nov 20, 2014 12:55 am
Yes Bill... You got that right... The long nose WW1 models are easier to balance. I do not count on any model of mine being a winner. At least not in FAC. But if all you want to do is fly and have fun, then I will agree I am working on a winner. My second choice for WW1 was the Fokker DVII (long nose). I also like the Nieport, because I like the tubular body for the rubber motor.
The first time I got a plane to fly, I was amazed. Then I joined FAC and learned a lot more. Now I have no doubt that my planes will fly... I am just not sure for how long. But one still has to take all the time and care to build carefully. I am still learning. I ordered some supplies and plan to start out with a 6 inch prop for this model. I am also changing the position of the rear peg. It will be moved up one bay and lowered one section. It will be right in line with the L parts for the supports for the cabine struts. I think the fuselage will be very strong in that section.
I bought some music wire today and will start working on the landing gear that will hold up to a flight and landing...stay tuned...
Mitch
UPDATE:
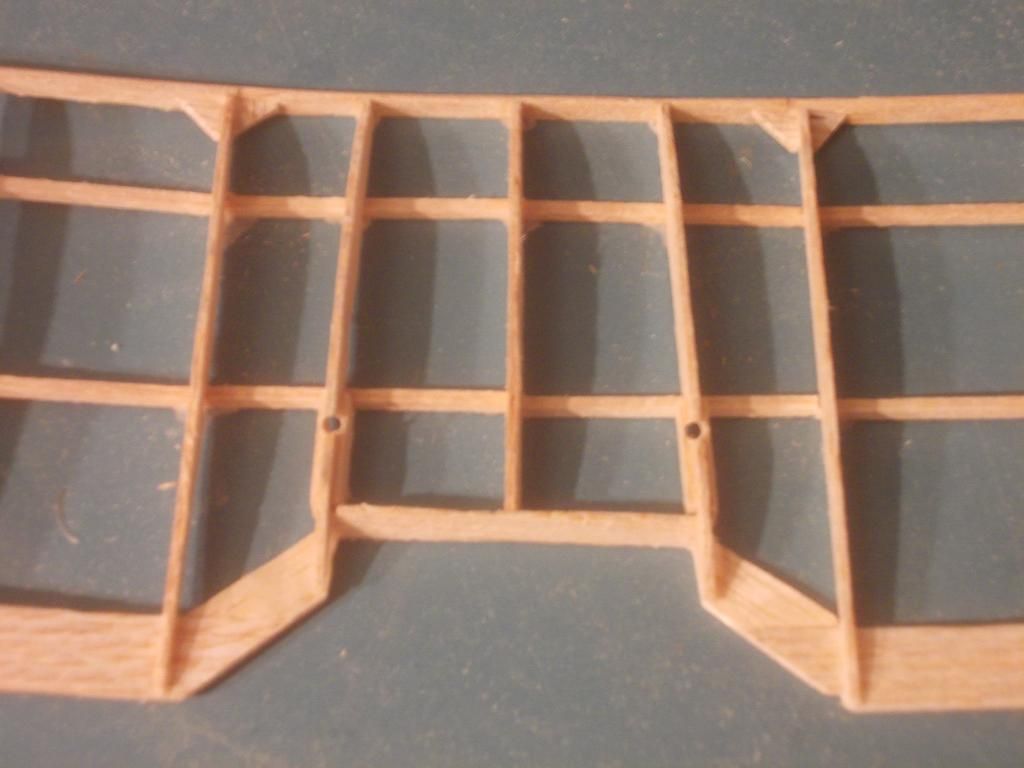
I decided to cut out new L parts as I do not like the printing on the parts and I thought I could get a better fit if I custom cut the parts.

I will use the kit parts as templates to cut out the notches then glue them in place. My rear peg will be in the center of the bay just behind the cockpit.

The first time I got a plane to fly, I was amazed. Then I joined FAC and learned a lot more. Now I have no doubt that my planes will fly... I am just not sure for how long. But one still has to take all the time and care to build carefully. I am still learning. I ordered some supplies and plan to start out with a 6 inch prop for this model. I am also changing the position of the rear peg. It will be moved up one bay and lowered one section. It will be right in line with the L parts for the supports for the cabine struts. I think the fuselage will be very strong in that section.
I bought some music wire today and will start working on the landing gear that will hold up to a flight and landing...stay tuned...
Mitch
UPDATE:
I decided to cut out new L parts as I do not like the printing on the parts and I thought I could get a better fit if I custom cut the parts.

I will use the kit parts as templates to cut out the notches then glue them in place. My rear peg will be in the center of the bay just behind the cockpit.
- Mitch
- Posts: 1347
- Joined: Mon Aug 22, 2011 9:16 pm
- Location: Kent, WA
Re: SE5 or SE5a, this one is heading to WESTFAC V!
![]() by 42swing » Thu Nov 20, 2014 11:43 am
by 42swing » Thu Nov 20, 2014 11:43 am
I just wanted to compliment you Mitch on a superb thread. Very informative and educational, and just plain fun to read. I look forward to each installment.
- 42swing
- Posts: 33
- Joined: Thu Oct 16, 2014 11:59 am
- Location: Malvern, PA
Re: SE5 or SE5a, this one is heading to WESTFAC V!
![]() by Mitch » Thu Nov 20, 2014 5:20 pm
by Mitch » Thu Nov 20, 2014 5:20 pm
Thank You All, I do this to share my enthusiasm, spread my limited knowledge, and seek your advice as well.
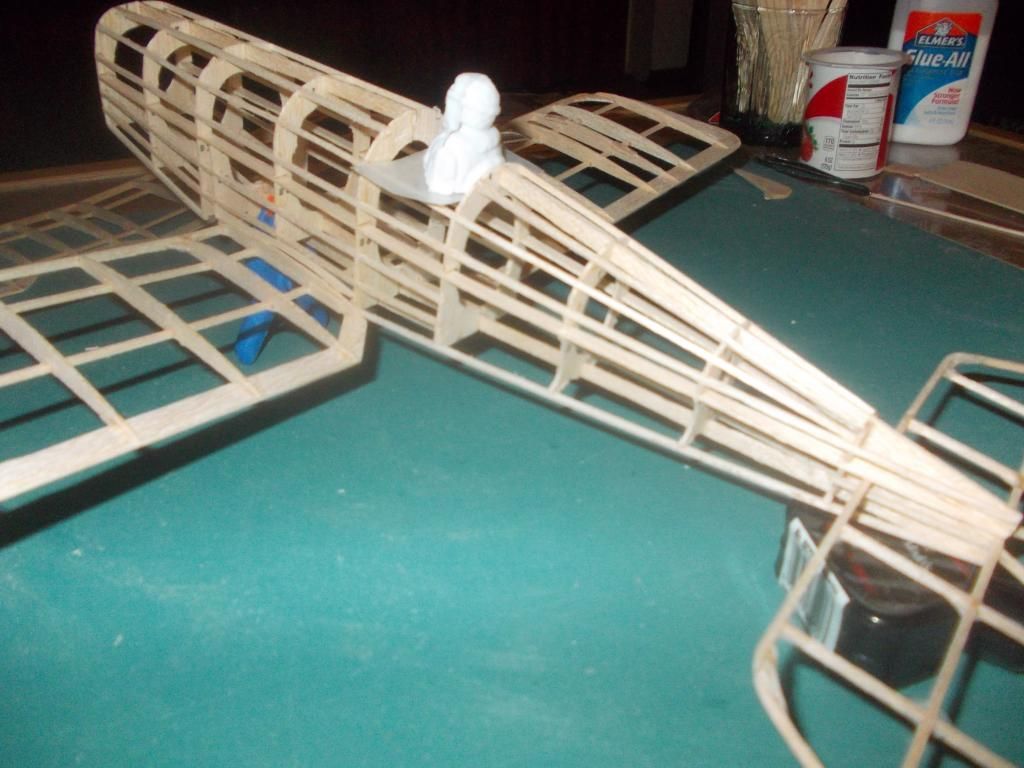
Today is day 9, and I am going to tackle the 'Achilles's heel' of Guillow methods... The fixed landing gear.
I bought some different music wire and I am starting with K&S Stock 500 (.025) This is very light, but with the short spans I believe it will be sturdy enough. My landing gear will be ONE piece. It will be braced to the model across the front between B3 and B4. It will not require any balsa for support, only for looks.
Here is how I bent the wire:
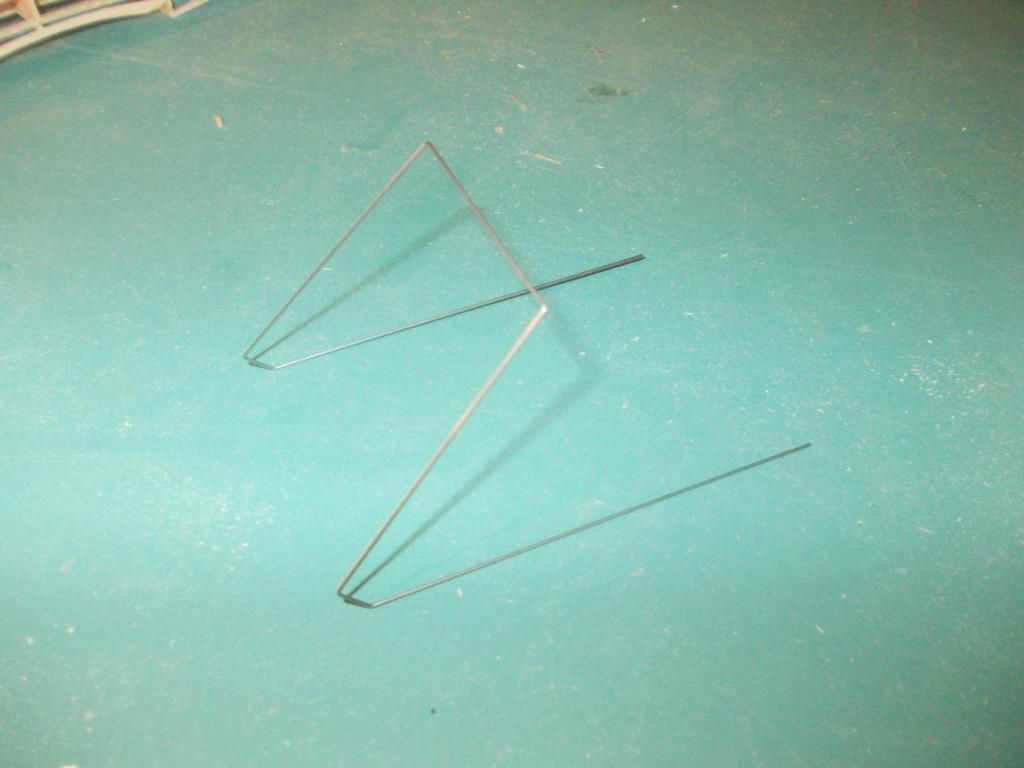
It will be free floating at the rear and pass though the wing:
I drilled holes where the wire will pass though.
Here is the skeleton 'standing' on her legs:
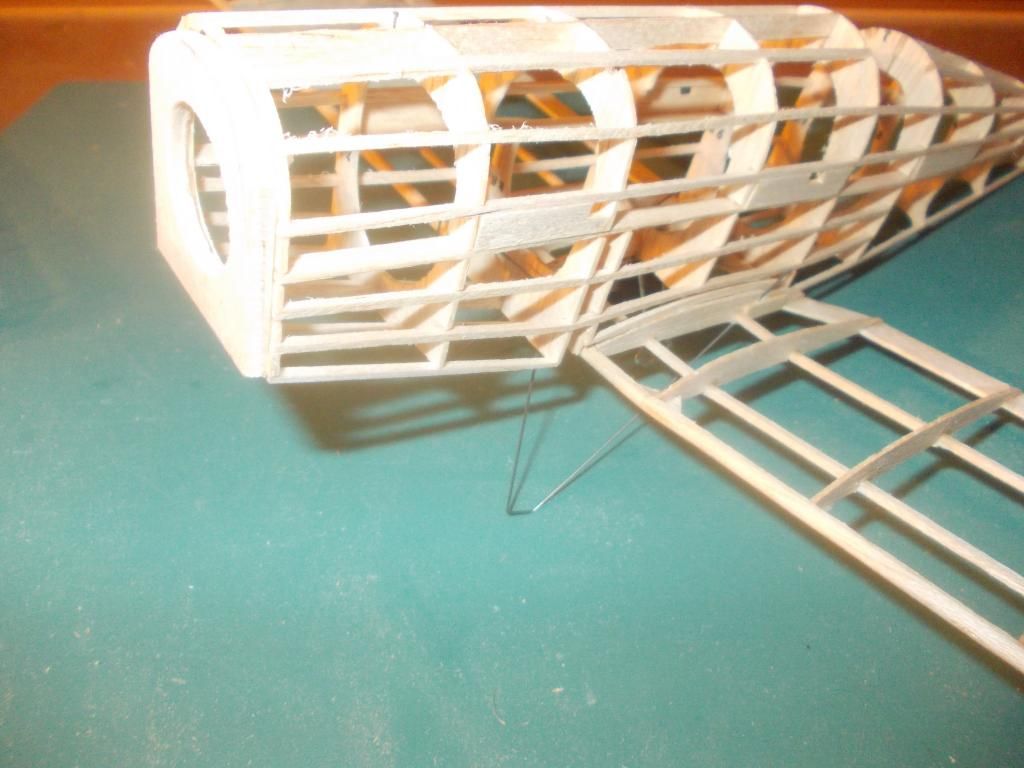
...and the front is not even secured yet!
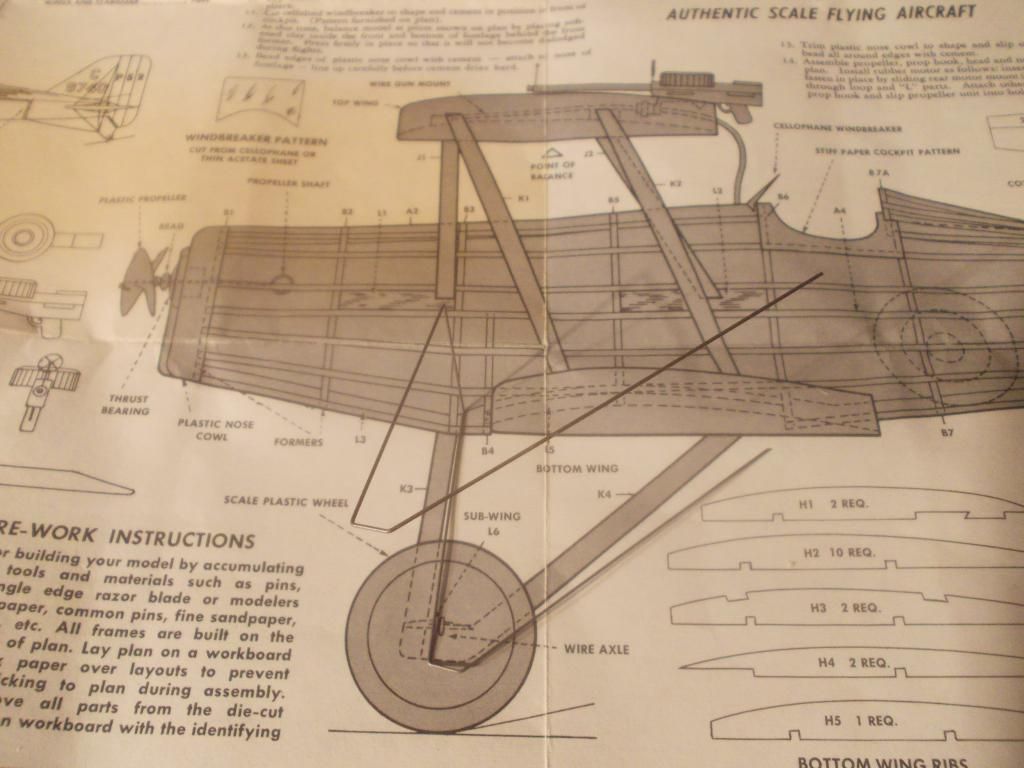
To further clarify here is a picture of the wire gear on the plans:
If the landing gear is not perfect height on each side I will hide the error inside the plane between B3 and B4 and wedge and glue in place!
When the gear is installed I will attach the 'axle' (music wire, supplied in kit) to the gear with thread. Then I can cover the wire with small straws or paper or balsa to get the effect of the right look of the scale landing gear. With the rear braces 'free floating', the gear should provide a very positive yet shock absorbing secure landing!
Mitch
UPDATE: One more picture... model mock up with 7 inch prop from a 400 series kit:
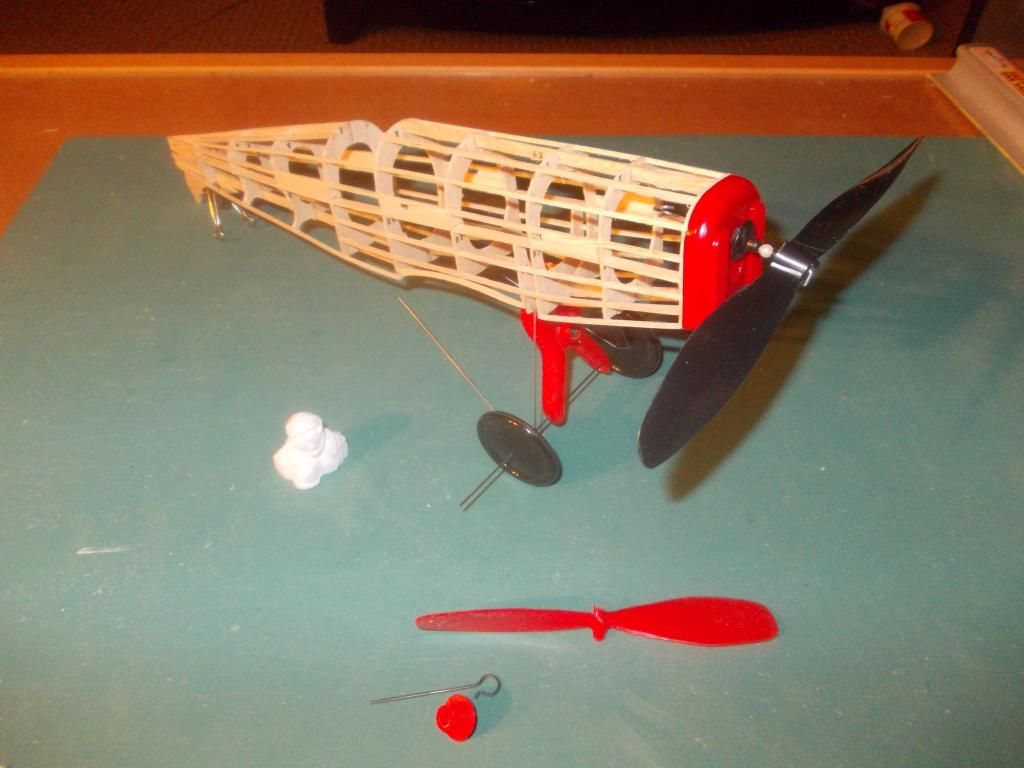
The prop clears the ground, but it looks very heavy. I plan to start with a white 6 inch prop... should be getting a package tomorrow! The red prop is what comes with the kit and that is 5 inches.
Today is day 9, and I am going to tackle the 'Achilles's heel' of Guillow methods... The fixed landing gear.
I bought some different music wire and I am starting with K&S Stock 500 (.025) This is very light, but with the short spans I believe it will be sturdy enough. My landing gear will be ONE piece. It will be braced to the model across the front between B3 and B4. It will not require any balsa for support, only for looks.
Here is how I bent the wire:

It will be free floating at the rear and pass though the wing:

I drilled holes where the wire will pass though.
Here is the skeleton 'standing' on her legs:

...and the front is not even secured yet!
To further clarify here is a picture of the wire gear on the plans:

If the landing gear is not perfect height on each side I will hide the error inside the plane between B3 and B4 and wedge and glue in place!
When the gear is installed I will attach the 'axle' (music wire, supplied in kit) to the gear with thread. Then I can cover the wire with small straws or paper or balsa to get the effect of the right look of the scale landing gear. With the rear braces 'free floating', the gear should provide a very positive yet shock absorbing secure landing!
Mitch
UPDATE: One more picture... model mock up with 7 inch prop from a 400 series kit:

The prop clears the ground, but it looks very heavy. I plan to start with a white 6 inch prop... should be getting a package tomorrow! The red prop is what comes with the kit and that is 5 inches.
- Mitch
- Posts: 1347
- Joined: Mon Aug 22, 2011 9:16 pm
- Location: Kent, WA
Re: SE5 or SE5a, this one is heading to WESTFAC V!
![]() by Mitch » Fri Nov 21, 2014 2:57 am
by Mitch » Fri Nov 21, 2014 2:57 am
It's almost midnight and I will finish the papering tomorrow.
I found this on the internet:
"In service the SE.5a was often modified to suit the wishes of individual pilots. Some pilots reduced dihedral to increase manouverability or removed the headfaring to increase rearward visibility.As the Allies were enjoying greater success producing aircraft, the Germans as a result of the Allied offensive to curtail aeroplane manufacture suffered diminishing success."
So I increased the dihedral, because the plane has to fly by itself, and removed the headrest because it serves no purpose for me.
I found a lot of nice pictures and information here:
http://thevintageaviator.co.nz/projects ... walkaround
I need to include some instruments. Making a holder for another drum for the Lewis gun would be nice but not necessary.
More tomorrow, Mitch
- Mitch
- Posts: 1347
- Joined: Mon Aug 22, 2011 9:16 pm
- Location: Kent, WA
Re: SE5 or SE5a, this one is heading to WESTFAC V!
![]() by Mitch » Fri Nov 21, 2014 4:40 pm
by Mitch » Fri Nov 21, 2014 4:40 pm
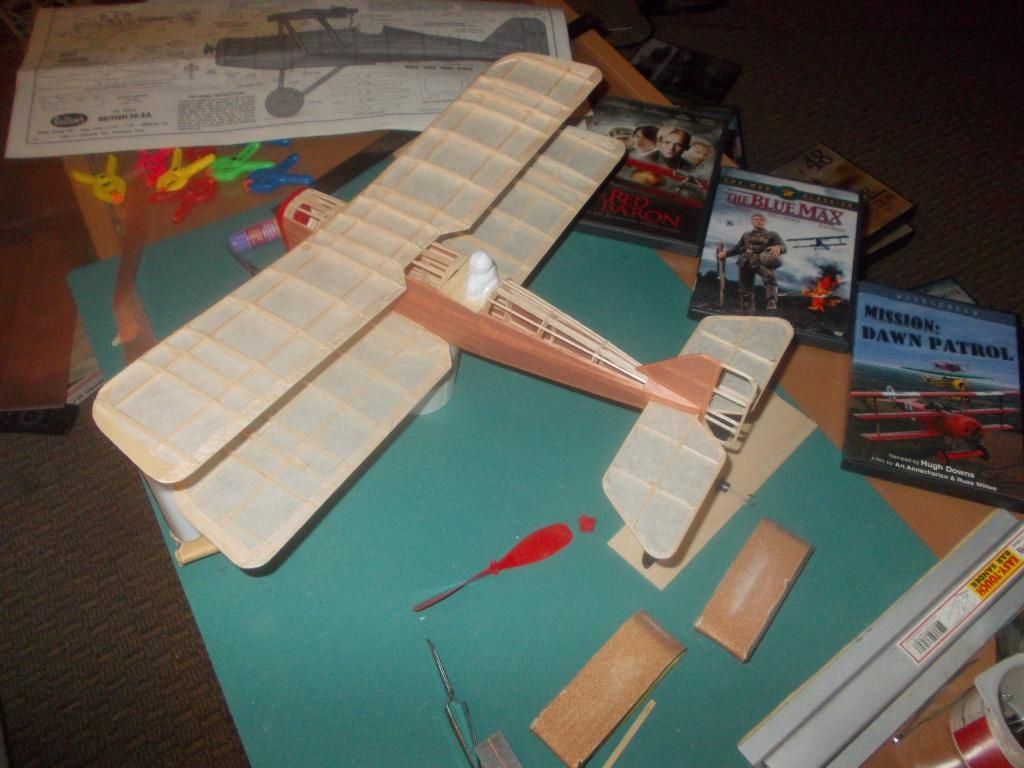
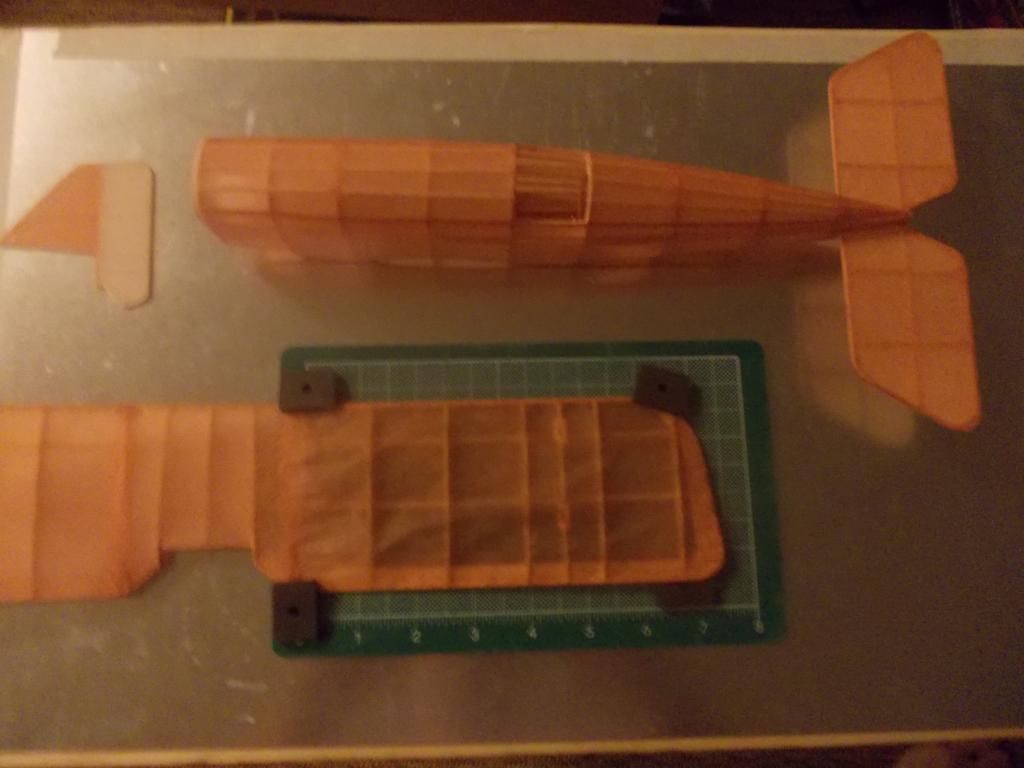
Day 10:
The model is covered. I will let the glue dry for a few hours and shrink the paper tonight. The paper is from the kit. But I also used some domestic paper (linen color) for the bottom of the wings and stabilizer.
All the struts are finished (laminated and sanded) I will stain them and get them ready.
The landing gear wire will be installed after the model is assembled. I need to prepare the landing gear struts and sub wing.
Mitch
The model is covered. I will let the glue dry for a few hours and shrink the paper tonight. The paper is from the kit. But I also used some domestic paper (linen color) for the bottom of the wings and stabilizer.
All the struts are finished (laminated and sanded) I will stain them and get them ready.
The landing gear wire will be installed after the model is assembled. I need to prepare the landing gear struts and sub wing.

Mitch
- Mitch
- Posts: 1347
- Joined: Mon Aug 22, 2011 9:16 pm
- Location: Kent, WA
Re: SE5 or SE5a, this one is heading to WESTFAC V!
![]() by Mitch » Sat Nov 22, 2014 2:52 am
by Mitch » Sat Nov 22, 2014 2:52 am
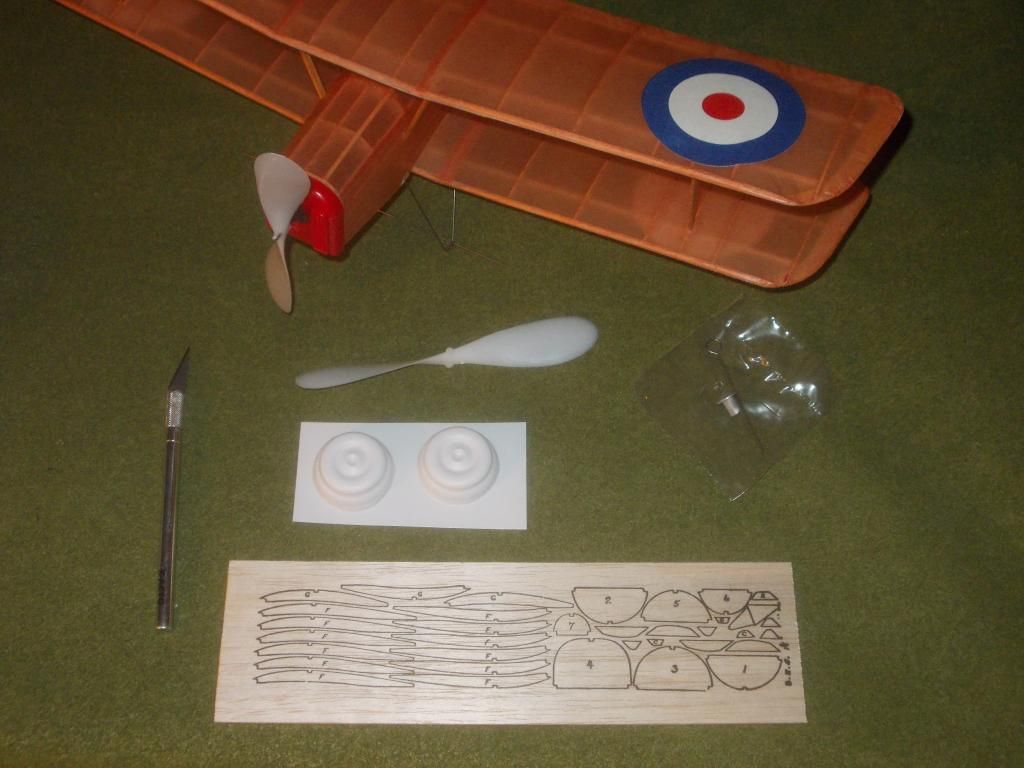
I received my package toady and among other things I got a bunch of new props.
I plan to use the 6 inch white prop for this model:

The red prop is closer in the picture. The size difference is greater than it looks like in the picture.
Top is 7 inch prop from 400 series kit. Weight 6 grams
Middle is new 6 inch prop. Weight 3 grams
Bottom is prop from this kit. Weight 3 grams
So besides being a nicer size prop the 6 inch weighs the same as the 5 inch. I think that is important as I will be using lighter rubber in this model and I don't want to swing a heavy prop... At least I think that sounds like a good idea.
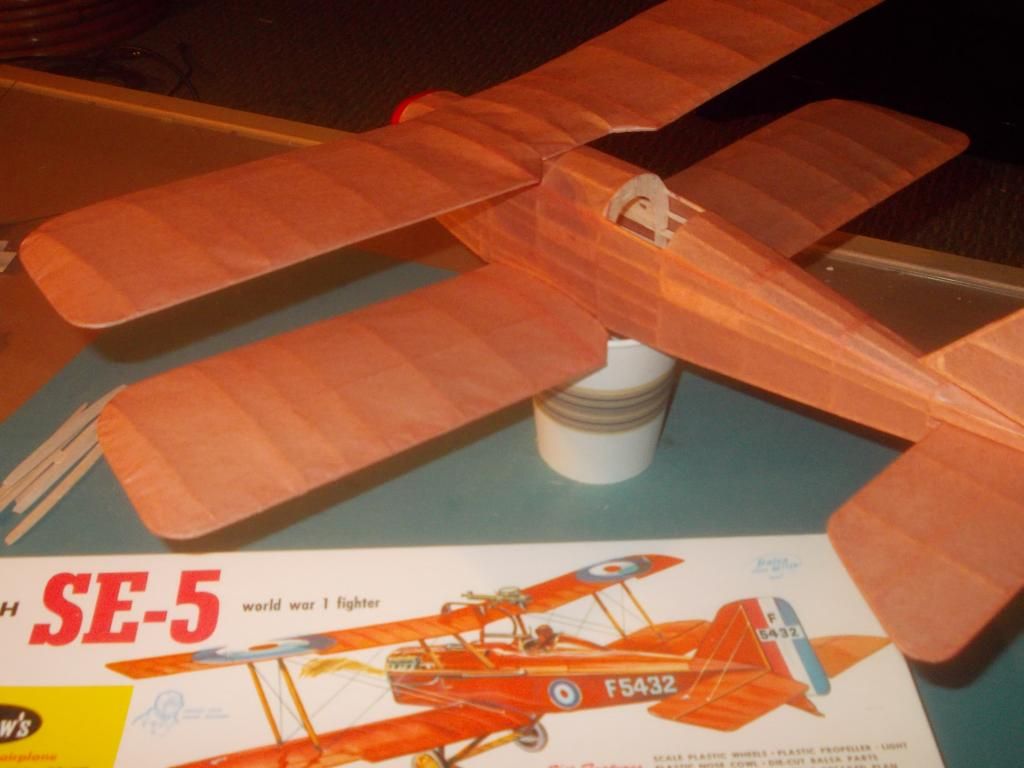
All the paper was shrunk today. Need to redo the wings and get the proper washout. also need to redo the stabilizer, but things are coming along.
Hope to have the parts doped and start assembly of the substructures this w/e.
Mitch
I plan to use the 6 inch white prop for this model:

The red prop is closer in the picture. The size difference is greater than it looks like in the picture.
Top is 7 inch prop from 400 series kit. Weight 6 grams
Middle is new 6 inch prop. Weight 3 grams
Bottom is prop from this kit. Weight 3 grams
So besides being a nicer size prop the 6 inch weighs the same as the 5 inch. I think that is important as I will be using lighter rubber in this model and I don't want to swing a heavy prop... At least I think that sounds like a good idea.
All the paper was shrunk today. Need to redo the wings and get the proper washout. also need to redo the stabilizer, but things are coming along.
Hope to have the parts doped and start assembly of the substructures this w/e.
Mitch
- Mitch
- Posts: 1347
- Joined: Mon Aug 22, 2011 9:16 pm
- Location: Kent, WA
Re: SE5 or SE5a, this one is heading to WESTFAC V!
![]() by WIDDOG » Sat Nov 22, 2014 8:47 am
by WIDDOG » Sat Nov 22, 2014 8:47 am
Hi Mitch your model looks great as always.
I did some propeller experimenting this morning. I used my Walnut sized 900 series Bird Dog. I used a 7 and 6 inch propeller. My model definitely flew better with the 6 inch propeller. I was using two loops or four strands of 1/8 inch rubber.
I did some propeller experimenting this morning. I used my Walnut sized 900 series Bird Dog. I used a 7 and 6 inch propeller. My model definitely flew better with the 6 inch propeller. I was using two loops or four strands of 1/8 inch rubber.
- WIDDOG
- Posts: 872
- Joined: Tue Aug 25, 2009 5:34 am
- Location: West Virginia USA
Re: SE5 or SE5a, this one is heading to WESTFAC V!
![]() by Mitch » Sat Nov 22, 2014 12:50 pm
by Mitch » Sat Nov 22, 2014 12:50 pm
Thanks DOG, Bigger is not always better. I believe everything has to be in balance and harmony. I like the size of the 7, but it looks too bulking, heavy and massive. I bought six, 6 inch props. For future builds and breakage.
Here is the morning report.
Fuselage paper shrunk a second time and reading for dope. Looking at the stabilizer it has a very slight twist and I believe it will turn the plane to the right. So I will leave it for now and dope that also. This should help counter the torque of the prop pulling the plane to the left. I can remove that latter if needed with steam.
The rudder is perfect and will be doped. The wings are getting wet again. One side at a time to install the washout. They should be finished by this afternoon.
In my excitement to get the model covered, I forgot to install the cockpit coaming. I will copy the plan, cut out from bond paper, cover with tissue and trim, then install that as one piece and clamp to the fuselage.
Here is the work this AM:
I decided to cover the rudder with 'linen' color paper, that section will be covered with the 3 color bars of the National Marking.
Mitch
Here is the morning report.
Fuselage paper shrunk a second time and reading for dope. Looking at the stabilizer it has a very slight twist and I believe it will turn the plane to the right. So I will leave it for now and dope that also. This should help counter the torque of the prop pulling the plane to the left. I can remove that latter if needed with steam.
The rudder is perfect and will be doped. The wings are getting wet again. One side at a time to install the washout. They should be finished by this afternoon.
In my excitement to get the model covered, I forgot to install the cockpit coaming. I will copy the plan, cut out from bond paper, cover with tissue and trim, then install that as one piece and clamp to the fuselage.
Here is the work this AM:

I decided to cover the rudder with 'linen' color paper, that section will be covered with the 3 color bars of the National Marking.
Mitch
- Mitch
- Posts: 1347
- Joined: Mon Aug 22, 2011 9:16 pm
- Location: Kent, WA
Re: SE5 or SE5a, this one is heading to WESTFAC V!
![]() by Wildpig » Sat Nov 22, 2014 9:01 pm
by Wildpig » Sat Nov 22, 2014 9:01 pm
Mitch, great thread and really nice model. 
You mentioned adding washout. I think, maybe, that if you set the upper wing at a greater incidence than the lower wing, that will accomplish the same thing as washout.
You mentioned adding washout. I think, maybe, that if you set the upper wing at a greater incidence than the lower wing, that will accomplish the same thing as washout.
- Wildpig
- Posts: 529
- Joined: Thu Jan 26, 2012 9:41 am
Re: SE5 or SE5a, this one is heading to WESTFAC V!
![]() by Mitch » Sat Nov 22, 2014 10:12 pm
by Mitch » Sat Nov 22, 2014 10:12 pm
Thanks VERY much for that info... I will do the wings over. I just finished the 'double' washout and DO NOT like the way it looks. This is my first biplane that I have built that I expect to fly. Thank you so much!
Here is a picture of how she looks tonight. I will spend another day REMOVING all the washout!!!
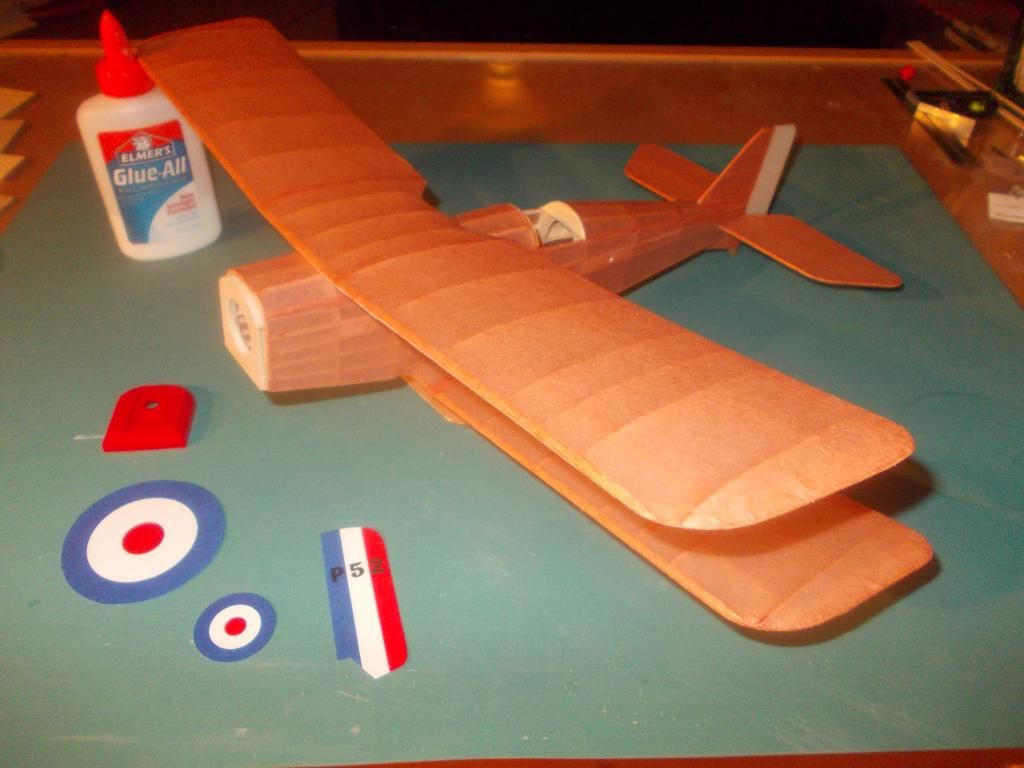
The model weighs 29 grams at this point with a wing area of about 116 sq. inches. If I double my weight with:
1. Nose Block. The Guillow's red cowling weighs 2 grams
2. Landing Gear. The Guillow's wheels weigh 8 grams
3. Rubber Motor. TBA
and finishing touches I am still at the MAGIC number of .5 grams / sq inch of wing loading!
The markings you see are copies of the original decals!
Mitch
UPDATE:
Since I have to re-adjust the wings... and I can NOT make water evaporate any faster than it takes...
I am spending the time cutting out markings, making, instruments, and making my cockpit coaming.
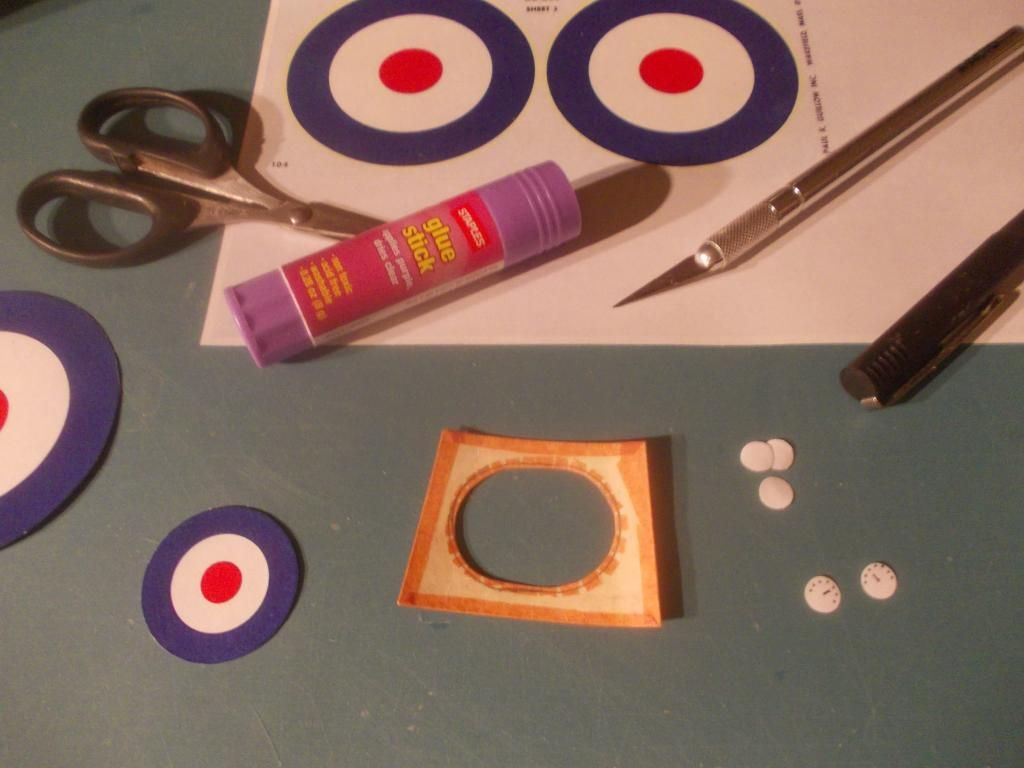
Usually I cut this out earlier and apply to model, then cover. But I goofed. I like to use manila folder paper as it is stronger than bond paper and has the same color as the balsa. Since I do not paint my models I think the paper covered manila folder is a close match to covering balsa wood!
More updates tomorrow... also the stain needs to dry thoroughly on my struts, so I hope to dope tomorrow and maybe start assembly!
- Mitch
- Posts: 1347
- Joined: Mon Aug 22, 2011 9:16 pm
- Location: Kent, WA
Re: SE5 or SE5a, this one is heading to WESTFAC V!
![]() by Mitch » Sun Nov 23, 2014 9:46 pm
by Mitch » Sun Nov 23, 2014 9:46 pm
Well I spent a day getting the 'washout' IN then another day taking it OUT again... Let's see I started this model (Just getting photo copies) on Veteran's Day (Armistice Day for the Great War) so that is 13 days... One more day to finish up...
Here she is tonight:
Total AUW with kit rubber, wheels, etc is 49 grams. I don't think I get full benefit from 2 wings. They are not as efficient as one wing of 116 sq inches. So I do not know what the target is for Biplanes for Wing Loading. But right now I am at .42 grams per square inch. I think the model will need a little ballast in the nose.
I will set the incidence in the upper wing and glue up the wing struts tonight. Then I will pop in and glue the cabine struts tomorrow. I also need to finish up the landing gear.
Mitch
PS Of course she will need a lot of detail work, and that will take more time. I want to have her 'flight ready' in 2 weeks!
Here she is tonight:

Total AUW with kit rubber, wheels, etc is 49 grams. I don't think I get full benefit from 2 wings. They are not as efficient as one wing of 116 sq inches. So I do not know what the target is for Biplanes for Wing Loading. But right now I am at .42 grams per square inch. I think the model will need a little ballast in the nose.
I will set the incidence in the upper wing and glue up the wing struts tonight. Then I will pop in and glue the cabine struts tomorrow. I also need to finish up the landing gear.
Mitch
PS Of course she will need a lot of detail work, and that will take more time. I want to have her 'flight ready' in 2 weeks!
- Mitch
- Posts: 1347
- Joined: Mon Aug 22, 2011 9:16 pm
- Location: Kent, WA
Re: SE5 or SE5a, this one is heading to WESTFAC V!
![]() by Mitch » Sun Nov 23, 2014 10:48 pm
by Mitch » Sun Nov 23, 2014 10:48 pm
I decided to get the landing gear wire in tonight and get the wing on tomorrow.
Landing Gear wire installed and block wedges cut to shape and squeezed in. Then removed, glued and pressed back in. The axle will run across the bottom and be tied to the gear with string from a Guillow kit and glued. When all that is done the balsa 'landing gear' will be duplicated and go on both sides of the wire. That will just be for looks. The wire does ALL the work!
Here she is standing on her 3 feet. (With Out Wheels) The tail skid is VERY strong!
The wire that exits the wing is bent so it will not puncture the fuselage when the wire gear flexes.
I could cut that down some , and it looks like I have to patch the fuselage at the front gear.
Mitch
Landing Gear wire installed and block wedges cut to shape and squeezed in. Then removed, glued and pressed back in. The axle will run across the bottom and be tied to the gear with string from a Guillow kit and glued. When all that is done the balsa 'landing gear' will be duplicated and go on both sides of the wire. That will just be for looks. The wire does ALL the work!

Here she is standing on her 3 feet. (With Out Wheels) The tail skid is VERY strong!

The wire that exits the wing is bent so it will not puncture the fuselage when the wire gear flexes.
I could cut that down some , and it looks like I have to patch the fuselage at the front gear.
Mitch
- Mitch
- Posts: 1347
- Joined: Mon Aug 22, 2011 9:16 pm
- Location: Kent, WA
Re: SE5 or SE5a, this one is heading to WESTFAC V!
![]() by Mitch » Mon Nov 24, 2014 9:56 pm
by Mitch » Mon Nov 24, 2014 9:56 pm
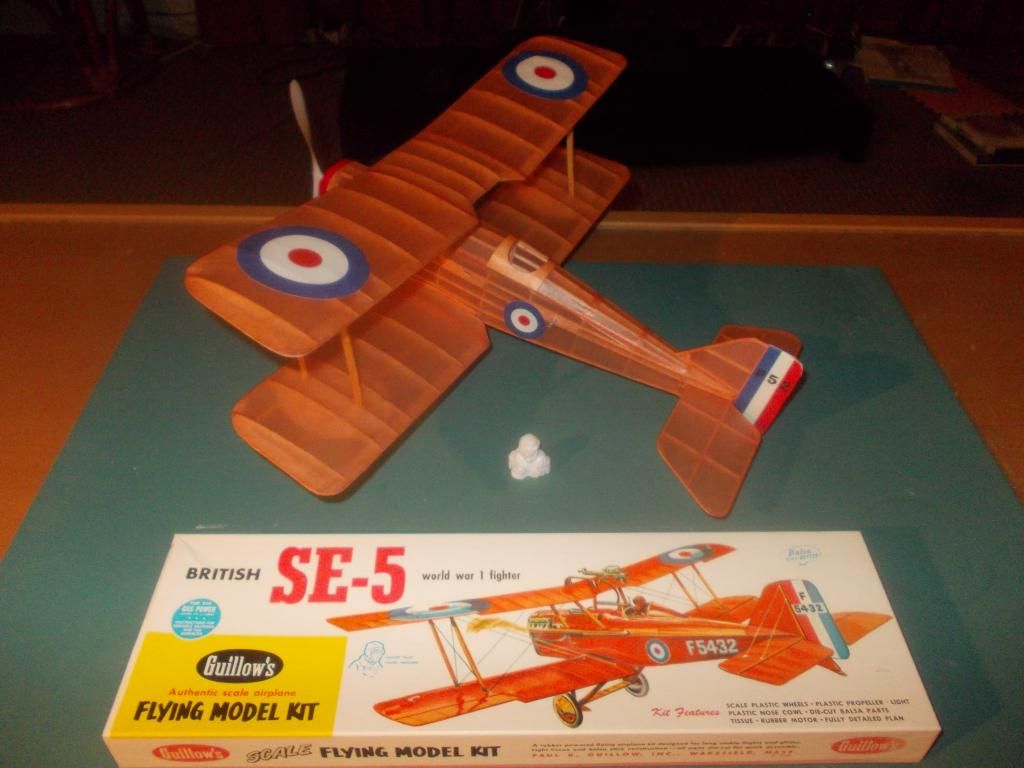
Okay Guys and Gals and all you 100 series fans, here she is after 2 weeks, 14 days from the time I opened the box:
The basic model is completed.
All the wing struts are stained and glued in place.
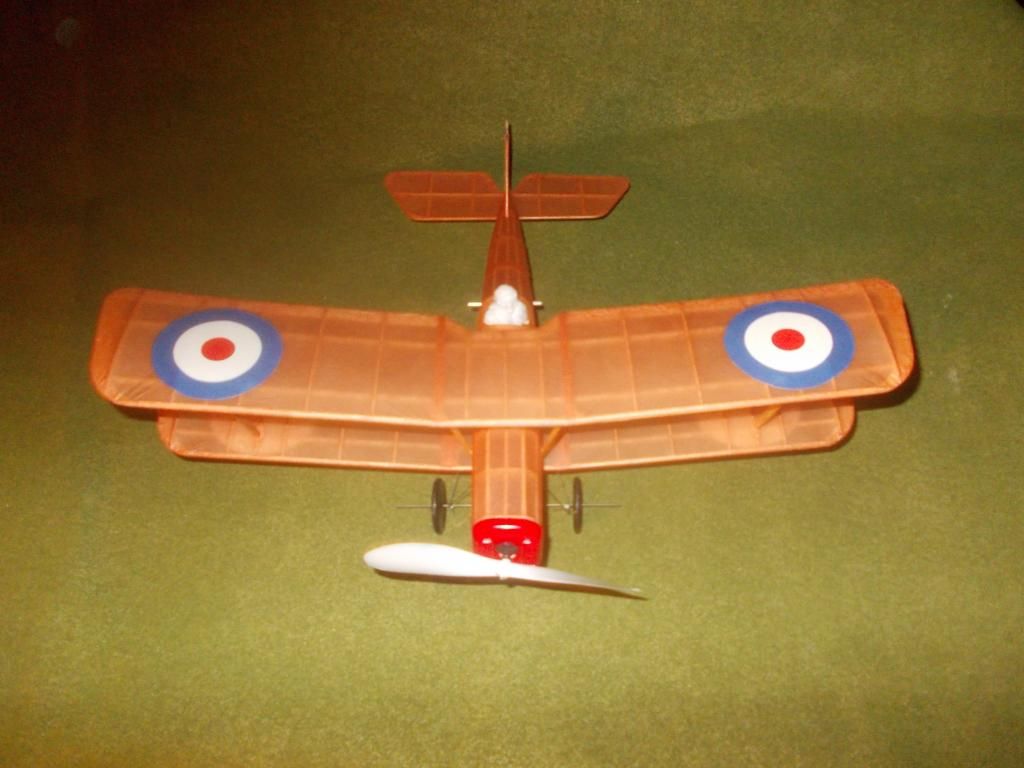
Complete with Guillows RED plastic cowl, BLACK wheels, and WHITE pilot.
I will first do test flights with a 6 inch prop and 4 stands of 1/8 rubber 20 inches long. She weighs a hefty 52 grams, I think if I change out the wheels I can get her down to 46, but she still needs about 2 grams in the nose for balance. I think if my final AUW w/o rubber is under 50 grams, she should do well.
Still need to do the following:
1. Add balsa to landing gear for correct look.
2. Add 2 mg's (paper and balsa)
3. Add rigging wires.
4. Ink in lines of control surfaces.
5. Paint pilot and other details.
BUT... the basic model is finished and could go out for field tests as is! EXCEPT that I live in Seattle and it is RAINING! 
Mitch... to be continued at a later date for flight tests!

The basic model is completed.

All the wing struts are stained and glued in place.

Complete with Guillows RED plastic cowl, BLACK wheels, and WHITE pilot.
I will first do test flights with a 6 inch prop and 4 stands of 1/8 rubber 20 inches long. She weighs a hefty 52 grams, I think if I change out the wheels I can get her down to 46, but she still needs about 2 grams in the nose for balance. I think if my final AUW w/o rubber is under 50 grams, she should do well.
Still need to do the following:
1. Add balsa to landing gear for correct look.
2. Add 2 mg's (paper and balsa)
3. Add rigging wires.
4. Ink in lines of control surfaces.
5. Paint pilot and other details.
BUT... the basic model is finished and could go out for field tests as is!
Mitch... to be continued at a later date for flight tests!
- Mitch
- Posts: 1347
- Joined: Mon Aug 22, 2011 9:16 pm
- Location: Kent, WA
Re: SE5 or SE5a, this one is heading to WESTFAC V!
![]() by Mitch » Tue Nov 25, 2014 10:25 am
by Mitch » Tue Nov 25, 2014 10:25 am
I found these light weight wheels in my toolbox.
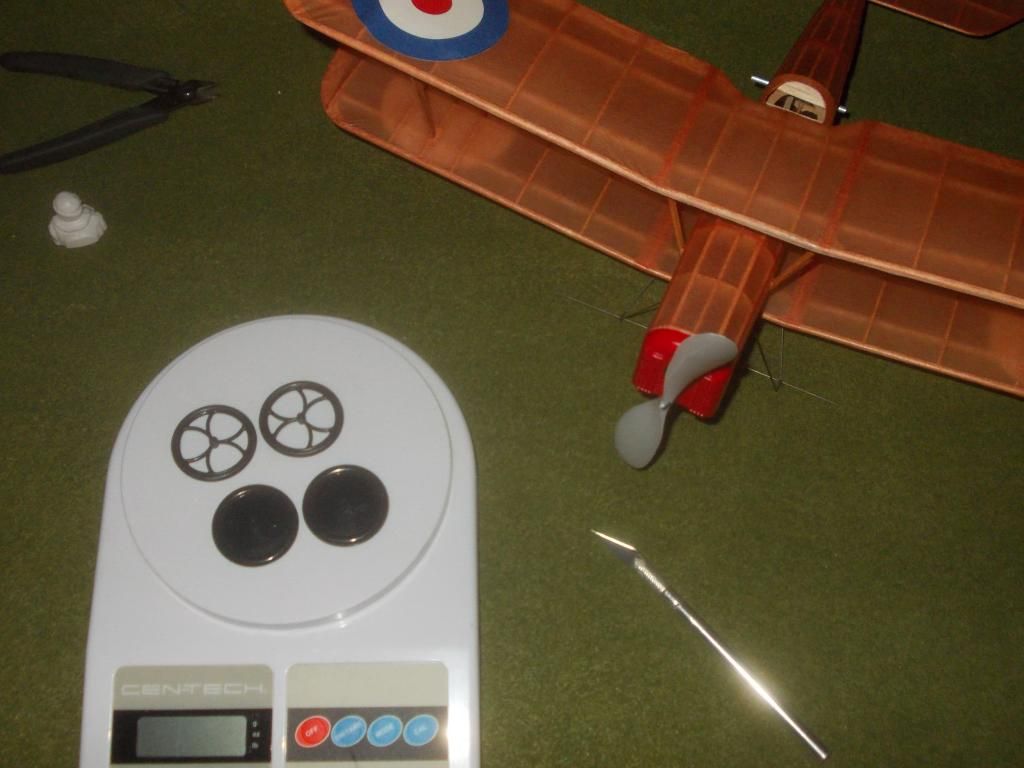
I will try to cover them with paper, and see how the look. The Guillow 'light weight' wheels weigh 9 grams. My new wheels weigh 3 grams. But I had to add some ballast to get the model to balance at the proper position...
AUW with new wheels and ballast 52 grams.
The competition:
less than 42 grams, with a Gizmo Geezer prop set up. This is a Mike Midkiff design, built by an FAC Grand Champion, and one of my friends at FAC. I have been communicating with him and plan to fly with him and we will be up against the Fokkers and others!
I was timer for this model and although he flew well and should have gone to the second round in 'Mass Launch' he broke a prop on landing. No repairs alowed in Mass Launch. Three flights. So that is just some of my competition.
Kits of the SE5 / SE5a that are in production in the 18" ws range, that I am aware of:
1. DPC make laser replacement parts for Guillows
2. DPC has his own design
3. Easy Built Models
4. Mike Midkiff design
Mitch
PS: I just opened up my EBM kit... I am always amazed on how little I get... There is not much to it, here are the plans:
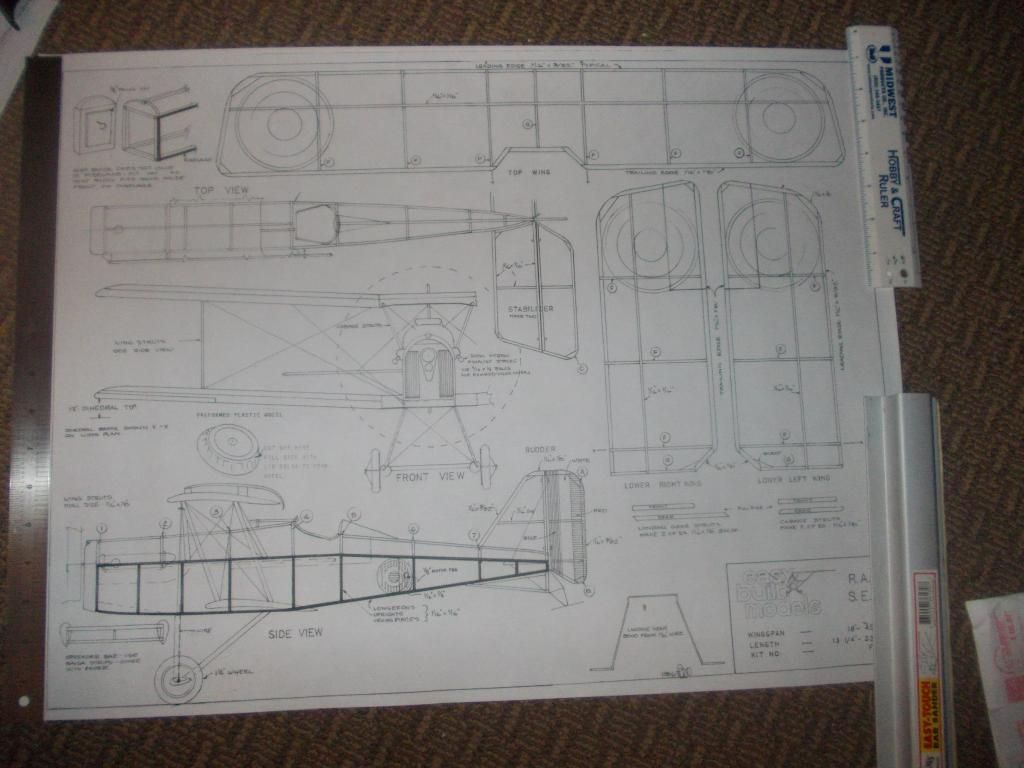
The model only has 7 wing ribs, Guillows has 17. I think I did well on the tail. And the landing gear is even simpler than what I did... But I think the Guillow's model will look nicer at the beauty contest!
UPDATE: I just had to show you how little you get in the EBM kit. Here it is. I also get balsa sticks, but I do not even want to touch them as I am on my 2nd cup of coffee, and they will break.
I think it will be VERY challenging for me to build this kit... On a bright note, although both kits are 18 inch, Guillow's has a bigger wing cord, so I have a bit more wing area!

I will try to cover them with paper, and see how the look. The Guillow 'light weight' wheels weigh 9 grams. My new wheels weigh 3 grams. But I had to add some ballast to get the model to balance at the proper position...
AUW with new wheels and ballast 52 grams.
The competition:

less than 42 grams, with a Gizmo Geezer prop set up. This is a Mike Midkiff design, built by an FAC Grand Champion, and one of my friends at FAC. I have been communicating with him and plan to fly with him and we will be up against the Fokkers and others!
I was timer for this model and although he flew well and should have gone to the second round in 'Mass Launch' he broke a prop on landing. No repairs alowed in Mass Launch. Three flights. So that is just some of my competition.
Kits of the SE5 / SE5a that are in production in the 18" ws range, that I am aware of:
1. DPC make laser replacement parts for Guillows
2. DPC has his own design
3. Easy Built Models
4. Mike Midkiff design
Mitch
PS: I just opened up my EBM kit... I am always amazed on how little I get... There is not much to it, here are the plans:

The model only has 7 wing ribs, Guillows has 17. I think I did well on the tail. And the landing gear is even simpler than what I did... But I think the Guillow's model will look nicer at the beauty contest!
UPDATE: I just had to show you how little you get in the EBM kit. Here it is. I also get balsa sticks, but I do not even want to touch them as I am on my 2nd cup of coffee, and they will break.

I think it will be VERY challenging for me to build this kit... On a bright note, although both kits are 18 inch, Guillow's has a bigger wing cord, so I have a bit more wing area!
- Mitch
- Posts: 1347
- Joined: Mon Aug 22, 2011 9:16 pm
- Location: Kent, WA
33 posts
• Page 2 of 3 • 1, 2, 3
Return to General Building Questions
Who is online
Users browsing this forum: Bing [Bot] and 5 guests