300 Series Cessna 170 Build
52 posts
• Page 3 of 4 • 1, 2, 3, 4
![]() by Phugoid » Sun Mar 20, 2011 4:16 pm
by Phugoid » Sun Mar 20, 2011 4:16 pm
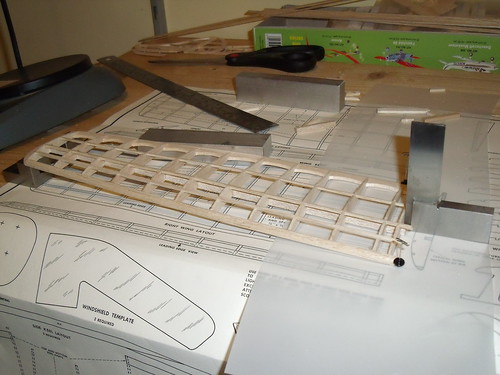
I've nearly completed the first wing - what a trial! The parts are an awful fit, to show how bad the parts are I lined up the noses of all the F1 wing ribs against a solid stop:
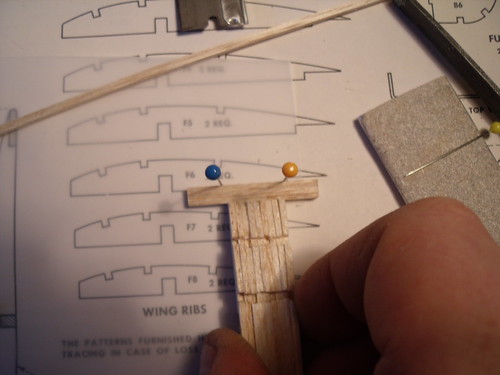
This reveals how inconsistent the ribs are:
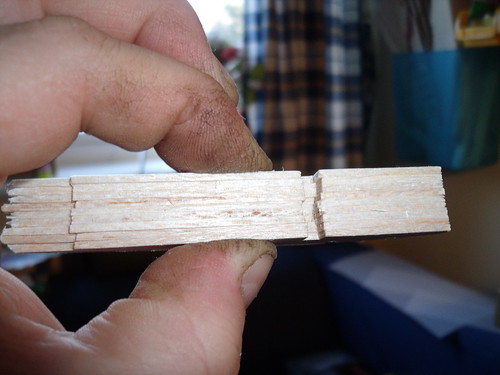
Come on Guillows, get these kits laser cut ASAP!
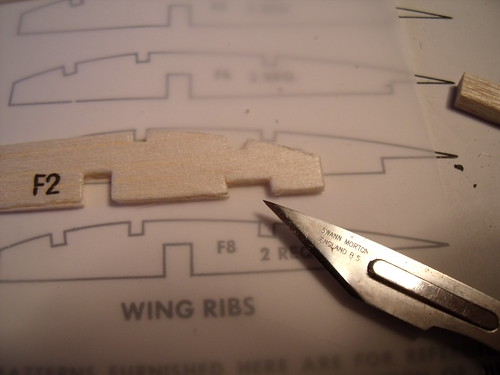
I filled in this notch in the F2 rib, It's meant to locate the wing strut but I think it will make life trickier than needs be.
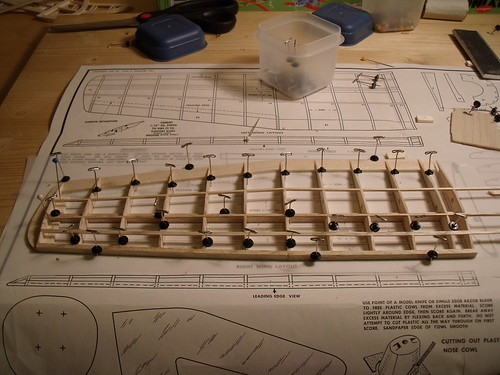
Picture of the first wing. The root rib is not fitted yet, I'll fit it when I prop up the wing tip to set the dihedral.
This reveals how inconsistent the ribs are:
Come on Guillows, get these kits laser cut ASAP!
I filled in this notch in the F2 rib, It's meant to locate the wing strut but I think it will make life trickier than needs be.
Picture of the first wing. The root rib is not fitted yet, I'll fit it when I prop up the wing tip to set the dihedral.
- Phugoid
- Posts: 952
- Joined: Wed Jan 20, 2010 8:17 am
![]() by supercruiser » Sun Mar 20, 2011 6:43 pm
by supercruiser » Sun Mar 20, 2011 6:43 pm
The variance in the ribs is quite common on any kit I've built, Guillow's,Sterling, Comet.
I line up the ribs using a piece of spar stock in the notches and then sand the ribs noses even.
Definitely on my "to build" list.
I line up the ribs using a piece of spar stock in the notches and then sand the ribs noses even.
Definitely on my "to build" list.
- supercruiser
- Posts: 405
- Joined: Wed Jun 15, 2005 8:47 am
![]() by ADW 123 » Sun Mar 20, 2011 8:50 pm
by ADW 123 » Sun Mar 20, 2011 8:50 pm
This is true. I never had any huge troubles putting these parts in. Sometimes I have had to make a small cut the fit it but that's not a prob for me. Also, wen u spread them apart, the miss aligned parts aren't as noticeable
- ADW 123
- Posts: 1158
- Joined: Mon Feb 22, 2010 5:22 pm
- Location: Cincinnati, Ohio
![]() by Phugoid » Mon Mar 21, 2011 3:24 am
by Phugoid » Mon Mar 21, 2011 3:24 am
The problem for me is that I'd be disapointed cutting them out that bad by hand. It does raise the debate (again?!) that Guillows would be better providing accurate printwood, rather than poor die cuts. This may be the alternative for laser cutting for kits where cost is an issue.
- Phugoid
- Posts: 952
- Joined: Wed Jan 20, 2010 8:17 am
![]() by PHS Paddy » Mon Mar 21, 2011 12:14 pm
by PHS Paddy » Mon Mar 21, 2011 12:14 pm
Phugoid wrote:The problem for me is that I'd be disapointed cutting them out that bad by hand. It does raise the debate (again?!) that Guillows would be better providing accurate printwood, rather than poor die cuts. This may be the alternative for laser cutting for kits where cost is an issue.
Hear, hear, Andrew you make an excellent point.
BTW, enjoying your thread. Always something to learn and pickup on in these building threads besides just watching the beauty of the construction, which is fine in itself though.
Regards,
Paddy
- PHS Paddy
- Posts: 20
- Joined: Mon Mar 07, 2011 5:07 pm
- Location: Wisconsin
![]() by Phugoid » Tue Mar 22, 2011 3:54 pm
by Phugoid » Tue Mar 22, 2011 3:54 pm
Thanks Paddy, that means a lot from a builder of your obvious calibre.
I've propped the wing up 20mm (just over 3/4") the Dihedral shown in the plan is about half of this (as scaled from the side view) But I didn't think it was enough for a really stable flyer. The root rib is now glued in place with an engineers square in position to ensure it is upright.
I've propped the wing up 20mm (just over 3/4") the Dihedral shown in the plan is about half of this (as scaled from the side view) But I didn't think it was enough for a really stable flyer. The root rib is now glued in place with an engineers square in position to ensure it is upright.
- Phugoid
- Posts: 952
- Joined: Wed Jan 20, 2010 8:17 am
![]() by Phugoid » Tue Mar 29, 2011 2:17 pm
by Phugoid » Tue Mar 29, 2011 2:17 pm
I've had a fustrating time with the other wing, the parts are so incredibly poor, each and every piece has been re-filled in all of the slots for all of the upper spars, lower spar and trailing edge. In short they fit nowhere!!!!
It has come very close to being crunched and dropped in the trash can, I hope the fuselage comes on better.
This is the last Guillows kit I'll build until this series goes laser cut or the new DH Beaver comes out.............
It has come very close to being crunched and dropped in the trash can, I hope the fuselage comes on better.
This is the last Guillows kit I'll build until this series goes laser cut or the new DH Beaver comes out.............
- Phugoid
- Posts: 952
- Joined: Wed Jan 20, 2010 8:17 am
![]() by lukebozek1 » Wed Mar 30, 2011 4:55 pm
by lukebozek1 » Wed Mar 30, 2011 4:55 pm
You have the skill set to overcome this type of problem. I have this exact kit in teh closet and put it away when I started cutting out the pieces from balsa that cut like oak. Very difficult. Truth is I am working another Comet kit, I enjoy the cutting and sanding and I can't blame anyone but me for any variation in the alignment. A little on the light side but I can stiffen it up a bit. Your's always look great. Do not can this one.
- lukebozek1
- Posts: 136
- Joined: Fri Jul 09, 2010 8:34 am
- Location: Hobe Sound Florida
![]() by Seeker » Thu Mar 31, 2011 5:37 pm
by Seeker » Thu Mar 31, 2011 5:37 pm
I've just started my first Guillow's kit, a 403 Spit, and it's also my first die cut kit.
I must say that the kit looks impressive, and the plans are lovely, but I'm completely underwhelmed by the die cutting.
1. Two of the parts sheets were cracked in the box. Luckily it seems that they split along the die cut lines, but that's hard to tell with out a printed out line as I haven't yet progressed to offer the affected parts up for fit.
2. I've spent ages sanding the back of the sheets to release the parts, but it's not really working, which means I have to cut them out in the end any way.
3. Cutting out die cut parts is really hard, as there's no clear print line to follow, and it's easy to mistake the die cut for a wood grain line.
4. Every single former has lost at least one "nub", "tab" or what ever you call the bits between the stringers. I'd probably lose a couple cutting out a printed sheet, and probably a couple more in construction, but this way every one is damaged before I even start.
5. The planes helpfully have a full size drawing of every former (so I can make replacements easily enough), but not a single former conforms to the diagrams. One or two are close, but none are exact.
6. One sheet has definitely been die crushed.
7. The stringer wood is sheet which has been cut very thinly. I haven't seen this before, it's a good idea, but in my example the sizing is very uneven, the wood doesn't seem very strong.
Nonetheless, bitching aside, it still seems a very impressive kit, one I've been itching to start!
I've not yet tried a lazer cut kit, but at the moment I'd prefer printed wood.
I'd probably be materially no better off with printed wood, but I'd be cross at my self for shoddy workmanship, instead of being cross with Guillows.
That said, after lurking here for a couple of weeks before starting the kit, I did approach the wood work with a much more critical eye than I've had before. If I hadn't found this place I'd probably say that this is the best kit I've ever had (which makes it my fourth!) and put the damaged parts down to my own clumsiness and I wouldn't have thought of actually checking the formers against the plans.
- Seeker
- Posts: 66
- Joined: Tue Mar 15, 2011 7:03 am
![]() by Phugoid » Sun Apr 03, 2011 8:36 am
by Phugoid » Sun Apr 03, 2011 8:36 am
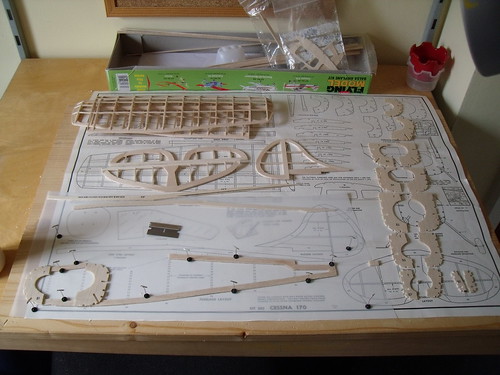
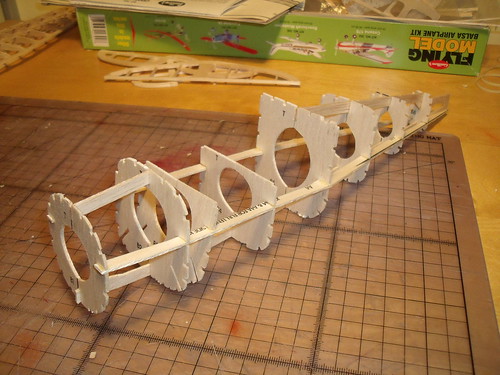
With a lot of messing around I finally managed to finish the other wing, There is a lot of wood in these designs so each wing weighs around 5.5g.
I'm now onto the fuselage, all of the formers are die crushed at the edges and the slots are too wide for the strip stock, howver this makes less difference on the fuselage because in most places I will scallop in between the stringers to make it look better, this also saves some weight.
I'm now onto the fuselage, all of the formers are die crushed at the edges and the slots are too wide for the strip stock, howver this makes less difference on the fuselage because in most places I will scallop in between the stringers to make it look better, this also saves some weight.
- Phugoid
- Posts: 952
- Joined: Wed Jan 20, 2010 8:17 am
![]() by Phugoid » Sun Apr 03, 2011 8:54 am
by Phugoid » Sun Apr 03, 2011 8:54 am
Re the comments from seeker and lukebozek. I'm not surprised you stuck yours in the cupboard lukebozek! Thanks for the kind comments and encouragement. Using the kit wood is worth 10 extra points in the G challenge, without that reward I would have given up some time ago!
I noticed that the formers and ribs on the plans do not match the ones that are cut too. This just makes you doubt things even more.
Like I said, "no more" until they are made with either decent printwood or laser cut sheets, I'm not fussed which, either is better than the poor quality die cuts, it really does let down what would otherwise be smashing kits, Guillows don't seem to realise what potential they could unlock with some small changes to what they do.......
- Phugoid
- Posts: 952
- Joined: Wed Jan 20, 2010 8:17 am
![]() by Phugoid » Sat Apr 09, 2011 4:13 pm
by Phugoid » Sat Apr 09, 2011 4:13 pm
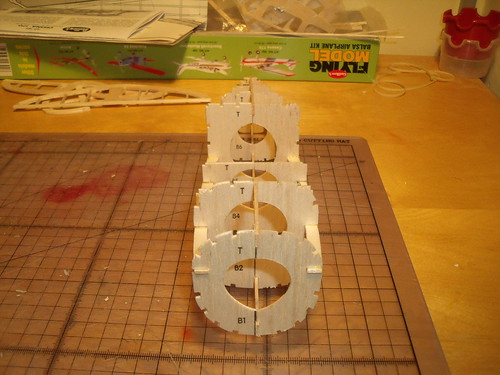
I've made a small amount of progress on this, small adjustments to most of the formers and they fitted fine, removing material from pre cut parts is fine, adding it is the problem!
I had to notch a 1/6" square from the side keels at the b5 former. Because the notches are too big for the keels I glued them with white glue the best I could to secure then used Aliphatic resin to fill the gap and make the joint strong. The aliphatic resin is thin and wicks into the joint when applied to it on a pin/ cocktail stick etc....
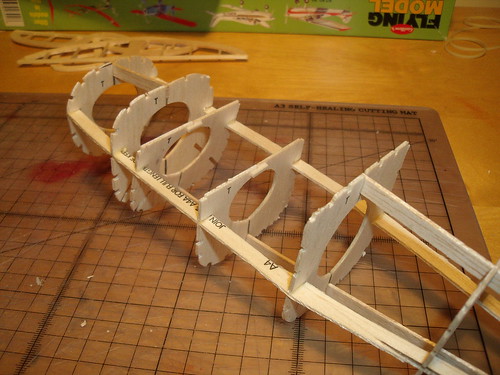
I added to liitle straps to the formers 3 and 4 at the top as shown in the pictures, they add a little bit of strength during construction.
I had to notch a 1/6" square from the side keels at the b5 former. Because the notches are too big for the keels I glued them with white glue the best I could to secure then used Aliphatic resin to fill the gap and make the joint strong. The aliphatic resin is thin and wicks into the joint when applied to it on a pin/ cocktail stick etc....
I added to liitle straps to the formers 3 and 4 at the top as shown in the pictures, they add a little bit of strength during construction.
- Phugoid
- Posts: 952
- Joined: Wed Jan 20, 2010 8:17 am
52 posts
• Page 3 of 4 • 1, 2, 3, 4
Return to General Building Questions
Who is online
Users browsing this forum: No registered users and 23 guests