900 Series T28 North American Trojan
30 posts
• Page 2 of 2 • 1, 2
![]() by Phugoid » Fri Nov 05, 2010 11:42 am
by Phugoid » Fri Nov 05, 2010 11:42 am
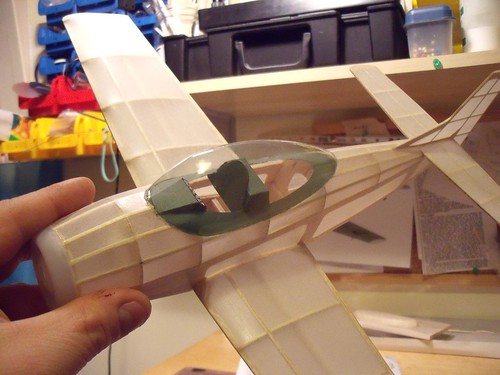
Has any one got any tips and hints on masking off the plastic canopies? I have had a go and it is proving quite tricky and I'm not confident that the paint won't bleed under the tape especially since the canopy has lots of compound curves. I may be imagining this, but is there some sticky gloop available you brush on and then cut out the areas and peel it off in the areas that you don't want to paint?
- Phugoid
- Posts: 952
- Joined: Wed Jan 20, 2010 8:17 am
![]() by John G Jedinak » Fri Nov 05, 2010 12:36 pm
by John G Jedinak » Fri Nov 05, 2010 12:36 pm
Yes there is....called liquid mask. I use it all the time. Try your LHS or Tower Hobbies...Luck
- John G Jedinak
- Posts: 119
- Joined: Sun Nov 15, 2009 2:53 pm
- Location: Ft. Wayne In.
![]() by John G Jedinak » Fri Nov 05, 2010 1:59 pm
by John G Jedinak » Fri Nov 05, 2010 1:59 pm
Just checked my stash.....from LHS I got Parma liquid mask and from Tower (I think) I got Hobbico MasterMask. Both worked well....Luck!!!
- John G Jedinak
- Posts: 119
- Joined: Sun Nov 15, 2009 2:53 pm
- Location: Ft. Wayne In.
![]() by Phugoid » Sat Nov 06, 2010 11:18 am
by Phugoid » Sat Nov 06, 2010 11:18 am
I found that the best liquid mask stuff that you can get is called Bob Devley, but if you want it in the UK it's nearly $30 for a quarter of a pint, never mind thae cost so much but I'd never use that amount in a month of Sundays. My local model shop had some Humbrol "maskol" which I bought and tried on my trial canopy, it masked off, and peeled off ok, but you can't cut it to form the various window shapes at all. It just snags even with a very sharp razor.
The Parma liquid mask is available on line and is cheaper, but every reference to it I found said it was poor.
I think I will mask the lot off, and paint on the lines by hand afterward.........
The Parma liquid mask is available on line and is cheaper, but every reference to it I found said it was poor.
I think I will mask the lot off, and paint on the lines by hand afterward.........
- Phugoid
- Posts: 952
- Joined: Wed Jan 20, 2010 8:17 am
![]() by Phugoid » Sat Nov 06, 2010 2:12 pm
by Phugoid » Sat Nov 06, 2010 2:12 pm
I've applied some paint. The light colour meant it needed a whole pot of Humbrol enamel, so it's probably added a couple of grammes to the weight at least.......
To be honest it's not the best finish, but each time I make one of these things I learn another lesson....
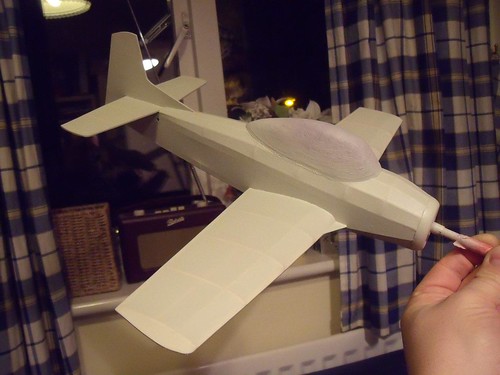
To be honest it's not the best finish, but each time I make one of these things I learn another lesson....
- Phugoid
- Posts: 952
- Joined: Wed Jan 20, 2010 8:17 am
![]() by Phugoid » Sun Nov 07, 2010 2:48 pm
by Phugoid » Sun Nov 07, 2010 2:48 pm
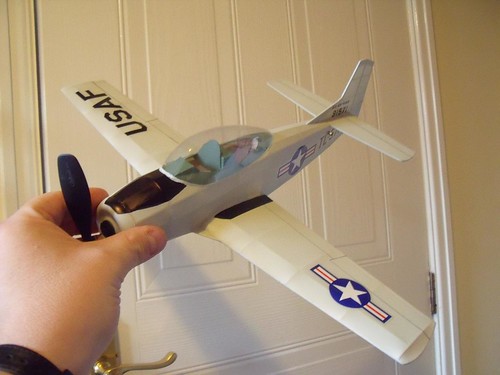
I ran out of the paint to do the canopy but I've done all of the other finishing. Because I wasn't all that happy with the paint, rather than taking up a load of time to mask off and paint all of the black detail I used a sharpie marker and in fact it looks quite reasonable.
I did think that the satin surface of the paint would cause problems but the Humbrol "Decalfix" worked very well and they stuck fine.
A quick glide reveals that it will need to fly fast to stay airborne, so I think this could be tricky to trim.
I did think that the satin surface of the paint would cause problems but the Humbrol "Decalfix" worked very well and they stuck fine.
A quick glide reveals that it will need to fly fast to stay airborne, so I think this could be tricky to trim.
- Phugoid
- Posts: 952
- Joined: Wed Jan 20, 2010 8:17 am
![]() by Phugoid » Sun Jan 30, 2011 11:50 am
by Phugoid » Sun Jan 30, 2011 11:50 am
The Trojan died today.
A couple of wobbly flights whilst trimming was followed by a reasonable one (at first) before suddenly it dipped a wing and dived nose first. The impact ripped off both wings, the wing joints were fine but it ripped the fuselage sides.
It's now gone to the big hanger in the sky........(the bin at the park)
- Phugoid
- Posts: 952
- Joined: Wed Jan 20, 2010 8:17 am
![]() by kittyfritters » Sat Feb 05, 2011 10:09 pm
by kittyfritters » Sat Feb 05, 2011 10:09 pm
Phugoid wrote:...The "nipple" on the thrust button seemed to make the prop stick out a long way from the nose, so I've cut it off and smoothed over the end before fitting the prop. As always the Guillows props are too small, but I'll stick with it for now and perhaps try a larger prop later on.
...
OOPS! The "nipple" on the Guillow's thrust button is there to provide enough bearing surface to give authority to thrust line adjustments. The original design of the thrust button was hollow in the back and had insufficient bearing surface. The "nipple" was added to the mold as a correction. Recently, the mold was modified again so that the hollow in the back of the thrust button has been nearly filled in (there is still a little conical depression) to provide even more area. Depending on the age of your kit the hollow in the thrust button may not be filled in. You should check. If there is too much lateral wiggle of the prop shaft in the thrust button you may need a replacement.
As far as props are concerned, the Guillow's props are usually in balance. The same cannot be said of the usual after market props such as the Peck props. Check this too. Balanced props can make a big difference in trimming a small rubber powered model.
Howard
- kittyfritters
- Posts: 697
- Joined: Tue Jan 03, 2006 6:58 pm
- Location: California
![]() by kittyfritters » Sat Feb 05, 2011 10:10 pm
by kittyfritters » Sat Feb 05, 2011 10:10 pm
Well now! My OOPS! Didn't read the second page of the thread/
- kittyfritters
- Posts: 697
- Joined: Tue Jan 03, 2006 6:58 pm
- Location: California
![]() by Phugoid » Sun Feb 06, 2011 7:23 am
by Phugoid » Sun Feb 06, 2011 7:23 am
I see you point on the nipple, having said that there wasn't a lot of wiggle in the shaft, to be honest I don't think that it contributed to its demise.
As for the props, I like the guillows props, they are effective and have a reasobaly strong clutch, HOWEVER guillows don't put big enoughs ones in the kits, I mean a 5" prop in a 24" span 300 series kit is just bonkers!
This is especially puzzling since they its larger 6" brother in some of the other kits like the 20" span 600 series.....
The 6" prop would be great in the 500 series kits, at the moment I am forced to use aftermarket props like the Peck ones simply because the correct one (or anything like it) is not provided in the kit.
I note from your thread on the new Beaver that it will have a suitably bigger prop, this is most welcome and I look forward to building your design when the kit comes out.
Andrew
- Phugoid
- Posts: 952
- Joined: Wed Jan 20, 2010 8:17 am
30 posts
• Page 2 of 2 • 1, 2
Return to General Building Questions
Who is online
Users browsing this forum: No registered users and 31 guests